
Ah, Cookie Monster Cookies! Just the name evokes images of the lovable, blue, cookie-obsessed monster from Sesame Street. These cookies aren’t just a treat for the taste buds; they’re a trip down memory lane for anyone who grew up watching Cookie Monster munching away with his signature “Om nom nom!” But beyond their playful appeal, these cookies are a hit at parties, especially with kids and the young at heart. So, let’s get the oven preheating and our aprons ready – we’re about to whip up some cookie magic that even Cookie Monster couldn’t resist!
Cookie Monster, with his insatiable appetite for cookies, has been a beloved figure on Sesame Street since its inception. His famous catchphrase, “Me want cookie!”, has echoed through generations, endearing him to audiences worldwide. The concept of Cookie Monster Cookies likely sprang from this deep cultural connection, blending the love for cookies with the charm of this furry blue character.
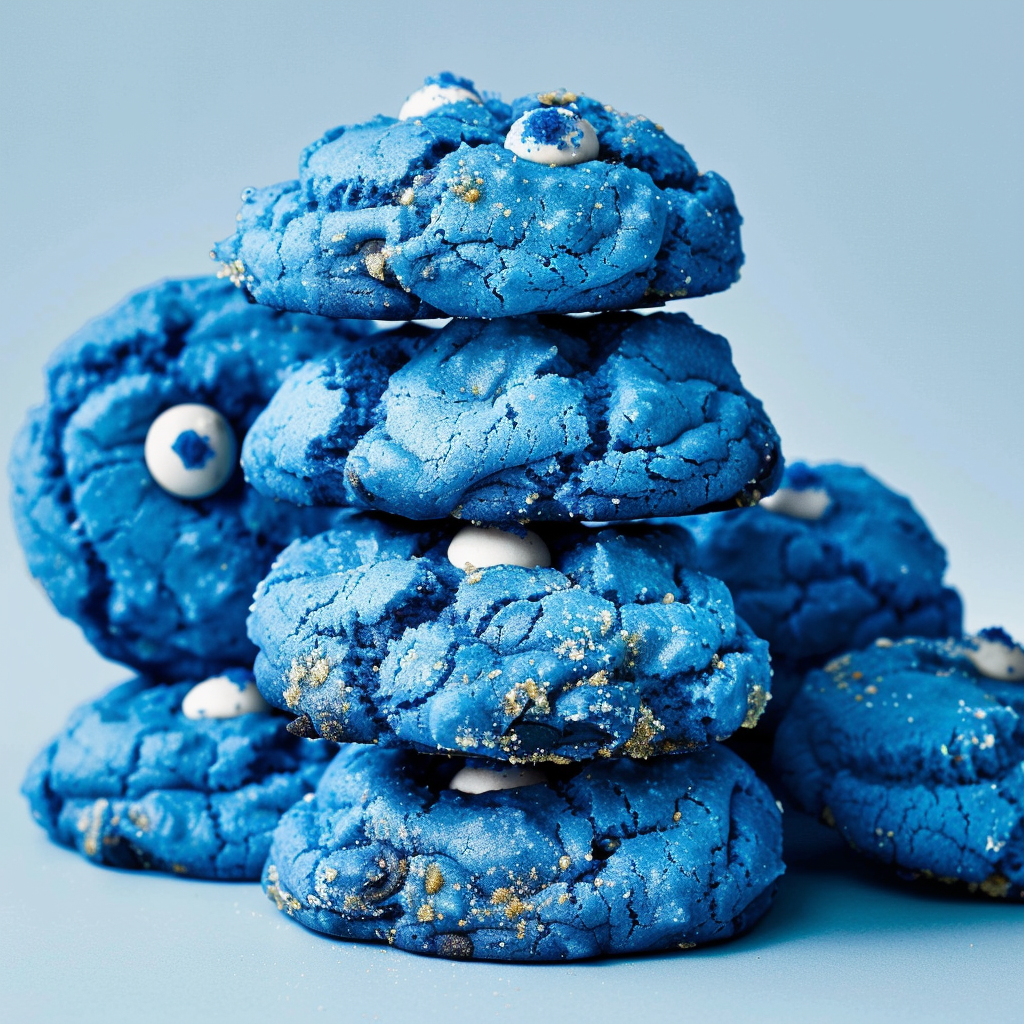
Initially, these cookies were simple chocolate chip or sugar cookies dyed blue to mimic Cookie Monster’s vibrant fur. However, as their popularity soared, bakers began to innovate, adding various fillings and decorations to make them even more delightful. Today, these cookies have morphed into a fun baking trend featured across blogs, cooking shows, and social media platforms.
The allure of Cookie Monster Cookies lies not just in their taste but in their visual appeal and the joy of creation. They serve as a fantastic project for bakers of all ages, encouraging creativity in the kitchen. Each cookie, with its unique decoration of googly candy eyes and mouthfuls of crunchy cookies, brings the essence of Cookie Monster to life.
As we continue to celebrate and reinvent this delightful treat, it’s clear that the legacy of Cookie Monster lives on, not just on television but in our kitchens and hearts. So, grab your aprons, and let’s pay homage to our favorite cookie-loving monster with some baking!
Ingredients
Ready to make some Cookie Monster Cookies? Here’s what you’ll need:
- Butter: ½ cup (softened)
- Brown sugar: ½ cup (packed, 105 grams)
- Granulated sugar: ½ cup (100 grams)
- Vanilla extract: 2 teaspoons
- Eggs: 2
- Royal Blue gel food coloring: ½ teaspoon
- Bread flour or all-purpose flour: 2-⅓ cups (280 grams)
- Baking powder: 1-¾ teaspoons
- Baking soda: 1 teaspoon
- Salt: 1 teaspoon
- Crushed cookies (Oreos, Chips Ahoy): 1 cup
- White chocolate chips: ½ cup
- Milk chocolate chips: ½ cup
- Milk chocolate bars (for stuffing): 2, cut into squares
- Whole cookies (Oreos, Samoas, Chips Ahoy): 12 for stuffing
- Candy eyeballs: for topping
- Additional crushed cookies: ½ cup (for topping)

Instructions
Now, let’s get down to the nitty-gritty of making these outrageously fun cookies:
- Start Your Mixer: In a large mixing bowl, combine the butter, brown sugar, granulated sugar, and vanilla extract. Beat them until the mixture is soft and fluffy, setting the stage for some seriously tasty cookies.
- Eggs One at a Time: Add the eggs one at a time, mixing well after each addition to incorporate fully.
- Color Me Blue: Stir in the royal blue food coloring until the mixture is evenly colored.
- Dry Ingredients: Sift together the flour, baking powder, baking soda, and salt. Gradually add these to the wet ingredients, mixing until just combined.
- Cookie Mix-Ins: Fold in the crushed cookies and chocolate chips, turning the dough into a treasure trove of textures and flavors.
- Form the Dough Balls: Using a large cookie scoop, form dough into balls. Stuff each ball with a square of milk chocolate or a whole cookie, then cover with more dough.
- It’s All in the Eyes: Decorate each dough ball with additional crushed cookies and a pair of candy eyeballs for that quintessential Cookie Monster look.
- Chill Out: Chill the dough balls in the refrigerator for at least 3 hours. This not only flavors meld but also helps the cookies maintain their shape while baking.
- Ready, Set, Bake: Preheat your oven to 350°F (177°C) and line your baking sheets with parchment paper. Place the chilled dough balls on the sheets, spacing them well apart.
- Baking Time: Bake the cookies for 20 to 22 minutes, or until the edges are just turning golden but the centers are still soft and chewy.
- Cool Down: Let the cookies cool on the baking sheet for 10 minutes before transferring them to a cooling rack.
And there you have it! Perfect Cookie Monster Cookies that are not only a feast for the taste buds but also a real eye-catcher at any gathering. Enjoy your baking and the smiles these cookies will surely bring!
Baking Tips for Perfect Cookies
Baking the perfect Cookie Monster Cookie isn’t just about following a recipe; it’s an art that requires a little know-how and a few tricks of the trade. Here are some tips to ensure your cookies come out just right:
- Quality Ingredients Matter: First things first, the quality of your ingredients can make or break your cookies. Always opt for the best butter you can find and use fresh baking powder for that perfect rise.
- Accuracy is Key: When it comes to baking, precision is your friend. Be meticulous with your measurements to ensure consistency in texture and taste.
- Chill the Dough: This step is crucial! Chilling the dough for at least three hours helps prevent the cookies from spreading too much and helps the flavors to develop more fully.
- Even Sizes for Even Baking: Try to keep your dough balls uniformly sized. This ensures all your cookies will bake at the same rate, avoiding some cookies being overdone while others are just right.
- Oven Hot Spots: Get to know your oven, as most have hot spots. Rotate your baking sheet halfway through the cooking time to allow for even baking.
- The Right Temperature: Make sure your oven is properly preheated — a good oven thermometer can be a baker’s best friend. The right temperature is critical for getting that perfect golden-brown edge.
Using these tips, you’ll not only bake cookies that look great but also taste divine. Remember, baking is as much about the joy of the process as it is about the tasty results. So, put on some music, maybe dance a little, and let the baking begin!

Creative Variations
Let’s shake things up a bit! While the classic Cookie Monster Cookies are always a hit, why not add a twist to your next batch? Here are some creative ideas to inspire your cookie creativity:
- Mix Up the Chocolate: Who says you have to stick to just one type of chocolate? Mix white, dark, and milk chocolate chips for a triple chocolate delight that adds a luxurious depth to each bite.
- Nutty Affair: For a crunchy contrast, toss in some chopped nuts. Almonds, pecans, or walnuts can add a delightful texture and a nutty flavor that complements the sweet and creamy components.
- Spice It Up: A dash of cinnamon or a pinch of nutmeg can warm up the flavor, making your cookies not just a treat for the eyes but also a cozy delight for chilly days.
- Fill ‘Em Up: Experiment with different fillings. Imagine biting into a cookie and finding a soft, gooey center of caramel or raspberry jam. Surprise centers are always a hit!
- Go Festive: Depending on the season, you can adapt the decorations and ingredients. Use pastel-colored candies in spring, or add peppermint chips during the holidays to make your cookies seasonally appropriate and extra festive.
By adding these variations to your Cookie Monster Cookies, you’re not just baking; you’re creating memories. Each batch can be a new adventure—so don’t be afraid to experiment and have fun with it. After all, every cookie should tell a story, right? Let’s make sure yours are deliciously unforgettable!
Packaging and Preservation Tips
After you’ve baked your delightful Cookie Monster Cookies, the next step is to ensure they look as good as they taste, especially if you’re sharing them as gifts or saving them for later. Here’s how to keep them fresh and present them beautifully:
- Cool Completely Before Packaging: Always let your cookies cool completely on a cooling rack before packaging. This prevents condensation inside the package, which can make the cookies soggy.
- Choosing the Right Container: For short-term storage, airtight containers will keep your cookies fresh for up to a week. Make sure the container is completely dry before you place the cookies inside.
- Layer with Parchment Paper: If you’re stacking cookies, separate layers with parchment paper to prevent them from sticking together or damaging the decorations.
- Decorative Boxes and Tins: For gift-giving, choose decorative cookie tins or crafty boxes. Line them with colorful tissue paper or food-safe paper for an extra festive touch.
- Shipping Cookies: If you’re sending cookies through the mail, choose sturdy containers and cushion them well with bubble wrap or packing peanuts. Always aim to ship at the beginning of the week to avoid your cookies sitting in a warehouse over the weekend.
These simple yet effective tips ensure your Cookie Monster Cookies are not only a feast for the taste buds but also a visual treat. Whether you’re keeping them for yourself or sharing with others, proper packaging and preservation are key to maintaining their delightful taste and whimsical appearance.
FAQs
Q: Can I make Cookie Monster Cookies gluten-free? A: Absolutely! Simply substitute the all-purpose or bread flour with your preferred gluten-free flour blend. Be sure to check that all other ingredients, like the chocolate and candy eyeballs, are certified gluten-free.
Q: How long can I store these cookies? A: Cookie Monster Cookies can be stored in an airtight container at room temperature for up to a week. For longer storage, you can freeze the baked cookies for up to 3 months. Just make sure to thaw them at room temperature before serving.
Q: Can I use natural food coloring instead of gel? A: Yes, you can use natural blue food coloring, though the color might be less vibrant compared to gel food coloring. You might need to adjust the amount to achieve the desired shade of blue.
Q: Are these cookies suitable for children’s parties? A: These cookies are perfect for children’s parties! They are fun, colorful, and delicious. Just be mindful of any potential allergens, especially if you’re adding nuts or using special fillings.
Q: Can I make the dough ahead of time? A: Making the dough in advance is a great way to save time. You can prepare the dough, shape it into balls, and refrigerate them covered for up to 2 days. When ready to bake, simply proceed with the baking instructions without needing to thaw.
Q: What’s the best way to achieve soft and chewy cookies? A: To ensure your cookies stay soft and chewy, don’t overbake them. Remove them from the oven when they are just set and still look a bit underdone in the center. They will continue to cook on the baking sheet as they cool.
Q: Any tips for adding the candy eyeballs without them melting? A: To prevent the candy eyeballs from melting, add them to the cookies immediately after removing them from the oven. This way, they stick to the warm cookies but don’t have enough heat to melt.
These FAQs are designed to help you master the art of making Cookie Monster Cookies and ensure you can adapt the recipe to suit various needs and preferences, making your baking experience as enjoyable and stress-free as possible. Enjoy baking and sharing your delicious crea