
 Pin it
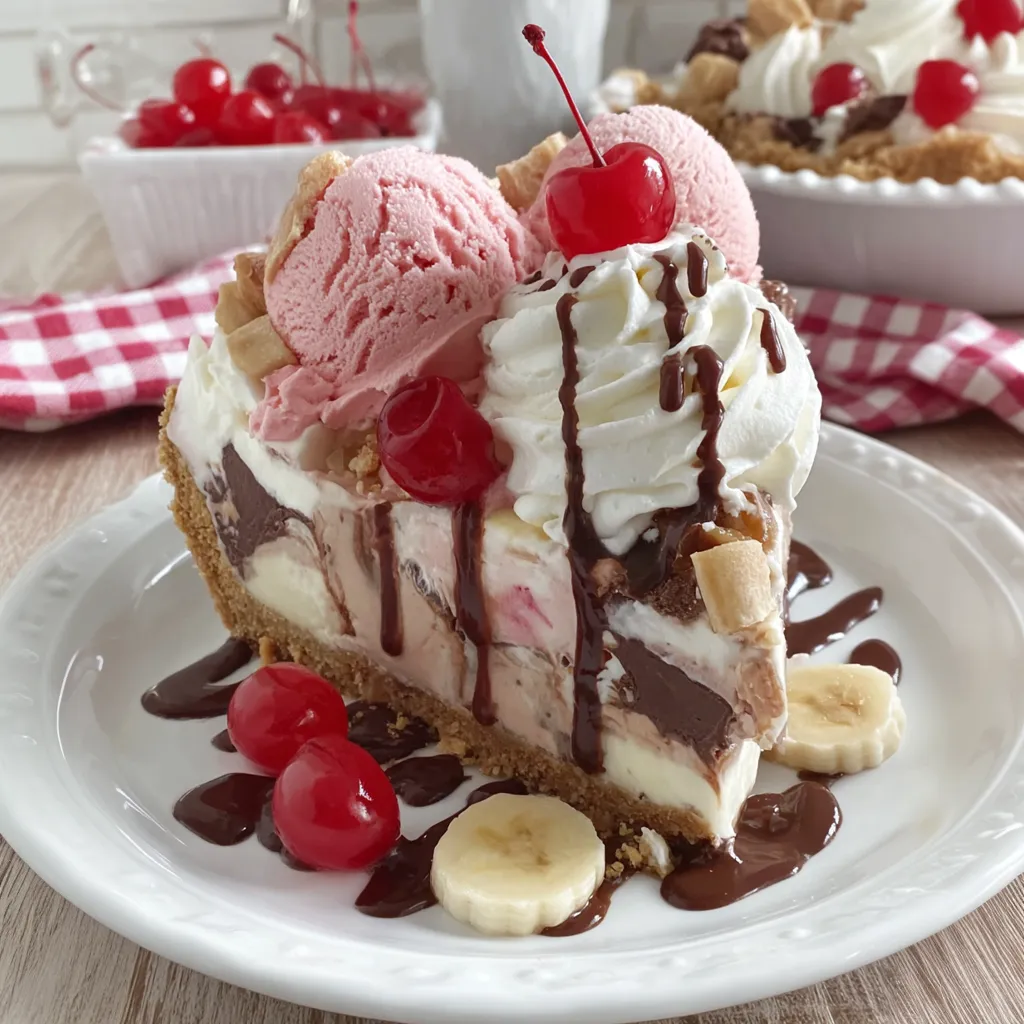
This banana split no-bake pie transforms the classic ice cream parlor dessert into a stunning cheesecake that requires no oven and delivers pure nostalgia in every slice. The swirled vanilla and chocolate fudge cheesecake sits in a buttery graham cracker crust, topped with scoops of vanilla, chocolate, and strawberry frosting styled to look like ice cream, finished with whipped cream, fudge drizzle, and those signature maraschino cherries. What makes this dessert absolutely genius is how it captures all the fun and flavor of a banana split while being completely make-ahead friendly and impressive enough for any special occasion.
My sister discovered a version of this at a friend's party and became obsessed with recreating those gorgeous frosting scoops that looked exactly like real ice cream. After several attempts at getting the presentation just right, this recipe finally captured that perfect banana split aesthetic that makes everyone smile. Now it's become our signature dessert for summer gatherings because it stays perfectly chilled even at outdoor events.
Essential Ingredient Guide
- Graham cracker crumbs: create that classic sweet base reminiscent of ice cream cone flavor
- Full-fat cream cheese: essential for rich, creamy cheesecake texture that slices cleanly
- Cool Whip: lightens the cheesecake filling and makes it fluffy without requiring gelatin
- Hot fudge sauce: use quality jarred sauce for both swirling and decorating
- Premade frostings: the three classic flavors create realistic-looking ice cream scoops
- Heavy whipping cream: makes fresh whipped cream that tastes infinitely better than canned
- Maraschino cherries and banana chips: essential for authentic banana split appearance
 Pin it
Graham Cracker Crust
- Crust Preparation:
- Line the bottom of a 9-inch springform pan with parchment paper and spray generously with baking spray to ensure easy removal later. In a medium bowl, combine the graham cracker crumbs, sugar, and melted butter, stirring until the mixture resembles wet sand and holds together when pressed.
- Forming the Base:
- Press approximately half of the graham cracker mixture firmly into the bottom of the prepared springform pan, using the bottom of a measuring cup to create an even, compact layer. Take the remaining crumb mixture and press it up along the sides of the pan, creating walls that will hold all the delicious filling. Place the prepared crust in the freezer while you make the cheesecake filling.
No-Bake Cheesecake Creation
- Filling Foundation:
- In a large mixing bowl, beat the softened cream cheese with an electric mixer until completely smooth and creamy with no lumps remaining. Gradually add the powdered sugar and pure vanilla extract, continuing to beat until the mixture becomes light and fluffy. The gradual sugar addition prevents graininess in the final texture.
- Lightening the Mixture:
- Gently fold the thawed Cool Whip into the cream cheese mixture using a spatula, working carefully to maintain the airiness of the Cool Whip while ensuring everything combines smoothly. Remove the crust from the freezer and carefully scoop the cheesecake batter into it, spreading evenly and smoothing the top with an offset spatula.
- Fudge Swirl Technique:
- Spoon about half of the hot fudge sauce into a microwave-safe bowl and heat for 30 seconds until it becomes pourable but not too hot. Transfer the warm fudge to a disposable piping bag and snip off the tip. Pipe squiggly lines randomly across the entire surface of the cheesecake in a decorative pattern.
- Creating the Swirl:
- Using a butter knife or thin spatula, gently swirl through the cheesecake and fudge lines, creating marble patterns throughout the surface. Don't overmix, you want distinct swirls rather than completely blended chocolate. Cover the cheesecake and place it in the refrigerator to chill overnight, which allows it to set completely.
Fresh Whipped Cream
- Preparation Steps:
- Place a large mixing bowl in the freezer for 30 minutes to chill completely, which helps the cream whip faster and hold better peaks. After chilling, add the heavy whipping cream, powdered sugar, and vanilla extract to the cold bowl.
- Whipping Process:
- Using a hand mixer, beat the cream mixture on medium-high speed for about 10 minutes, until stiff peaks form that hold their shape when you lift the beaters. The cream should look thick and glossy. Transfer the whipped cream to a large piping bag fitted with a star tip.
- Border Creation:
- Remove the chilled cheesecake from the refrigerator and pipe generous dollops of whipped cream all around the outer edge of the pie, creating a beautiful border. Place the decorated pie back in the freezer for 1 hour to harden the whipped cream, which makes adding the final decorations much easier.
Final Decoration Process
- Hot Fudge Drizzle:
- About 15 minutes before the hour is up, scoop more hot fudge sauce into a microwave-safe bowl and heat for 30 seconds until soft and pourable. Pour into a disposable piping bag and place in the freezer for 3 minutes to thicken slightly for better control.
- Fudge Application:
- Remove both the pie and the fudge from the freezer, and carefully remove the springform pan sides. Cut the tip off the fudge piping bag and drizzle it over the whipped cream border, creating that classic hot fudge sundae appearance. Return the pie to the freezer for another 30 minutes to set the fudge drizzle.
- Ice Cream Scoop Styling:
- Remove the pie from the freezer and use a medium cookie scoop to create frosting mounds that resemble ice cream scoops. Scoop the vanilla frosting first, placing it in the center of the pie like a perfect ice cream ball. Add a chocolate frosting scoop next to it using the same technique, then complete the trio with a strawberry frosting scoop.
- Final Touches:
- Pipe a generous dollop of whipped cream on top of each frosting scoop, just like whipped cream on real ice cream. Place a maraschino cherry in each whipped cream dollop. Arrange banana chips and additional cherries around the pie as decorative accents, creating that authentic banana split presentation.
The first time I attempted this pie, I tried adding all the decorations at once without freezing between steps, which resulted in everything melting together into a messy blob. My baker friend explained that working in stages with freezing time between layers keeps everything distinct and beautiful. This patience has transformed all my decorative desserts.
Beautiful Serving Suggestions
Serve this stunning pie chilled, removing it from the refrigerator about 10 minutes before slicing for easier cutting. Use a sharp knife dipped in hot water and wiped clean between cuts for the cleanest slices. Each piece should showcase the swirled cheesecake interior and decorated top. Serve on dessert plates with extra fudge sauce on the side for those who want more.
Creative Flavor Variations
Transform this into a cookies and cream version by adding crushed Oreos to the cheesecake filling and using chocolate crust. For tropical flair, use coconut cream in place of Cool Whip and top with toasted coconut instead of banana chips. A peanut butter lover's version works beautifully with peanut butter swirled into the cheesecake and Reese's pieces as decoration.
Storage and Make-Ahead
Store this pie covered in the refrigerator for up to three days, though it's best within the first two days when everything maintains optimal texture. The cheesecake base can be made up to two days ahead, with decorations added the day of serving. This dessert actually benefits from advance preparation as the flavors meld together beautifully overnight.
 Pin it
This banana split no-bake pie has become my signature summer dessert because it combines impressive presentation with nostalgic flavors that make everyone smile. The genius lies in how simple techniques create something that looks incredibly complicated and professional, proving that the best desserts often come from creative presentation rather than difficult recipes.
Frequently Asked Questions
- → Can I make this ahead of time?
- Yes! The cheesecake needs to chill overnight anyway. You can complete everything except the final frosting scoops and decorations a day ahead, then finish decorating a few hours before serving.
- → Why use frosting instead of real ice cream?
- Frosting looks like ice cream but won't melt, making this perfect for parties and warm weather. It stays stable and looks beautiful for hours.
- → Can I skip the overnight chilling?
- The cheesecake needs at least 8 hours to set properly. You can speed it up slightly by using the freezer, but overnight in the fridge gives the best texture.
- → What if I don't have a springform pan?
- You can use a regular 9-inch pie pan, though it will be harder to remove slices neatly. A springform pan makes serving much easier and looks more impressive.
- → How do I store leftovers?
- Cover and refrigerate for up to 3 days. The whipped cream may soften slightly, but the pie will still taste delicious.
- → Can I use homemade whipped cream throughout?
- Cool Whip is recommended for the cheesecake layer as it's more stable. Use fresh whipped cream for the piped topping and garnish for the best flavor and texture.