Cook sugar, butter and cream, mix in white chocolate and marshmallow creme, add vanilla pudding mix, split the mixture, add cocoa to one portion, layer in a pan, swirl together, cool, cut, then top with melted chocolate.
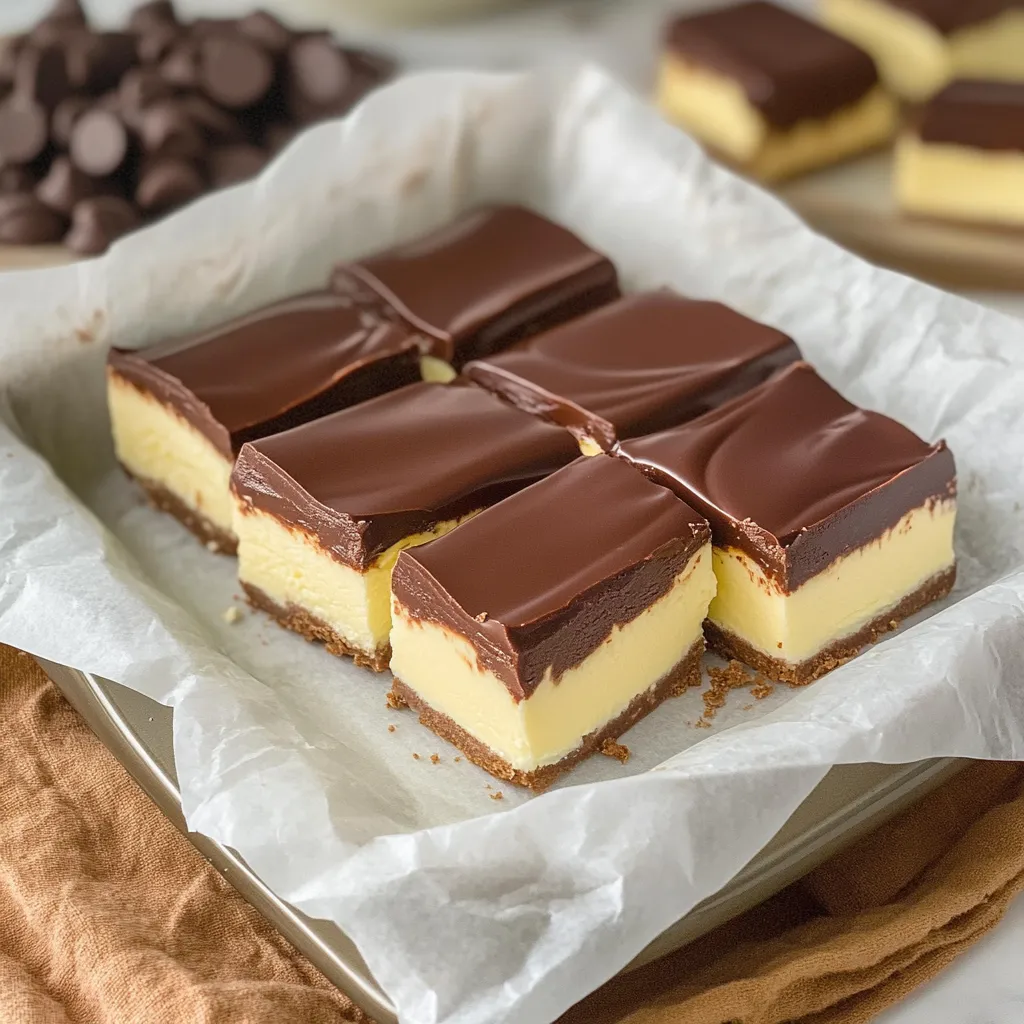
This Boston cream pie fudge has become my secret weapon for holiday cookie exchanges and gift-giving. I created it a few years back when I was looking for something different than my usual chocolate fudge for the neighborhood Christmas party. The combination of creamy vanilla "custard" fudge layer with rich chocolate topping recreates all those classic Boston cream pie flavors in a perfectly giftable, bite-sized treat. Even better, it looks incredibly impressive but requires only basic ingredients and about 15 minutes of active time.
Why You'll Love This Recipe
It combines two beloved desserts – fudge and Boston cream pie – into one incredible treat
The layered look creates a stunning presentation that stands out on any dessert table
No fancy equipment required – just a good saucepan and a few measuring cups
It makes the perfect homemade gift that stays fresh for days
Last Christmas, I included these in cookie boxes for my kids' teachers. My son's math teacher actually emailed me to say it was the best fudge she'd ever tasted and asked if I would share the recipe. When a complete stranger goes out of their way to request your recipe, you know it's a keeper!
Key Ingredients
Marshmallow creme - This gives the fudge that perfect smooth, creamy texture without requiring a candy thermometer or worrying about crystallization. It's basically fudge insurance!
White chocolate chips - These create the sweet, creamy base for the vanilla layer. Use a good quality brand for the best flavor and meltability.
Vanilla pudding mix - The secret ingredient that adds that distinctive Boston cream pie custard flavor. Just the dry mix – no need to prepare the pudding.
Heavy cream - Provides the perfect rich texture. Don't substitute milk or half-and-half here; the fat content in heavy cream is essential for proper setting.
Cocoa powder - This transforms part of the vanilla fudge into the chocolate swirl, giving you both flavors from one batch of fudge. Use unsweetened for the best chocolate flavor.
Pin itBoston Cream Pie Fudge Recipe | recipesbyclare.com
Step-by-Step Instructions
Constant stirring - Don't wander away from the stove during the cooking process! Those 7 minutes of stirring might feel like an eternity, but it prevents scorching and ensures perfect texture.
The ice water test - That drop of fudge in ice water trick really works! It's the most reliable way to know when your fudge base has reached the perfect consistency.
Quick working time - Once you remove the mixture from heat, you need to work relatively quickly as it starts to set up. Having all your ingredients measured and ready makes this much less stressful.
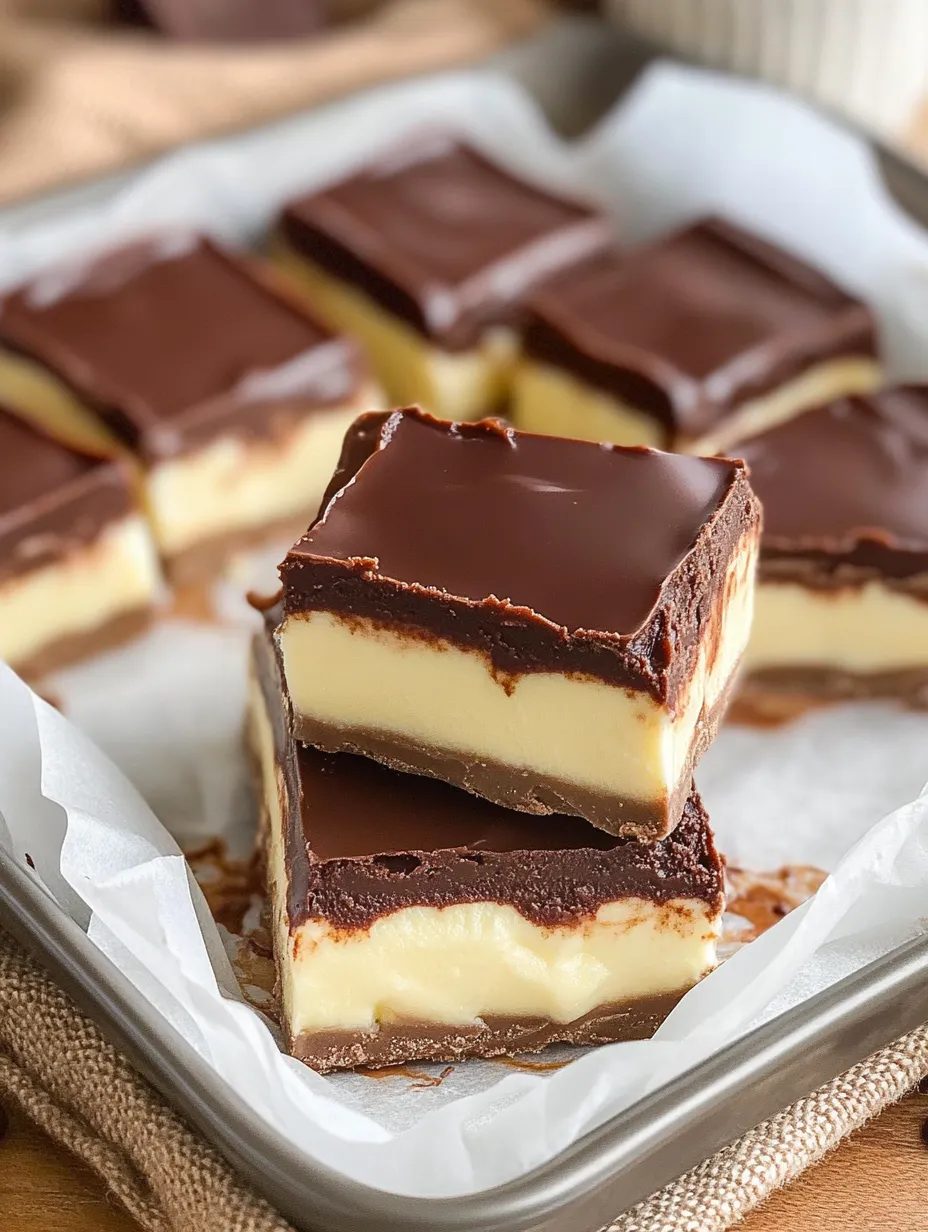
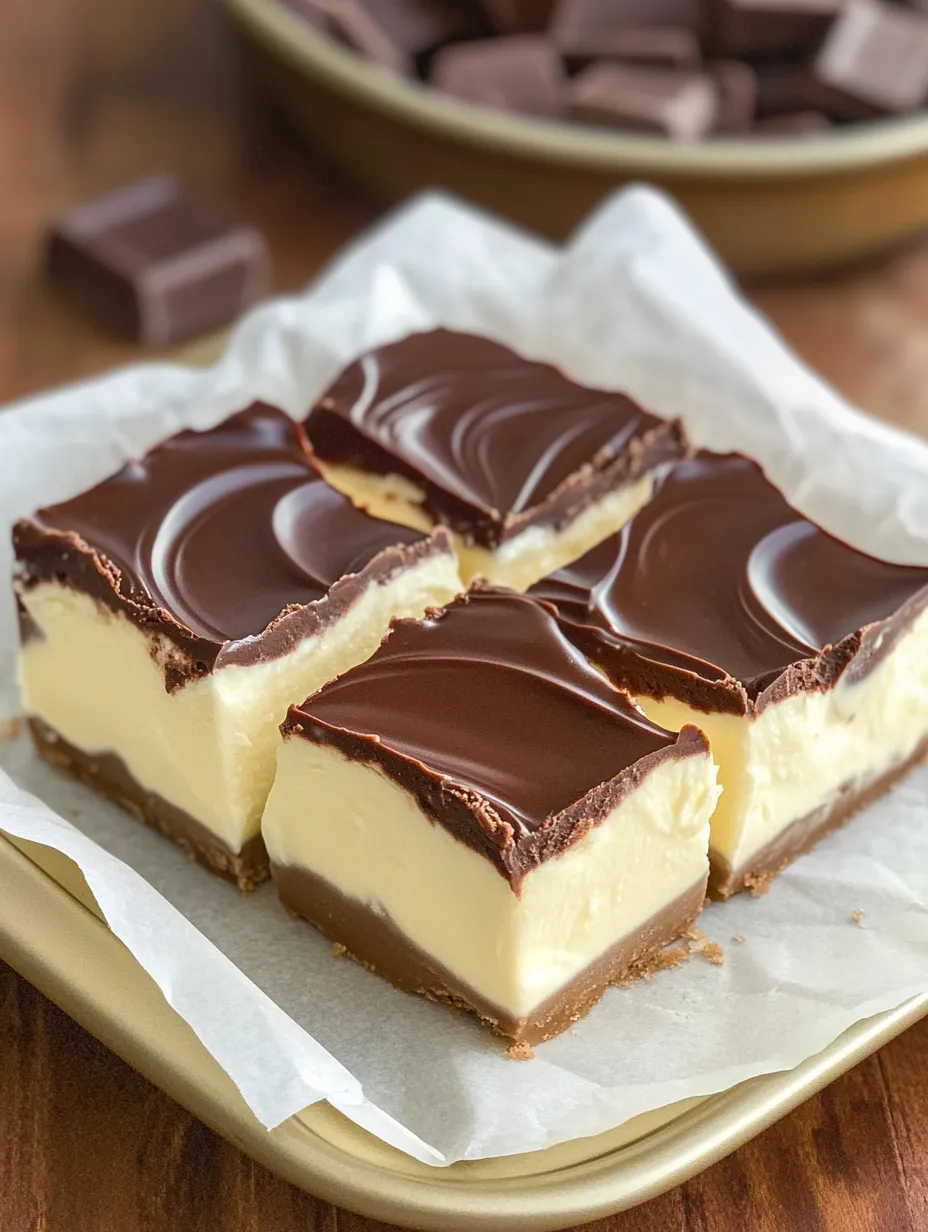
Perfect swirling - When adding the chocolate layer, don't over-swirl or you'll lose the distinct layers. Just a few gentle passes with a knife creates that beautiful marbled effect.
Cutting technique - Let the fudge cool completely before cutting. A warm knife (run under hot water and dried) makes the cleanest cuts.
Dipping method - When coating with the chocolate topping, just dip the tops rather than trying to coat the entire piece. It's cleaner, easier, and gives that authentic Boston cream pie look.
You Must Know
The fudge needs proper chilling time to set – don't rush this step!
Parchment paper with overhang is crucial for easy removal from the pan
Store in a single layer to preserve that perfect chocolate top
I've been refining this recipe for several holiday seasons now. My first attempts didn't include the vanilla pudding mix, and while good, they were missing that authentic Boston cream pie flavor. Adding that one ingredient transformed it from nice vanilla fudge to something truly special. I also experimented with different chocolate-to-vanilla ratios before landing on this perfect balance where neither flavor overpowers the other.
Serving Ideas
Serve these fudge squares on a simple white plate to showcase their beautiful layers. For holiday gatherings, I arrange them on a tiered stand alternating with my chocolate truffles for a dramatic presentation. They pair wonderfully with coffee after dinner, and I've found they're substantial enough to serve as the only dessert for small gatherings. For gift-giving, place them in mini cupcake liners inside a decorative tin.
Tasty Twists
Try adding a layer of raspberry jam before the chocolate layer for a fruity twist. For coffee lovers, add a teaspoon of espresso powder to the chocolate topping. During the holidays, I sometimes add a few drops of peppermint extract to the chocolate layer for a festive touch. If you're feeling particularly indulgent, sprinkle the wet chocolate topping with some finely chopped toasted hazelnuts before it set.
Storage Smarts
This fudge keeps beautifully in an airtight container at room temperature for up to a week, or in the refrigerator for two weeks. Layer pieces between sheets of parchment paper to prevent sticking. For longer storage, you can freeze the fudge for up to three months – just thaw in the refrigerator overnight before serving. I often make a double batch in early December so I have some on hand for unexpected holiday visitors.
Pin itEasy Boston Cream Pie Fudge | recipesbyclare.com
Fudge Secrets
For the cleanest layers, let the vanilla layer cool for about 5 minutes before adding the chocolate portion
Slightly dampening your fingers makes pressing the fudge into the corners of the pan much easier
For a shiny chocolate topping, make sure your chocolate and oil are thoroughly mixed before dipping
I've made this Boston cream pie fudge for countless holiday events, bake sales, and as gifts for friends and neighbors. There's something about those familiar flavors in an unexpected form that makes people's eyes light up. The fact that it looks like it took hours of effort when it's actually quite simple is just a bonus! It's become one of my signature treats that friends and family request year after year, and I'm always happy to oblige.
Frequently Asked Questions
→ What kind of vanilla pudding should I use?
Use the dry instant vanilla pudding mix powder, not prepared pudding. The dry mix adds flavor and helps stabilize the fudge. If you don't have pudding mix, you can substitute with an additional 1/2 teaspoon of vanilla extract and 2 tablespoons of powdered sugar, though the flavor won't be exactly the same.
→ My fudge seems too soft. What went wrong?
Fudge that's too soft usually means it wasn't cooked long enough or to a high enough temperature. Make sure to cook the sugar mixture for the full 7 minutes, stirring constantly. Using a candy thermometer can help - the mixture should reach about 235-240°F (soft ball stage). Also ensure you're using the correct measurements for all ingredients.
→ Can I use dark chocolate instead of semisweet for the topping?
Yes! Dark chocolate makes a wonderful topping and actually creates a stronger contrast to the sweet vanilla layer, much like a traditional Boston cream pie. Milk chocolate can also be used for a sweeter, more mellow flavor.
→ How long does this fudge last?
When stored in an airtight container, this fudge will stay fresh for about 1 week at room temperature or up to 2 weeks in the refrigerator. You can also freeze it for up to 3 months - just thaw in the refrigerator before serving.
→ Why do I need to add oil to the chocolate topping?
The vegetable oil helps thin the chocolate slightly, creating a smoother consistency for dipping. It also helps the chocolate set with a slight shine while preventing it from becoming too brittle or cracking when you bite into the fudge.
→ Can I add other flavors to this fudge?
Absolutely! Try adding 1/4 teaspoon of almond extract to the vanilla layer for a subtle flavor enhancement. You could also mix in some crushed cookies or sprinkles between the layers for texture, or add a tablespoon of espresso powder to the chocolate portion for a mocha twist.
Boston Cream Pie Fudge
A decadent layered fudge that captures the essence of Boston cream pie - vanilla custard flavor, chocolate topping, and all the creamy sweetness you love in a convenient, bite-sized treat.
Line an 8x8 baking dish with parchment paper, leaving the edges hanging off the sides so you can easily lift the fudge out of the dish later. Set aside.
Step 02
Add the sugar, butter, and heavy cream to a large saucepan. Bring the mixture to a boil over medium heat.
Step 03
Reduce the heat to medium-low and cook for 7 minutes, stirring constantly. To test if it's ready, drop a small amount into a glass of ice water. If you can grab the ball and it has a fudge-like consistency, it's perfect.
Step 04
Working quickly, remove the pan from heat and immediately add the white chocolate chips. Stir until completely melted and well mixed. Add the marshmallow creme and mix well to combine.
Step 05
Add the vanilla pudding and vanilla extract, mixing until combined and smooth. Pour about 2/3 of the fudge into the parchment paper-lined pan.
Step 06
Immediately whisk the cocoa powder into the remaining 1/3 of fudge in the pan, mixing until combined. Pour this chocolate mixture on top of the vanilla fudge layer in the pan.
Step 07
Use a knife to make swirls through the two layers of fudge, creating a marbled effect.
Step 08
Let the fudge cool to room temperature, then cut it into 16 equal squares.
Step 09
In a microwave-safe bowl, combine the semisweet chocolate chips and vegetable oil. Microwave in 30-second intervals, stirring after each interval, until the chocolate is melted and smooth.
Step 10
Let the melted chocolate cool for 15 minutes. Once cooled, pick up each piece of fudge and dip the top into the chocolate. Place the dipped fudge on parchment paper.
Step 11
Allow the chocolate topping to set and harden for about an hour before serving. Enjoy!
Notes
The fudge needs to be worked with quickly after cooking, so have all ingredients measured and ready to go.
For the vanilla pudding, use the dry mix powder, not prepared pudding.
Store in an airtight container at room temperature for up to 1 week, or in the refrigerator for up to 2 weeks.
For cleaner cuts, use a knife dipped in hot water and wiped dry between slices.
Tools You'll Need
8x8 baking dish
Parchment paper
Large saucepan
Wooden spoon or heat-resistant spatula
Knife
Microwave-safe bowl
Glass with ice water (for testing fudge consistency)
Measuring cups and spoons
Allergy Information
Please check ingredients for potential allergens and consult a health professional if in doubt.
Contains dairy (butter, heavy cream, white chocolate, pudding mix)
May contain soy (in chocolate chips)
Nutrition Facts (Per Serving)
It is important to consider this information as approximate and not to use it as definitive health advice.

 Pin it
 Pin it
 Pin it