


Bubblegum cloud fudge is a no-thermometer white-chocolate candy with a pink-and-white swirl, miniature marshmallows, and rainbow confetti sprinkles. Sweetened condensed milk and butter create a smooth sliceable base, while a measured amount of bubblegum flavoring gives the candy its playful character.
White chocolate is sensitive to heat, so the method uses short microwave intervals and thorough stirring. Once the base is smooth, work efficiently: add flavor, create the color swirl, fold in the mix-ins, and transfer to a lined pan before the mixture begins to set.
Ingredients for Bubblegum Cloud Fudge
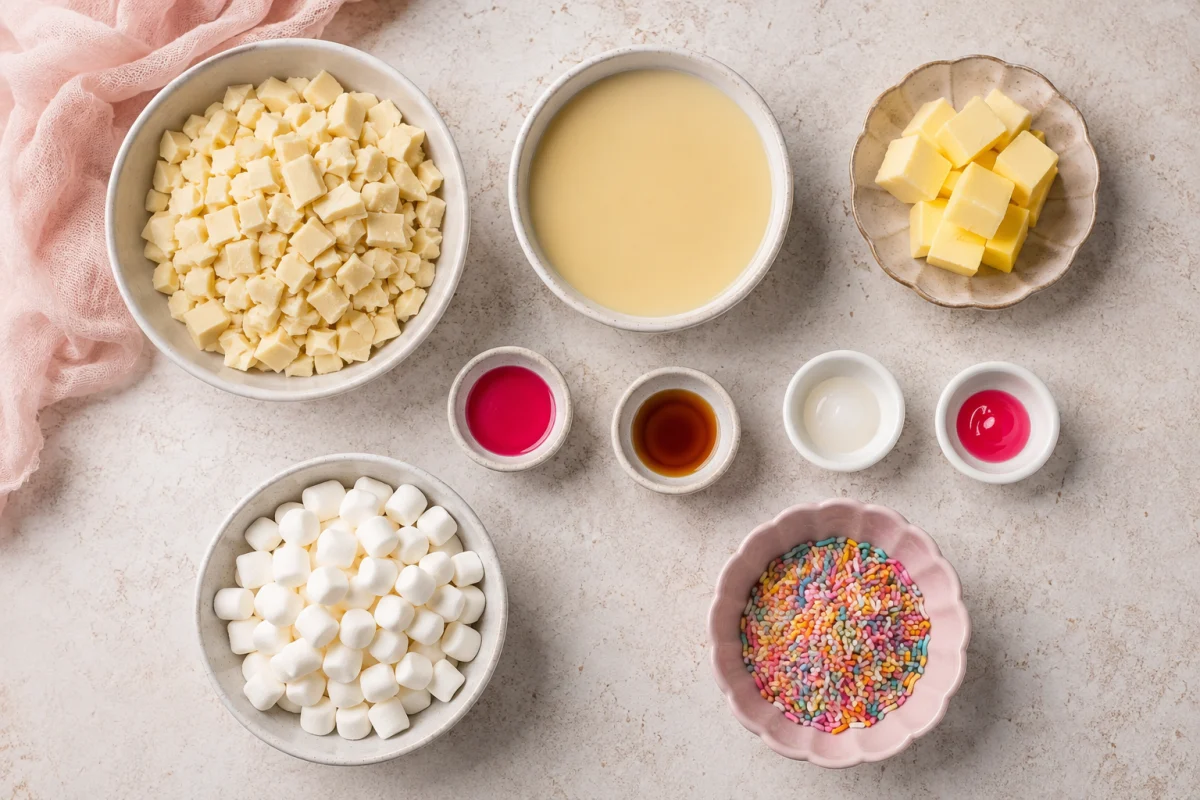
The fudge base uses 21 1/4 ounces chopped white chocolate, 3/4 cup sweetened condensed milk, and 4 1/2 ounces unsalted butter. Flavor it with 1 teaspoon concentrated bubblegum flavoring and 2 teaspoons vanilla extract.
For the appearance and texture, use three drops each of white and pink food gel, 1 cup miniature marshmallows, and 1/4 cup rainbow confetti sprinkles. Gel coloring is preferable to liquid because it adds concentrated color without extra water.
If you enjoy this recipe, you may also like Snickers Apple Salad.
How to Make Bubblegum Cloud Fudge
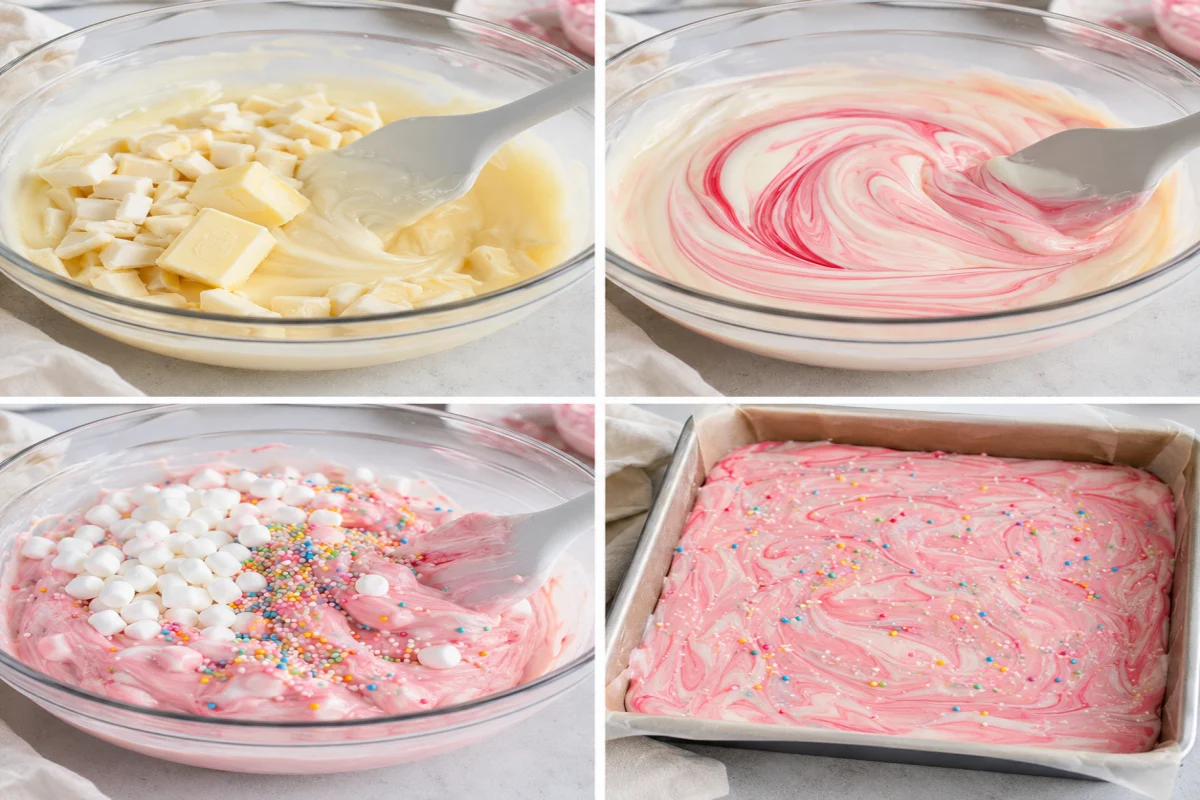
- Line the pan. Fit parchment into a 9-by-9-inch square pan, leaving overhang on two sides for lifting.
- Combine the base. Place chopped white chocolate, condensed milk, and butter in a large microwave-safe bowl.
- Melt gradually. Microwave for 40 seconds, stir thoroughly, and repeat for two or three cycles only until smooth.
- Add flavor. Stir in the bubblegum flavoring and vanilla until evenly distributed.
- Create the colors. Divide the mixture between two bowls, tint one pale pink and the other white, or add the gels in separate areas and fold minimally for a controlled marbled effect.
- Add texture. Fold in the miniature marshmallows and most of the sprinkles, reserving a small amount for the top.
- Fill the pan. Drop alternating spoonfuls of pink and white mixture into the pan. Draw a knife through once or twice and smooth the surface lightly.
- Chill. Refrigerate three to four hours, until completely firm. Lift out by the parchment and cut into 36 small squares.
For storage details after serving, the USDA leftovers and food safety guidance.
Choose White Chocolate That Melts Well
Use white chocolate intended for baking, whether bars, wafers, or good-quality chips. Bars should be chopped into small uniform pieces so they melt at the same rate. Large chunks can remain solid while the surrounding mixture overheats.
White baking morsels vary in cocoa-butter content and sweetness. A product that lists cocoa butter generally melts more fluidly, but the recipe can still work with baking chips when heat is controlled and each interval is followed by patient stirring.
If you enjoy this recipe, you may also like White Chocolate Raspberry Cheesecake Bars.
Melt in Short Intervals
Microwave power differs, so treat 40 seconds as a maximum interval rather than permission to heat continuously. After each cycle, scrape the bottom and sides of the bowl and stir for at least 20 seconds. Residual heat melts pieces that still look solid.
Stop microwaving when only a few small soft lumps remain and stir until smooth. White chocolate that becomes thick, greasy, or grainy has probably overheated. Adding more heat rarely repairs it.
Use Gel Coloring
Pink and white food gels produce clear colors with only a few drops. Liquid food coloring introduces water, which can make melted white chocolate thicken or seize. Use clean toothpicks or separate droppers to avoid contaminating the bottles.
The pink should remain soft rather than neon so the fudge keeps a polished appearance. White gel increases contrast, especially when the natural white-chocolate mixture has a yellow cast from butter.
Create Defined Pink-and-White Swirls
Alternating spoonfuls give more control than pouring one entire color over the other. Fill gaps with smaller dollops, then pass a thin knife through the pan in a broad S pattern. One or two passes are enough.
Over-swirling blends the colors into a single muddy pink. The surface does not need to look perfectly patterned before chilling; slicing reveals new marbled shapes within every piece.
Fold in Marshmallows and Sprinkles
Let the base cool for a minute if it is very hot before adding miniature marshmallows. They should remain as soft white pockets rather than melt completely. Use a broad spatula and fold from the bottom until they are dispersed.
Confetti sprinkles can release color if mixed aggressively into warm candy. Reserve some for the surface and use only a few gentle folds for the rest. Add the topping sprinkles immediately after spreading so they adhere.
Line the Pan for Easy Removal
Cut parchment wide enough to cover the base and two opposite sides of the 9-inch square pan. A light coating of nonstick spray under the paper can keep it from shifting while the thick fudge is spread.
Leave several inches extending above the rim as handles. Once the fudge is completely firm, loosen the two uncovered edges with a thin knife and lift the entire slab onto a cutting board.

Cut Small, Clean Squares
This fudge is very sweet, so 36 small pieces are more practical than large dessert bars. Mark six equal rows in each direction before cutting. Use a long sharp knife and press straight down instead of sawing through the slab.
For clean edges, warm the blade in hot water and wipe it completely dry between cuts. Moisture should never be left on the knife. If the slab begins to soften, return it to the refrigerator for 15 minutes.
Storage and Gifting
Store fudge in an airtight container with parchment between layers. It keeps at cool room temperature for about one week or in the refrigerator for up to two weeks. Let chilled pieces sit briefly before serving for a creamier bite.
For longer storage, freeze well-wrapped pieces for up to three months and thaw overnight in the refrigerator. When gifting, use food-safe bags or a rigid candy box and keep the package away from heat and direct sunlight.
Conclusion
Melt chopped white chocolate, condensed milk, and butter in short microwave intervals, stirring thoroughly after each. Add measured bubblegum and vanilla flavorings, create restrained pink-and-white swirls with gel color, fold in marshmallows and sprinkles, then chill in a lined pan until firm enough to cut.
Frequently Asked Questions
- → Why did my white chocolate fudge turn grainy?
It was probably overheated. Use short microwave intervals, stir after each one, and stop heating while a few soft pieces still remain.
- → Can I use liquid food coloring?
Gel coloring is safer because liquid adds water that can thicken or seize white chocolate. Use only a few drops of gel.
- → How do I keep the colors from blending together?
Drop alternating spoonfuls into the pan and drag a knife through only once or twice. Excessive swirling turns the pattern into one color.
- → How long does bubblegum fudge keep?
Keep it airtight for about one week at cool room temperature or up to two weeks refrigerated. It can also be frozen for up to three months.