


Cheesy stuffed shells combine jumbo pasta, seasoned beef marinara, and a creamy ricotta-Parmesan filling under a bubbling mozzarella top. Each shell holds its own portion of cheese while the meat sauce surrounds it, so the finished skillet is easy to scoop and satisfying without needing a separate pasta layer.
This recipe makes about 21 filled shells and serves six in roughly 40 minutes. Cook the pasta only to al dente, drain the beef well, and keep the ricotta mixture thick. Those three details prevent torn shells, greasy sauce, and filling that runs out during baking.
Ingredients for Cheesy Stuffed Shells
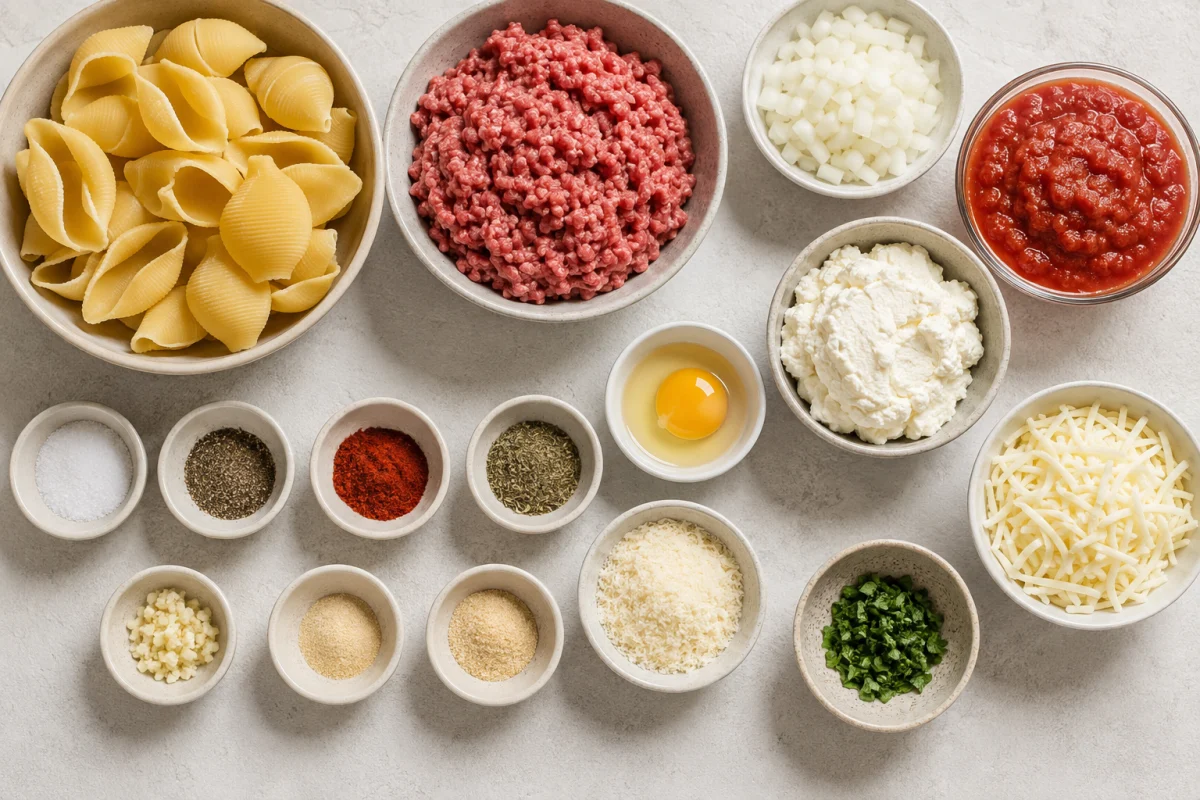
Use one 12-ounce box jumbo pasta shells. The meat sauce needs 1 pound ground beef, 1 chopped onion, 1/2 teaspoon each salt and black pepper, 1 teaspoon each paprika and Italian seasoning, 1 tablespoon minced garlic, and one 24-ounce jar marinara.
For the filling, combine 20 ounces ricotta, 1 large egg, 1/2 cup grated Parmesan, 1 teaspoon dried parsley, and 1 teaspoon garlic powder. Finish with 1 cup shredded mozzarella and extra parsley if desired.
If you enjoy this recipe, you may also like Shepherd's Pie.
How to Make Stuffed Shells
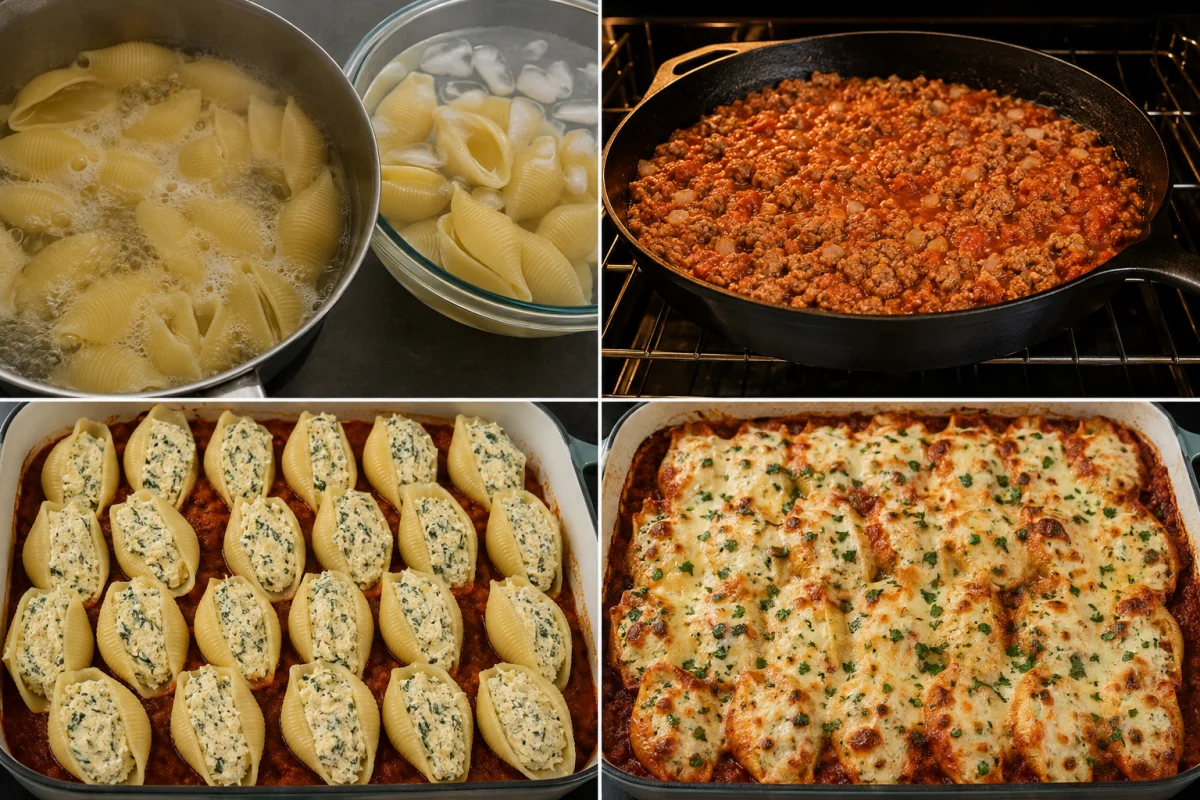
- Cook the shells. Boil in salted water until al dente, drain, and spread out to cool.
- Brown the beef. Cook beef and onion in a 12-inch oven-safe skillet with salt, pepper, paprika, and Italian seasoning. Drain excess fat.
- Build the sauce. Cook garlic for 30 seconds, add marinara, and simmer gently.
- Mix the filling. Stir ricotta, egg, Parmesan, parsley, and garlic powder until uniform.
- Fill. Spoon about 1 1/2 to 2 tablespoons into each intact shell.
- Arrange. Nestle about 21 shells open-side up in the meat sauce.
- Top and bake. Add mozzarella and bake at 400°F for 25 minutes, until bubbling and thoroughly hot.
- Rest. Add parsley and wait several minutes before serving.
For storage details after serving, the USDA leftovers and food safety guidance.
Cook More Shells Than You Need
A 12-ounce box provides extra shells because a few commonly tear or collapse during boiling. About 21 intact pieces fit a 12-inch skillet. Stir gently after adding the pasta and use a roomy pot so shells can move without pressing against one another.
Stop at al dente. The pasta continues absorbing sauce in the oven, and fully tender boiled shells can split during filling. Drain without rinsing away all the surface starch, then arrange in one layer so they cool without sticking.
If you enjoy this recipe, you may also like Street Corn Steak Crunch Wraps.
Cool the Pasta Before Filling
Hot shells are slippery, fragile, and uncomfortable to handle. Spread them on a lightly oiled sheet pan or clean parchment with the openings visible. A few minutes of cooling firms the surface enough for stuffing.
Do not pile drained shells in the colander. Their trapped steam continues cooking them, and their edges bond as starch dries. If two stick together, loosen them with a few drops of warm water rather than pulling hard.
Brown Beef and Onion Together
Use medium-high heat and break the ground beef into small crumbles. The onion softens in the rendered fat and distributes through the sauce. Let some meat touch the skillet undisturbed long enough to brown rather than stirring continuously.
Cook until no pink remains and the onion is tender, then drain pooled fat carefully. Ground beef should reach 160°F. Returning a greasy skillet to the sauce makes the finished dish heavy and can prevent marinara from clinging.
Add Garlic After Draining
Minced garlic needs only about 30 seconds in the warm beef. Adding it after excess fat is removed keeps its flavor clear and reduces the chance of burning during the longer browning stage.
Pour in marinara as soon as the garlic smells fragrant. Scrape the bottom to release browned residue, then reduce the heat. The sauce only needs a gentle simmer while the filling is mixed; aggressive cooking makes it too thick for nestling the shells.

Mix Ricotta Until Uniform
Stir ricotta, egg, finely grated Parmesan, dried parsley, and garlic powder in a separate bowl. Break the egg yolk first and fold until no yellow streaks remain. The egg helps the filling hold together as it bakes.
If the ricotta has visible liquid, drain it through a fine sieve before mixing. Excess whey can water down the sauce. Finely grated Parmesan blends more evenly than coarse shreds and brings enough salt that additional seasoning may be unnecessary.
Fill Without Tearing the Shells
Hold each shell in one hand and open it gently along its natural seam. Add 1 1/2 to 2 tablespoons filling with a small spoon or piping bag. The filling should reach the ends but should not force the shell completely flat.
Set filled shells open-side up on a clean tray until all are ready. Dividing the filling in two rounds helps keep portions even. Use torn shells as a cook's snack or tuck small pieces into sauce rather than trying to overstuff them.
Arrange the Skillet for Even Baking
Spread meat sauce evenly across the skillet, then nestle shells into it without burying their openings. Start around the outside and work inward. Close spacing supports the pasta, but leave enough room for hot sauce to bubble between pieces.
If your skillet is not oven-safe, transfer the sauce to a 9-by-13-inch baking dish before adding shells. Never put a pan with a plastic handle into a hot oven.
Top with Freshly Shredded Mozzarella
Scatter mozzarella from edge to edge, concentrating a little over each filled shell. Cheese shredded from a block melts into a more unified layer than pre-shredded cheese coated with anti-caking starch.
One cup gives coverage without hiding the shell shapes. For more color, add a small dusting of Parmesan. Do not press the cheese down, because loose shreds melt evenly around the raised pasta edges.
Covered or Uncovered Baking
Bake uncovered at 400°F for firmer pasta edges and browned cheese spots. Cover loosely with foil if you prefer uniformly soft shells or if the mozzarella colors before the center is hot. Keep foil from touching the cheese.
The dish is ready when sauce bubbles at the edges and the filling reaches 165°F. If assembled from cold, allow extra time and verify the center with an instant-read thermometer rather than judging only the melted top.
Rest Before Serving
Wait 5 to 10 minutes after baking. The sauce stops bubbling and the cheese filling firms enough to stay inside the shells. A wide spoon can then lift two or three pieces with sauce beneath them.
Parsley adds color, while red pepper flakes provide optional heat. Serve with a crisp salad, roasted broccoli, or green beans. Garlic bread is useful for extra sauce but makes the meal considerably richer.
Make-Ahead Instructions
Assemble the shells in sauce up to 24 hours ahead, cover, and refrigerate. Add mozzarella before baking or at assembly. Let a glass baking dish stand briefly at room temperature so it does not experience a sudden temperature change.
Bake until the middle reaches 165°F, which may take longer than a freshly assembled dish. For staged preparation, cook the sauce and mix the filling up to two days ahead, storing them separately.
Storage and Freezing
Refrigerate cooled leftovers in an airtight container for up to four days. Reheat covered at 350°F or microwave individual portions until the center is 165°F. Add a spoonful of marinara if the pasta has absorbed much of the sauce.
Freeze baked or unbaked shells for up to two months in a freezer-safe dish. Thaw overnight in the refrigerator before baking or reheating for the most even result.
Troubleshooting
- Shells tear: Cook only to al dente and cool in one layer.
- Filling is watery: Drain wet ricotta and measure the egg correctly.
- Dish is greasy: Drain browned beef before adding marinara.
- Pasta edges are hard: Cover with foil during baking.
- Filling spills out: Do not overfill, and place shells opening-side up.
Conclusion
Cook jumbo shells until al dente. Brown ground beef and onion, drain, add garlic and marinara, then make a ricotta, egg, Parmesan, and herb filling. Stuff about 21 shells, arrange them open-side up in the meat sauce, top with mozzarella, and bake at 400°F until bubbling and hot.
Frequently Asked Questions
- → How many jumbo shells fit in a 12-inch skillet?
About 21 filled shells fit comfortably. Cook the entire box because a few pieces may tear during boiling.
- → Can cheesy stuffed shells be assembled ahead?
Yes. Assemble, cover, and refrigerate for up to 24 hours, then bake until the center reaches 165°F.
- → Why is my ricotta filling watery?
The ricotta may contain excess whey. Drain it before mixing and keep the filling cold until assembly.
- → Can stuffed shells be frozen?
Yes. Freeze them baked or unbaked for up to two months, then thaw overnight in the refrigerator before heating.