
 Pin it
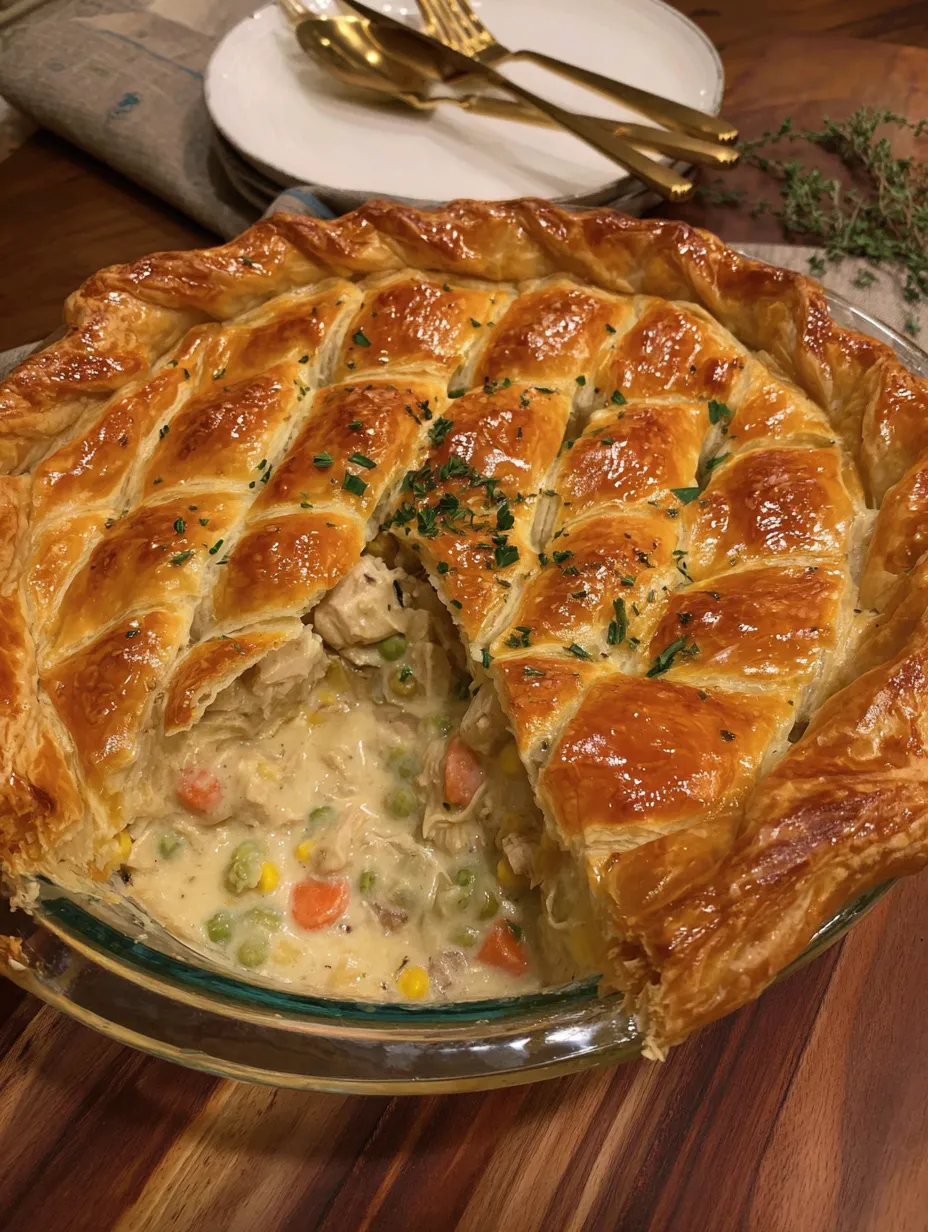
Chicken pot pie with puff pastry is basically what happens when you take the best parts of homemade comfort food and combine them with the laziest possible approach to pie crust, which is exactly the kind of cooking philosophy I can get behind. You season and cook chicken thighs until they're perfect, sauté vegetables with herbs, build a creamy sauce with chicken stock and cream, fold in frozen peas and corn, then dump everything into a pie dish lined with store-bought puff pastry and top it with more puff pastry before baking until golden. The result tastes like you spent hours making pie dough from scratch when really you just opened a package from the freezer section and let it do all the work creating those flaky layers. I started making this when my mother-in-law announced she was coming for dinner with only four hours notice, and I panicked because she's one of those people who judges your cooking skills based on how "homemade" everything looks. This pot pie saved me because it genuinely looks impressive with that golden puff pastry top, and she spent the entire meal asking about my "wonderful pastry technique." I didn't tell her I bought it frozen at Costco, and I'm taking that secret to my grave.
My friend Amanda claims she's too busy to cook real dinners and lives off takeout and frozen meals. She came over one evening when I was making this, watched the entire process, and kept insisting it must be way more complicated than I was making it look. When I served it forty-five minutes later and she tasted it, she got genuinely angry that she'd been spending money on mediocre restaurant pot pies when this was apparently achievable on a weeknight. Now she makes this every Sunday and meal-preps portions for the week, which her kids apparently prefer to the chicken nuggets and mac-and-cheese rotation she'd been doing. Her husband told me at a party that their grocery bill has dropped significantly and the complaining about dinner has stopped completely, which he credits entirely to me teaching Amanda that cooking wasn't actually impossible.
What Goes Into It
- Chicken thighs: One pound boneless and skinless provides the protein base, staying tender and juicy instead of drying out like breasts would during all this cooking.
- Paprika: Two teaspoons add color and mild smoky sweetness to the chicken seasoning without any real heat.
- Garlic powder: Two teaspoons create savory depth in the chicken seasoning that complements the fresh garlic you'll add later.
- Onion powder: Another two teaspoons enhance the onion flavor throughout the dish without needing to add more fresh onions.
- Italian seasoning: Two teaspoons bring dried herbs into the chicken seasoning, adding complexity before you even start building the filling.
- Celery stalks: Two finely sliced add that classic pot pie flavor and texture, creating aromatic base along with carrots and onions.
- Carrots: One cup finely sliced or diced adds sweetness and color, plus that traditional pot pie vegetable everyone expects to find.
- Large onion: Finely diced provides aromatic sweetness that forms the flavor foundation of the whole filling.
- Garlic cloves: Three minced add pungent savory notes that make everything taste more complex and intentional.
- Fresh rosemary: One teaspoon brings piney, aromatic flavor that makes this taste sophisticated instead of just being chicken and vegetables in cream.
- Fresh thyme: One teaspoon adds earthy herbal notes that pair perfectly with chicken and create that classic pot pie taste.
- Butter: Six tablespoons create the base for your roux while adding richness throughout the sauce.
- All-purpose flour: A third of a cup combines with butter to make the roux that thickens everything into proper sauce instead of soup.
- Chicken stock: Two cups provide the liquid base that combines with cream to create the sauce, adding savory chicken flavor throughout.
- Heavy cream: Half a cup makes the sauce rich and velvety instead of just being thickened broth.
- Parmesan cheese: A quarter cup freshly grated adds salty, nutty depth and helps thicken the sauce while contributing umami.
- Worcestershire sauce: Two teaspoons add savory complexity and slight tanginess that makes the filling taste more layered.
- Frozen peas: Half a cup adds color and sweetness without requiring you to shell fresh peas or buy canned ones that taste weird.
- Frozen corn: Another half cup contributes sweetness and texture, plus corn in pot pie just feels right and traditional.
- Puff pastry sheets: Two sheets thawed but still cold create both the bottom crust and the top layer, giving you flakiness everywhere.
- Salt and pepper: To taste throughout, adjusting as you go since different stocks and cheeses have varying sodium levels.
- Olive oil: For sautéing vegetables and cooking chicken, providing fat for browning without burning.
- Egg: One beaten and brushed on top creates that shiny golden finish that makes this look bakery-quality.
 Pin it
Making This Pot Pie
- Getting your oven ready:
- Turn your oven to 400 degrees Fahrenheit and let it heat completely while you prepare everything else. This higher temperature is what makes the puff pastry get golden and crispy instead of staying pale and doughy.
- Cooking the chicken:
- Pat your chicken thighs dry with paper towels if they're wet, which helps them brown better instead of steaming. Season both sides generously with salt, pepper, and all your spices—the paprika, garlic powder, onion powder, and Italian seasoning. Don't be shy with the seasoning because this is your only chance to flavor the actual meat. Set a large skillet over medium-high heat and add enough olive oil to coat the bottom, about two tablespoons. When the oil is hot and shimmering, carefully add your seasoned chicken thighs in a single layer without crowding them. Let them cook undisturbed for about 5 to 6 minutes, resisting the urge to move them around so they develop a nice brown crust on the first side. Flip the chicken over and immediately turn the heat down to medium-low, covering the pan with a lid. This covered cooking on lower heat keeps the chicken tender and juicy instead of getting tough and dry. Cook for another 5 to 6 minutes until the chicken is cooked through with no pink remaining in the center. Remove the cooked chicken from the skillet and set it on a cutting board to rest while you work on the vegetables. Once it's cool enough to handle, use two forks to shred the chicken into bite-sized pieces, or throw it in a stand mixer with the paddle attachment for easier shredding. Set the shredded chicken aside in a bowl.
- Sautéing the vegetables:
- In that same skillet with all the tasty browned bits left from cooking the chicken, add another tablespoon or two of olive oil if the pan looks dry. Add your diced onion, sliced celery, and diced or sliced carrots all at once. Turn the heat to medium-low and cook for about 6 to 7 minutes, stirring occasionally, until the vegetables soften and the onions turn translucent. You want them tender but not browned or caramelized. Add your minced garlic, fresh rosemary, and fresh thyme, stirring everything together and cooking for just 30 seconds until the garlic becomes fragrant. Don't let the garlic burn or it'll taste bitter and ruin everything.
- Building the sauce:
- Add your six tablespoons of butter to the vegetables in the pan, stirring as it melts and combining with all those browned chicken bits stuck to the bottom. Use your spoon to scrape the bottom of the pan, releasing all that fond which adds incredible flavor to your sauce. Once the butter is melted, sprinkle your third cup of flour over everything and whisk it in vigorously, cooking this roux for about 2 to 3 minutes while stirring constantly. You want the flour to lose that raw taste without browning too much. The mixture will look thick and paste-like. Slowly pour in your two cups of chicken stock while whisking constantly to prevent lumps from forming. Add your half cup of heavy cream and continue whisking as the sauce comes together. Let this mixture cook for about 10 to 15 minutes over medium-low heat, stirring occasionally, until it thickens significantly and coats the back of your spoon. When the sauce has reached the right thick, creamy consistency, stir in your grated parmesan cheese and Worcestershire sauce until the cheese melts completely. Add your shredded chicken, frozen peas, and frozen corn, stirring everything together. Let this filling simmer for just a few more minutes so the frozen vegetables thaw and heat through. Taste the filling and season generously with salt and pepper—this is your last chance to adjust seasoning, so make sure it tastes really good on its own because the pastry won't add flavor.
- Assembling the pot pie:
- Get out your 9-inch pie dish and have it ready nearby. Take one sheet of thawed puff pastry and gently press it into the bottom of your pie dish, letting the excess hang over the edges. Don't stretch it or it'll shrink back during baking. Pour your hot chicken and vegetable filling into the pastry-lined dish, spreading it evenly and making sure it's not mounded too high in the center. Lay your second sheet of puff pastry over the top of the filling, again letting the excess hang over the edges. Use kitchen scissors or a sharp knife to trim the excess pastry around the edges, leaving about half an inch of overhang. Press the top and bottom pastry edges together all around the rim, sealing them so filling can't escape. You can crimp them with a fork or just press with your fingers—doesn't need to be perfect. Use a sharp knife to cut several small slits or X-shapes in the top pastry to allow steam to escape during baking. Crack your egg into a small bowl and beat it thoroughly with a fork, then use a pastry brush to brush this egg wash all over the top of the pastry. The egg wash is what creates that gorgeous golden brown shine.
- Baking to perfection:
- Carefully slide your assembled pot pie into the preheated oven and set a timer for 30 minutes. Start checking at 30 minutes to see if the pastry is deeply golden brown and puffed up dramatically. If it still looks pale or the pastry hasn't puffed much, give it another 5 minutes. When the top is gorgeously golden and the pastry has risen into beautiful flaky layers, take it out of the oven. Immediately sprinkle some coarse salt over the top if you want, which adds a nice finishing touch and extra flavor. Let the pot pie rest for a full 10 minutes before cutting into it, which allows the filling to thicken slightly and cool down so you don't burn your mouth on molten filling. After resting, slice into wedges and serve while everything is still hot and the pastry is crispy.
Things Worth Knowing
Chicken thighs are essential instead of breasts because they stay moist through all the cooking, while breasts would dry out and get stringy by the time the pot pie finishes baking. Using the same pan for chicken and vegetables captures all those flavorful browned bits that add so much depth you can't get from starting with a clean pan. Letting the roux cook for a few minutes before adding liquid gets rid of that raw flour taste that would make your sauce taste pasty and weird. The 10-minute rest after baking is crucial because if you cut into it immediately, all the filling will pour out like soup instead of holding together in neat slices.
The first time I made this, I used chicken breasts thinking they'd be healthier and "better." By the time everything finished baking, the chicken was dry and stringy, totally ruining the creamy sauce. Chicken thighs cost less anyway and taste better, staying juicy even after extended cooking. Now I use thighs for any recipe that involves long cooking times or reheating.
I tried making the vegetables in a separate clean pan once thinking it would be faster than wiping out the chicken skillet. The filling tasted fine but completely lacked the depth and richness you get from cooking in the same pan with all those browned chicken bits. Those stuck-on bits dissolve into the butter and become part of the sauce, adding layers of flavor you can't replicate starting fresh. Now I always use the same pan even though it feels slightly messy.
The first pot pie I attempted, I was impatient and added the stock to the roux after only like 30 seconds of cooking. The finished sauce had this unpleasant raw flour taste underneath all the cream and cheese that made it taste slightly off and pasty. Cooking the roux for those full 2 to 3 minutes really does eliminate that flour taste, creating a neutral base that just provides thickness without contributing weird flavor.
I cut into my first pot pie about 2 minutes after taking it from the oven because I was starving and impatient. The filling was so hot and liquid it poured out everywhere, leaving me with pastry crust sitting in a puddle of cream sauce. Waiting that full 10 minutes lets everything firm up enough to slice properly while still being hot enough to enjoy. It's worth the patience even when you're hungry.
Using fresh thyme and rosemary instead of dried makes such a noticeable difference in flavor. I tried using dried herbs once and while it worked okay, the flavor was flatter and less bright. Fresh herbs cost a bit more but the aromatic quality they bring to the filling is completely worth it. If you can't find fresh, use half the amount of dried since dried herbs are more concentrated.
Serving This Pot Pie
Cut generous wedges and serve on dinner plates while everything is still hot from the oven, when the pastry is at peak crispiness and the filling is steaming. This feeds about eight people with substantial portions that don't need much else alongside except maybe a simple green salad. The pot pie is rich and filling enough to be a complete meal without requiring multiple side dishes, though crusty bread for soaking up extra sauce is never a bad idea. This works perfectly for Sunday family dinners, holiday meals, or any cold evening when you want maximum comfort food with minimal effort relative to how impressive it looks.
For gatherings, this travels reasonably well if you keep it covered and serve within an hour or two. The individual portions you cut can be reheated easily for people who show up late or want seconds. Kids generally love pot pie because it's basically chicken, vegetables, and cream sauce in a flaky crust, hitting all the comfort food buttons without being too adventurous or scary.
The combination of tender chicken, soft vegetables, and rich creamy sauce all enclosed in buttery puff pastry creates this perfect bite that's simultaneously comforting and satisfying. Each forkful gives you crispy pastry, creamy filling, and savory chicken all together instead of needing to assemble bites carefully to get the right ratio.
This is substantial enough that one slice usually fills people up completely, though serious eaters will definitely come back for seconds. The richness from the cream and butter means a little goes a long way in terms of satiation. Adults appreciate the sophisticated flavors from fresh herbs and parmesan, while kids just focus on the chicken and pastry without noticing all the vegetables hidden in that creamy sauce.
Different Ways to Try It
- Add mushrooms sautéed with the other vegetables for earthy flavor and more substance.
- Use leftover turkey instead of chicken for a fantastic way to use up Thanksgiving or Christmas leftovers.
- Try adding diced potatoes to the filling for more heartiness and to stretch the recipe further.
- Mix in some white wine with the stock for more complex, restaurant-style flavor.
- Add bacon cooked and crumbled for smoky richness throughout.
- Use different vegetables like green beans, butternut squash, or asparagus depending on the season.
- Make individual pot pies in ramekins for portion control and easier serving at gatherings.
- Top with mashed potatoes instead of puff pastry for shepherd's pie vibes with chicken.
Keeping It Fresh
Leftover pot pie keeps in the refrigerator for up to 4 days stored in an airtight container or with the pie dish covered tightly with foil. Reheat individual slices in a 350-degree oven for about 15 minutes until heated through, or microwave for 2 to 3 minutes though the pastry won't stay as crispy. The filling can be made ahead and refrigerated for up to 2 days before assembling with the pastry and baking fresh for better texture. The unbaked assembled pot pie can be frozen for up to 3 months wrapped really well in plastic wrap and foil. Bake frozen pot pie straight from the freezer, adding about 15 extra minutes to the baking time and covering with foil if the top browns too quickly. Already baked pot pie freezes okay but the pastry loses some of its flakiness when reheated, so freezing the filling separately or unbaked is better.
 Pin it
I've made this chicken pot pie with puff pastry countless times since discovering how much easier it is than making traditional pie crust while still delivering that flaky, buttery pastry everyone loves. There's something really satisfying about serving a pot pie that looks this impressive while knowing the crust came from the freezer section and required zero skill to use. The combination of perfectly seasoned chicken, creamy vegetable filling, and golden puff pastry creates this ultimate comfort food experience that makes cold evenings feel warmer and dinner feel like an event instead of just another meal. My family requests this regularly during fall and winter when we're craving something hearty and warming, and I never get tired of making it because it comes together quickly enough for weeknights but tastes special enough for company. The fact that I can prep the filling while doing other things and assemble everything in about twenty minutes makes this actually feasible instead of being one of those recipes that sounds good but never actually happens. This has earned its permanent spot in my regular dinner rotation, joining that small group of meals I make constantly because they're reliable, impressive, and consistently make everyone happy without requiring professional cooking skills or hours of labor!
Frequently Asked Questions
- → Can I use chicken breasts instead of thighs?
- Sure! Chicken breasts work fine but they can dry out more easily. If using breasts, be careful not to overcook them. Thighs are more forgiving and stay juicier.
- → Can I use store-bought rotisserie chicken?
- Absolutely! That's a great shortcut. You'll need about 3 cups of shredded rotisserie chicken. Just skip the chicken cooking steps and add it when the recipe calls for it.
- → Do I have to make the lattice top?
- Not at all. A simple full pastry sheet on top works perfectly. The lattice is just for looks if you want to get fancy. Either way tastes the same.
- → Can I freeze chicken pot pie?
- Yes! Assemble it completely but don't bake it. Wrap it really well in plastic wrap and foil, then freeze for up to 3 months. Bake from frozen, just add 15-20 minutes to the baking time.
- → What vegetables can I substitute?
- Green beans, mushrooms, potatoes, or bell peppers all work great. Just keep the total amount of vegetables about the same so the sauce ratio stays right.
- → Why is my filling too watery?
- Make sure you cook the flour and butter mixture long enough before adding liquids. Also, let the sauce simmer until it's actually thick before assembling. If it's thin going into the oven, it'll be soupy when done.