
 Pin it
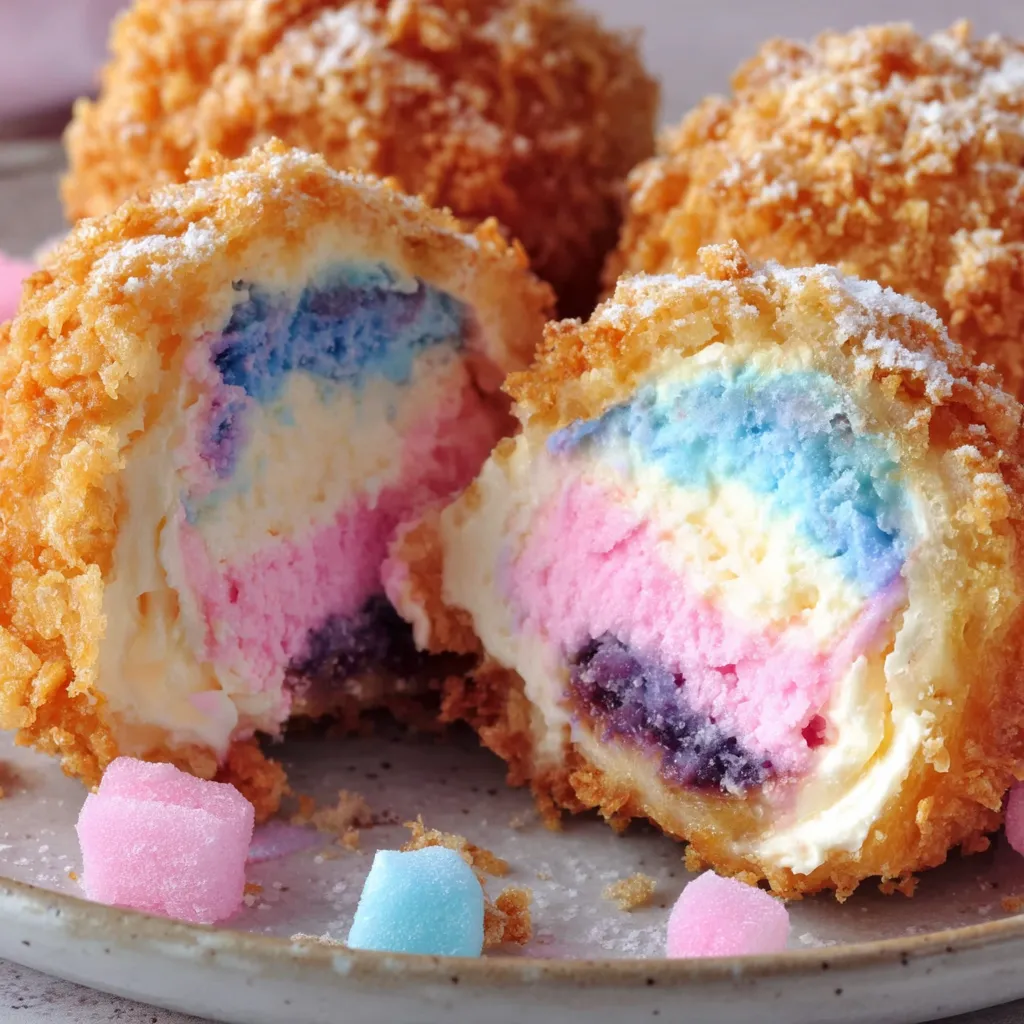
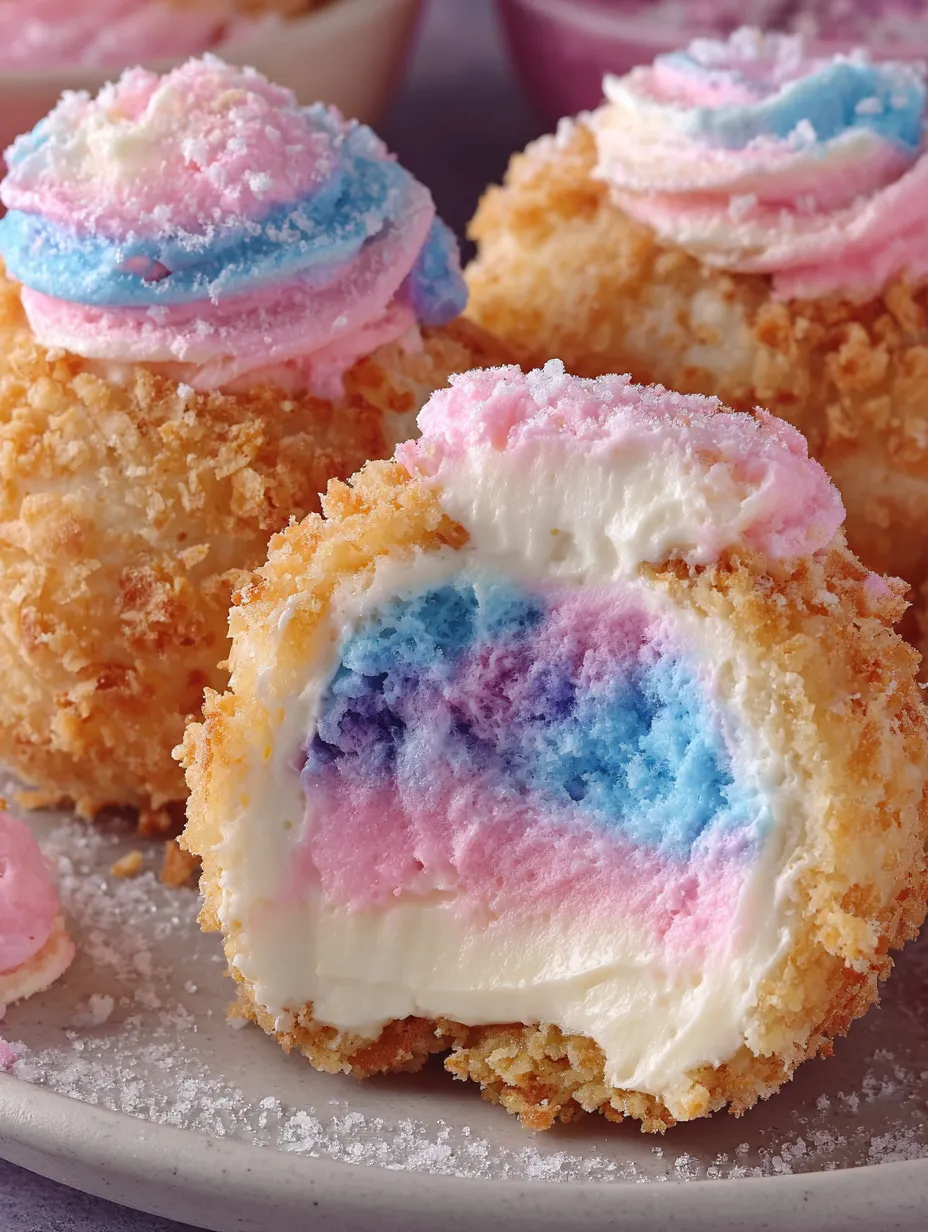
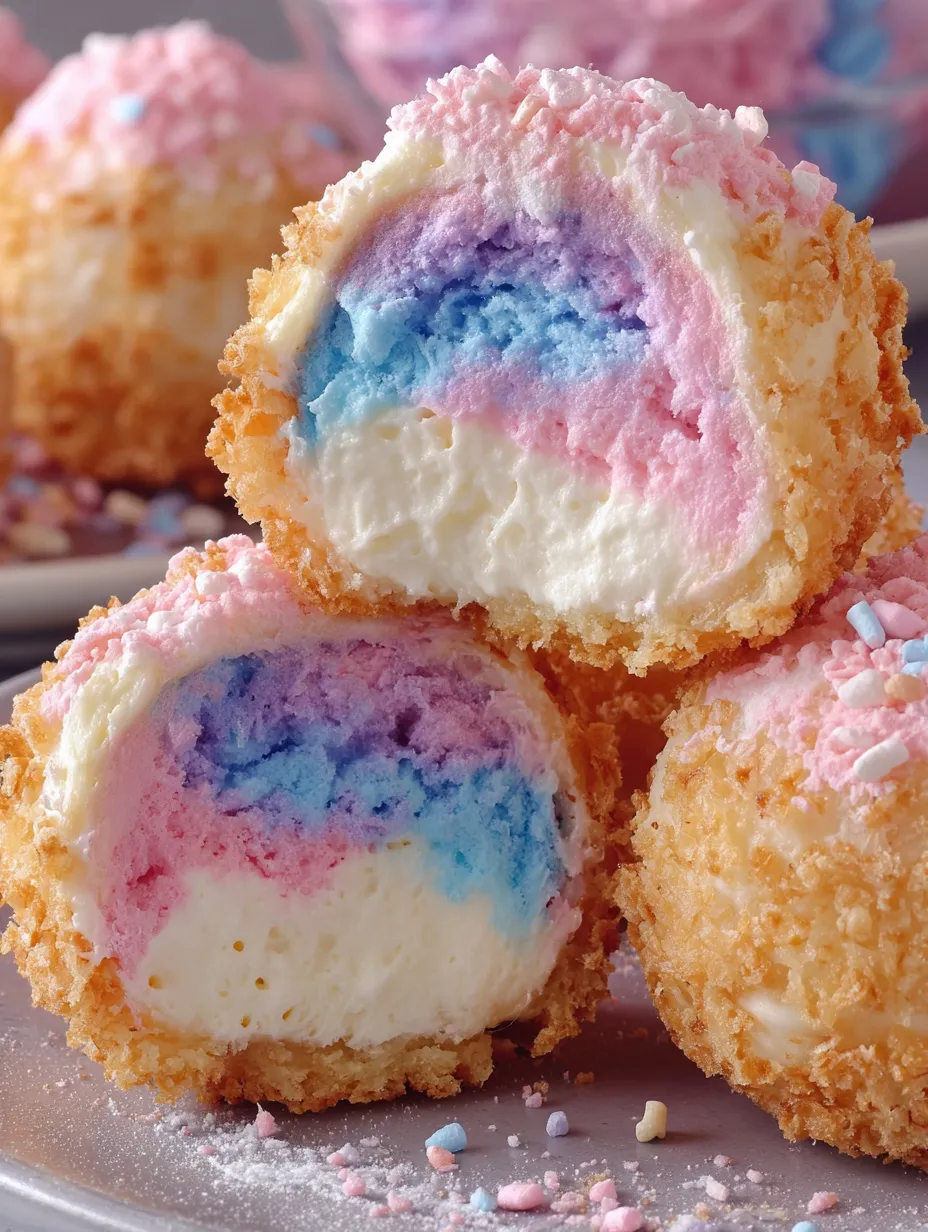
These fried cheesecake bombs have completely transformed how I think about carnival-inspired desserts at home. I created this recipe after my daughter came home from the county fair absolutely raving about the fried cheesecake she had tried, and I knew I had to recreate that magic in my own kitchen with a whimsical cotton candy twist. The contrast between the crispy golden exterior and that cloud-like, sweet cream cheese filling creates this incredible carnival experience that takes me straight back to childhood summers. Every bite delivers that nostalgic cotton candy flavor wrapped in warm, pillowy fried dough that makes both kids and adults light up with pure joy.
I'll never forget the first time I made these for my daughter's birthday sleepover. Eight giggling ten-year-olds crowded around my kitchen counter, watching with wide eyes as these golden bombs emerged from the oil. They couldn't believe I was actually frying dough right there in front of them! The birthday girl declared them "better than the fair" and her friends kept asking if they could have "just one more." That batch disappeared in about fifteen minutes, and I've been making them for special occasions ever since. Now my daughter requests these instead of traditional birthday cake.
Essential Ingredients Breakdown
- Cream cheese: The heart of these bombs that creates that luxurious, tangy filling everyone loves in cheesecake. Always use full-fat cream cheese, and let it sit at room temperature for at least an hour before mixing. Cold cream cheese will give you lumps that won't smooth out no matter how much you beat it, and those lumps will show up in your finished filling.
- Cotton candy flavoring: This magical ingredient transforms ordinary cheesecake filling into something that tastes like spun sugar clouds from the carnival. You can find it in the baking aisle near other extracts, and a little goes a long way. The artificial flavor might seem unusual, but it's what creates that authentic cotton candy taste that makes these bombs so special, and different from regular fried cheesecake.
- Powdered sugar: Sweetens the filling without adding graininess that granulated sugar would create. The fine texture dissolves completely into the cream cheese, giving you that smooth, sweet filling. I also use it for the final dusting because it creates that beautiful snowy appearance that makes these look bakery-perfect.
- Biscuit dough: Your convenient shortcut to perfect fried dough that puffs up beautifully, and creates those lovely golden layers. I use refrigerated biscuit dough from a can because it has just the right thickness, and texture for frying. The dough is forgiving, and easy to work with, even if you've never made fried desserts before.
- Whipped topping: Lightens the cream cheese filling, and adds that airy, mousse-like quality that keeps the filling from being too dense. This ingredient is what makes the filling feel more like cotton candy clouds rather than heavy cheesecake. Don't skip it or substitute with more cream cheese, or your filling will be too thick and rich.
- Vanilla extract: Rounds out all the flavors, and adds depth to the sweetness. Pure vanilla extract works best here because it has that warm, complex flavor that balances the artificial cotton candy flavoring beautifully.
- Heavy cream: Loosens the filling just enough to make it scoopable, and helps everything blend together smoothly. This small amount makes a big difference in achieving that perfect consistency that's thick enough to hold its shape but soft enough to feel luxurious when you bite into it.
- Vegetable oil: Your frying medium that heats evenly, and doesn't impart any flavor to the dough. I prefer vegetable oil over peanut or canola because it has a neutral taste, and a high smoke point. You need enough oil for the bombs to float freely, and cook evenly on all sides.
 Pin it
Making the Magic Happen
- Preparing the filling
- Start by taking your cream cheese out of the refrigerator, and letting it sit on the counter until it feels soft when you press it with your finger. Place the softened cream cheese in a large mixing bowl, and beat it with an electric mixer on medium speed for about two minutes until it becomes completely smooth, and fluffy with no lumps remaining. Add the powdered sugar, and continue beating for another minute until the mixture looks light, and creamy. Pour in the vanilla extract, and cotton candy flavoring, then beat everything together until the flavoring is fully incorporated, and you can smell that distinctive cotton candy aroma. Gently fold in the whipped topping using a rubber spatula, making broad strokes from the bottom of the bowl up, and over the top to keep as much air in the mixture as possible. Drizzle in the heavy cream, and fold just until everything combines into a smooth, cloud-like filling. Cover the bowl tightly with plastic wrap, and place it in the refrigerator for at least thirty minutes to firm up, which makes it much easier to scoop, and shape later.
- Preparing the dough
- Open your package of biscuit dough, and separate each biscuit carefully, placing them on a clean work surface. Lightly dust your counter or cutting board with flour, spreading it evenly so the dough won't stick but using just enough that you don't dry out the biscuits. Take one biscuit, and use a rolling pin to flatten it into a circle about four to five inches in diameter, and roughly one-eighth inch thick. The dough should be thin enough to wrap around the filling completely but not so thin that it tears easily. Roll from the center outward in different directions to create an even thickness throughout. If the dough springs back or resists rolling, let it rest for a minute before continuing. Repeat this process with each biscuit, keeping the flattened rounds covered with a clean kitchen towel to prevent them from drying out while you work with the others.
- Assembling the bombs
- Remove your chilled filling from the refrigerator, and use a small cookie scoop or spoon to scoop out about one to two tablespoons of filling. Roll this portion between your palms to create a smooth ball, working quickly so the filling doesn't warm up too much from your hands. Place this filling ball right in the center of one flattened biscuit round. Carefully lift the edges of the dough up, and over the filling, bringing all sides together at the top to completely enclose the cream cheese ball. Pinch the seams together firmly, making sure there are no gaps or thin spots where filling could leak out during frying. Once sealed, roll the entire bomb gently between your palms to smooth out any seams, and create a perfect round shape. Place the finished bomb seam-side down on a plate, and repeat with the remaining dough, and filling. If you notice any bombs with visible seams or cracks, pinch, and smooth those areas again because any openings will cause the filling to burst out when the bombs hit the hot oil.
- Heating the oil
- Pour your vegetable oil into a deep, heavy-bottomed pot that's at least four inches deep, making sure the oil comes up at least two to three inches from the bottom but leaves plenty of room at the top to prevent overflow when you add the bombs. Attach a candy thermometer to the side of the pot, making sure the tip is submerged in the oil but not touching the bottom of the pot. Turn the heat to medium-high, and watch the thermometer carefully as the oil heats up. You're aiming for exactly 350 degrees Fahrenheit, which is the perfect temperature for frying these bombs. If the oil is too cool, the dough will absorb too much oil, and become greasy. If it's too hot, the outside will burn before the dough cooks through. Once the oil reaches 350 degrees, adjust your heat to maintain that temperature throughout the frying process.
- Frying to perfection
- Working in small batches of two or three bombs at a time to avoid crowding the pot, and dropping the oil temperature, carefully lower each bomb into the hot oil using a slotted spoon or spider strainer. The bombs should sizzle immediately, and start to float within a few seconds. Let them fry for about one to two minutes on the first side, watching as the dough turns a beautiful golden brown color. Use your slotted spoon to gently flip each bomb over, being careful not to splash hot oil. Fry the second side for another one to two minutes until it matches the golden color of the first side. The bombs should be evenly golden all over, and will have puffed up significantly from when you first dropped them in. Use your slotted spoon to lift the bombs out of the oil, letting excess oil drip back into the pot for a few seconds. Transfer the fried bombs to a plate lined with several layers of paper towels to drain. Check your oil temperature before adding the next batch, and adjust the heat if needed to maintain that perfect 350 degrees.
- Final touches
- While the bombs are still warm but cool enough to handle without burning yourself, roll each one in granulated sugar until completely coated. If you want an extra burst of cotton candy flavor, add a few drops of cotton candy flavoring to the granulated sugar, and mix it well before rolling the bombs. The warmth of the bombs helps the sugar stick beautifully, and creates that irresistible sweet crust. Once all bombs are sugar-coated, transfer them to your serving plate. Right before serving, dust them generously with powdered sugar using a fine-mesh sieve for that gorgeous snowy effect. Top each bomb with a small tuft of actual cotton candy for that full carnival presentation that makes everyone smile. These are absolutely best served immediately while still warm, when the contrast between the crispy exterior, and creamy filling is at its peak.
I've experimented with this recipe countless times to get the ratios just right. My early attempts had too much filling, and I learned the hard way what happens when a bomb bursts in hot oil, it's not pretty! I also discovered that refrigerating the assembled bombs for about fifteen minutes before frying helps them hold their shape even better. On particularly warm days, I sometimes pop the whole plate of assembled bombs in the freezer for ten minutes instead. The cold filling creates a bit of insulation that gives the dough time to cook through, and crisp up before the center gets too hot.
Serving These Beauties
Serve these cotton candy cheesecake bombs warm from the fryer for the most incredible eating experience. The temperature contrast between the hot crispy shell and the cool cream cheese center creates this amazing sensation that makes each bite memorable. For birthday parties, I arrange them on a tiered cake stand with extra tufts of cotton candy scattered around for decoration. Kids absolutely love picking their own bomb, and pulling off the cotton candy topping first. Pair these with cold glasses of milk for children or vanilla milkshakes for an over-the-top carnival experience. At adult gatherings, I've served them alongside champagne or sweet dessert wines, which surprisingly complement the cotton candy sweetness beautifully. You can also create a dessert board with these bombs as the centerpiece, surrounded by fresh berries, chocolate sauce for dipping, and extra cotton candy for anyone who wants more of that spun sugar magic.
Creative Variations to Try
Transform these bombs for different occasions by changing the flavor profile completely. Replace the cotton candy flavoring with strawberry extract, and add pink food coloring to the filling for a strawberry cheesecake version that's perfect for Valentine's Day. During fall, swap the cotton candy flavor for maple extract, and add a pinch of cinnamon to both the filling, and the sugar coating. For chocolate lovers, mix three tablespoons of cocoa powder into the cream cheese filling, and roll the finished bombs in cinnamon sugar instead of plain granulated sugar. I've also made a cookies, and cream version by crushing Oreos into the filling, and rolling the fried bombs in more crushed Oreos mixed with sugar. During the holidays, try adding peppermint extract, and rolling them in crushed candy canes for a festive treat. You can even make savory versions by omitting all the sugar, and cotton candy flavor, filling the bombs with herbed cream cheese instead, and serving them as an appetizer.
Keeping Them Fresh
These bombs are truly best enjoyed fresh, and warm right after frying, but I understand that sometimes you need to prepare ahead. If you must store them, place completely cooled bombs in an airtight container with paper towels between layers to absorb any moisture. They'll keep in the refrigerator for up to two days, though the exterior will lose some of its crispiness. To reheat, place them on a baking sheet in a 350-degree oven for about five to eight minutes until warmed through. Don't use the microwave because it will make them soggy. The filling can be made up to three days in advance, and kept covered in the refrigerator. The assembled but unfried bombs can be frozen for up to one month. Place them on a baking sheet in a single layer, and freeze until solid, then transfer to a freezer bag. Fry them directly from frozen, adding an extra minute or two to the cooking time. Never store these with the cotton candy topping already on them because the cotton candy will dissolve from any moisture.
Understanding the Frying Process
Deep frying might seem intimidating if you've never done it before, but these bombs are actually a great beginner project. The key is maintaining steady heat, and not panicking when you add the dough to the oil. Always keep a lid nearby when frying in case of any oil splatters or flames, though you shouldn't need it if you're careful. Never walk away from hot oil, stay present, and attentive the entire time. Use a pot that's deep enough to prevent oil from bubbling over when you add the bombs. If your oil starts smoking, it's too hot, turn off the heat immediately, and let it cool down before resuming. The oil should bubble actively around the bombs but shouldn't be violently bubbling. You'll know the bombs are ready to flip when you can see the edges turning golden brown, and they float freely in the oil without sticking to each other or the pot.
Troubleshooting Common Issues
If your bombs are browning too quickly on the outside but the dough still seems raw inside, your oil temperature is too high. Lower the heat, and use your thermometer to bring it back to 350 degrees. If the bombs are absorbing too much oil, and coming out greasy, your temperature is too low, increase the heat gradually. When bombs burst open during frying, you either overfilled them or didn't seal the seams well enough. Check each bomb carefully before frying, and pinch any suspicious spots. If your filling is oozing out despite good sealing, it might be too warm, make sure it's properly chilled, and firm before assembly. Bombs that turn out dense, and heavy usually mean the oil wasn't hot enough, causing the dough to absorb oil instead of puffing up. If the cotton candy topping dissolves immediately, your bombs are too hot, let them cool for a minute or two before adding it.
 Pin it
These cotton candy cheesecake bombs have become my signature fun dessert that bridges the gap between childhood nostalgia and grown-up indulgence. There's something magical about transforming simple refrigerated biscuit dough into these carnival-worthy treats that make people smile before they even take a bite. Yes, deep frying requires attention, and care, but the process is much simpler than most people think, and the results are absolutely spectacular. I love how these bombs create this immediate sense of celebration and whimsy at any gathering. They're the dessert that gets people talking, taking photos, and asking how you possibly made something so creative.
Frequently Asked Questions
- → Can I bake these instead of frying them?
- Yes, you can bake them at 375°F for about 12-15 minutes until golden brown. They won't be quite as crispy, but they'll still taste great.
- → Where can I find cotton candy flavoring?
- You can find cotton candy flavoring at most craft stores, baking supply shops, or online. If you can't find it, you can skip it and they'll still be delicious.
- → How do I keep the filling from leaking out while frying?
- Make sure to seal the edges really well by pinching them tight and rolling the ball smooth. Also, don't overfill them - stick to 1-2 tablespoons of filling per bomb.
- → Can I make these ahead of time?
- These are best fresh, but you can prepare the filling and shape the bombs a few hours ahead. Keep them covered in the fridge, then fry right before serving.
- → What kind of biscuit dough works best?
- Regular refrigerated biscuit dough from the grocery store works perfectly. The flaky layers style or buttermilk biscuits both work great.
- → Do I have to use real cotton candy on top?
- No, the cotton candy is just for decoration and extra fun. You can skip it and just dust with powdered sugar if you prefer.