


Honey BBQ Chicken and Rice turns bite-size chicken, long-grain rice, broth, barbecue sauce, honey, and mixed vegetables into a complete one-pan dinner. The chicken is seared first, the rice is toasted in the flavorful skillet, and both finish gently under a tight lid before the vegetables are added. The recipe serves 4 and records 40 minutes total: 10 minutes of preparation and 30 minutes of cooking, followed by the explicit five-minute covered rest that finishes the rice texture.
This guide preserves every recorded ingredient, quantity, temperature, time, and method step. Read the full sequence once before beginning.
Honey BBQ Chicken & Rice Ingredients
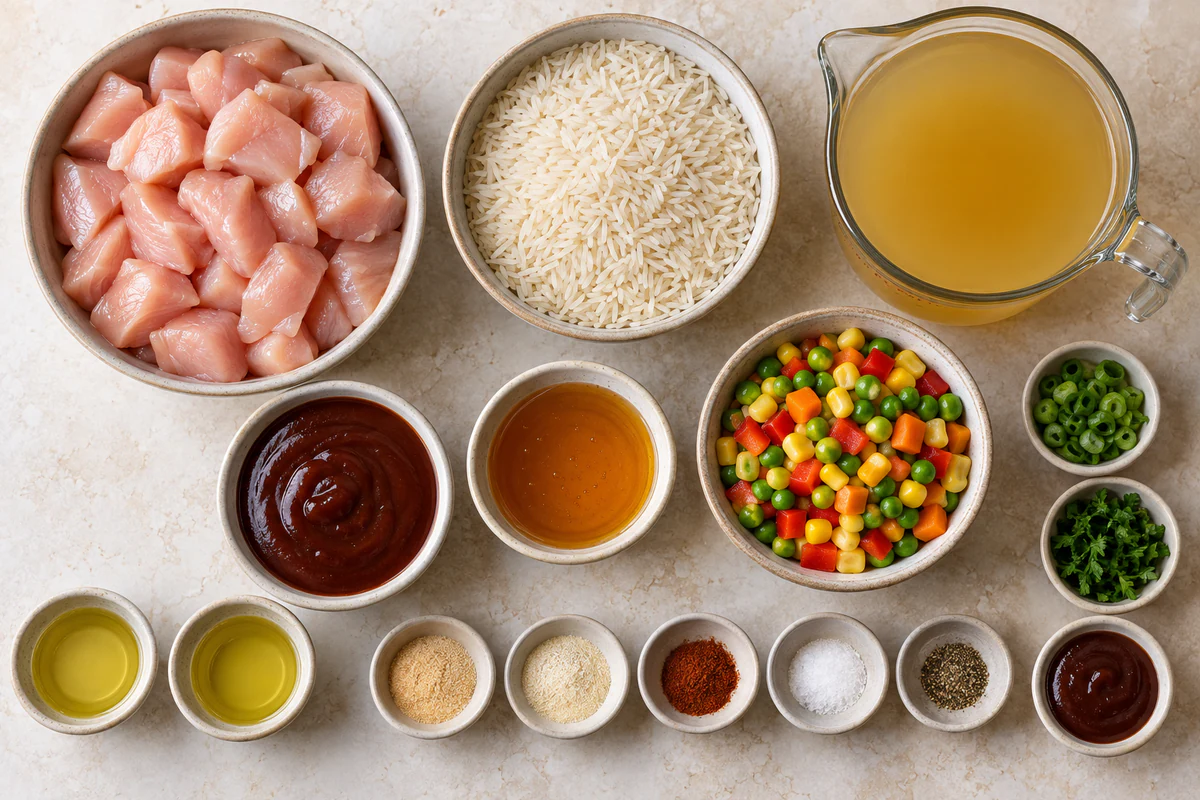
Main Ingredients: 1 pound boneless, skinless chicken thighs or breasts, cut into bite-sized pieces; 1 cup long-grain white rice, rinsed and drained; 2 cups chicken broth, preferably low-sodium; 1/2 cup BBQ sauce (mesquite flavor recommended for extra smokiness); 1/4 cup honey; 1 cup mixed vegetables (frozen or fresh - peas, carrots, corn, and bell peppers work well); 2 tablespoons vegetable or olive oil, divided.
Seasonings: 1 teaspoon garlic powder; 1 teaspoon onion powder; 1/2 teaspoon smoked paprika; 1/2 teaspoon salt, or to taste; 1/4 teaspoon black pepper, or to taste.
Garnish (Optional): 2-3 green onions, thinly sliced; 2 tablespoons fresh parsley, chopped; Extra drizzle of BBQ sauce.
If you enjoy this recipe, you may also like Honey BBQ Chicken + Garlic Parmesan Potatoes.
Plan the Work Before Cooking
Measure every ingredient and prepare these tools: Large skillet or Dutch oven with lid; Measuring cups and spoons; Fine-mesh strainer (for rinsing rice); Sharp knife and cutting board; Instant-read thermometer (recommended); Wooden spoon or spatula. Arrange each recipe group in method order. Keep raw chicken or beef and their utensils away from cooked food, and reserve clean serving tools. This setup protects short timing windows and lets you watch browning, bubbling, doneness, or melting instead of searching for an item. Keep the exact source quantities because their ratios determine seasoning, structure, and yield.
For storage details after serving, the USDA leftovers and food safety guidance.
How to Make Honey BBQ Chicken & Rice
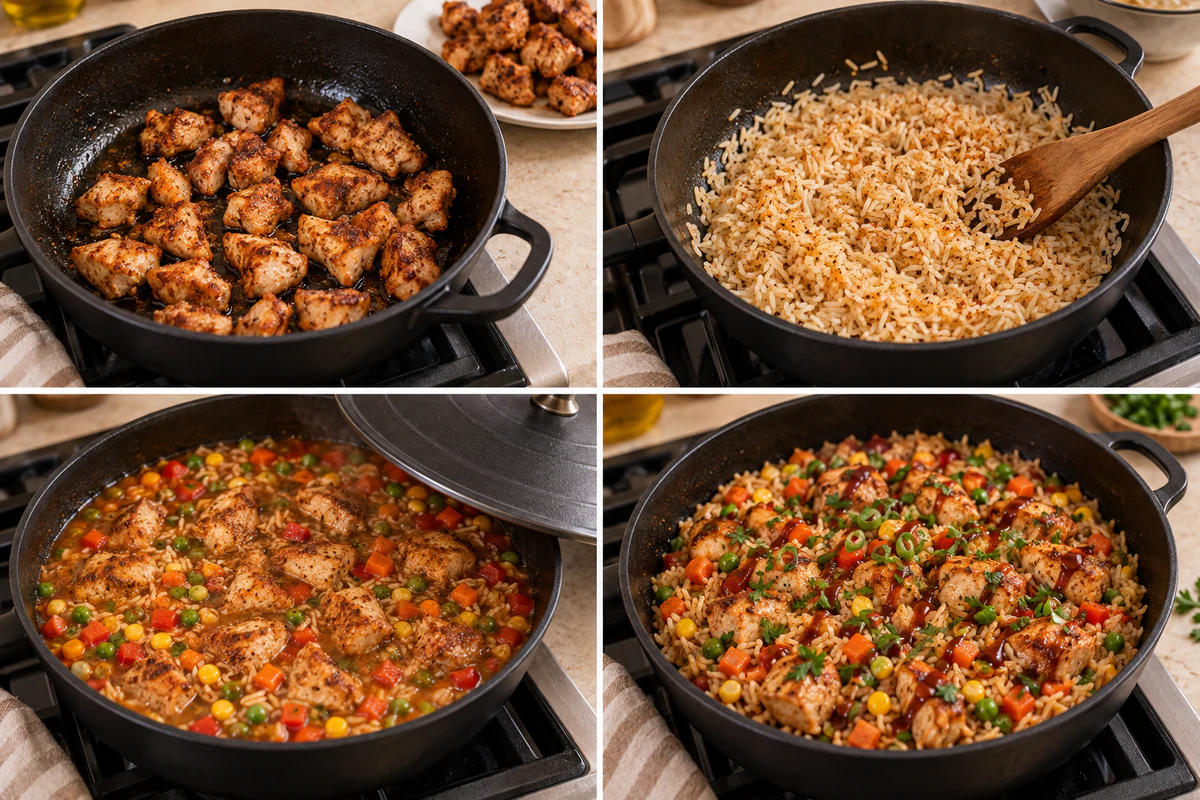
- Prepare the ingredients: If using chicken breasts, cut them into 1-inch cubes or bite-sized pieces (chicken thighs can be left a bit larger). Mix all the seasonings (garlic powder, onion powder, smoked paprika, salt, and pepper) in a small bowl. Rinse the rice in a fine-mesh strainer until the water runs clear, then drain well. Have all other ingredients measured and ready to go.
- Season and sear the chicken: Heat 1 tablespoon of oil in a large skillet or Dutch oven over medium-high heat. Sprinkle half of the seasoning mixture over the chicken pieces. Once the oil is hot, add the chicken to the pan in a single layer, being careful not to overcrowd (work in batches if needed). Sear for 3-4 minutes per side until golden brown but not necessarily cooked through. Transfer the chicken to a plate and set aside.
- Toast the rice: In the same pan, add the remaining 1 tablespoon of oil. Add the rinsed and drained rice to the pan along with the remaining seasoning mixture. Stir constantly and cook for 1-2 minutes until the rice becomes slightly translucent around the edges and smells toasty. This step adds depth of flavor to the final dish.
- Add liquids and sauce: Carefully pour in the chicken broth (it may splatter), BBQ sauce, and honey. Stir well to combine, making sure to scrape up any browned bits from the bottom of the pan - these contain tons of flavor! Bring the mixture to a gentle boil, then reduce the heat to low.
- Return chicken and simmer: Add the seared chicken back to the pan, nestling the pieces into the rice mixture. Cover the skillet with a tight-fitting lid and simmer on low heat for 15 minutes. Resist the urge to lift the lid or stir, as this will release steam and affect the cooking of the rice.
- Add vegetables: After 15 minutes, quickly add the mixed vegetables on top of the rice and chicken, spreading them evenly. Cover again immediately and continue cooking for another 5 minutes, or until the rice is tender, the vegetables are heated through, and the chicken reaches an internal temperature of 165°F (74°C).
- Rest and fluff: Remove the pan from the heat and let it sit, covered, for 5 minutes. This resting period allows the rice to absorb any remaining liquid and the flavors to meld together. After resting, uncover and gently fluff the rice with a fork, carefully incorporating the vegetables.
- Garnish and serve: Sprinkle the sliced green onions and/or chopped parsley over the top if using. For extra BBQ flavor, drizzle a small amount of additional BBQ sauce over the dish just before serving. Serve hot, directly from the skillet for a rustic presentation or transfer to a serving dish.
If you enjoy this recipe, you may also like Creamy Chicken Pesto Pasta.
Why the Order Matters
The sequence uses the same pan to build flavor without sacrificing texture. Half the seasoning coats the chicken before searing, while the rest seasons the rice as it toasts. Moving the browned chicken to a plate prevents it from overcooking while the rice receives its brief toast. Broth loosens the browned bits, and barbecue sauce plus honey flavor the cooking liquid rather than sitting only on the surface. The covered low simmer supplies the steam long-grain rice needs. Mixed vegetables go in after fifteen minutes so they heat through without spending the whole cooking time in the liquid.
Critical Visual and Timing Cues
Rinse one cup of rice until the water runs clear, drain it well, and keep the chicken pieces close to the recorded bite-size or one-inch dimensions. Sear in a single layer for three to four minutes per side, working in batches rather than crowding. The rice should look slightly translucent at the edges after one to two minutes of constant stirring. Once the liquids reach a gentle boil, lower the heat and keep the lid closed for fifteen minutes. Add one cup mixed vegetables quickly, cover for five more minutes, and confirm the chicken reaches 165°F or 74°C before resting covered another five minutes.
Serving and Storage
Fluff the rested rice gently so the vegetables distribute without crushing the grains. Add only the recorded optional green onions, parsley, or extra barbecue-sauce drizzle at serving time. A heavy-bottomed skillet or Dutch oven helps keep the honeyed sauce from catching while the rice cooks. Cool leftovers promptly and refrigerate them in an airtight container for up to four days as the source permits. Add a small splash of water or broth before reheating covered, and heat the chicken and rice thoroughly. Individual cooled portions may also be frozen for up to three months, though the vegetables can soften after thawing.
Food Safety and Allergen Note
The recorded allergen information is: Check BBQ sauce ingredients for potential allergens; May contain soy, gluten, or other allergens depending on BBQ sauce used. Check packaged ingredients when cooking for someone with an allergy because brands and facilities vary. Refrigerate perishables promptly, prevent cross-contamination, and use every explicit internal-temperature or doneness test in the source method. These precautions support the recipe without changing its quantities, temperatures, timing, or sequence.

Conclusion
Honey BBQ Chicken & Rice makes 4 servings in 40 minutes of recorded preparation and cooking, plus any separately stated marinating or resting time. Follow the exact ingredient list and ordered method for the intended texture and doneness.
Frequently Asked Questions
- → How many servings does Honey BBQ Chicken & Rice make?
It serves 4 and makes 4 servings.
- → How long does Honey BBQ Chicken & Rice take?
The recipe records 10 minutes of preparation, 30 minutes of cooking, and 40 minutes total, plus any separately stated marinating or resting time.
- → What equipment should be ready?
Prepare Large skillet or Dutch oven with lid; Measuring cups and spoons; Fine-mesh strainer (for rinsing rice); Sharp knife and cutting board; Instant-read thermometer (recommended); Wooden spoon or spatula before starting.
- → Can I change the recorded method?
For the verified result, keep the listed quantities, temperatures, timing, and ordered instructions exactly as written. Use only optional variations explicitly recorded in the recipe tips.