


Honey Butter Fried Chicken uses a three-stage flour and sparkling-water coating, a double fry, and a warm butter-honey-soy glaze to produce crisp, craggy tenders. One pound of chicken makes about 8–10 pieces and serves 3. The recipe records 80 minutes total: 60 minutes of preparation and 20 minutes of cooking, including at least a 30-minute marinade, a 10-minute coated rest, and two separate frying passes.
This guide preserves every recorded ingredient, quantity, temperature, time, and method step. Read the full sequence once before beginning.
Honey Butter Fried Chicken Ingredients
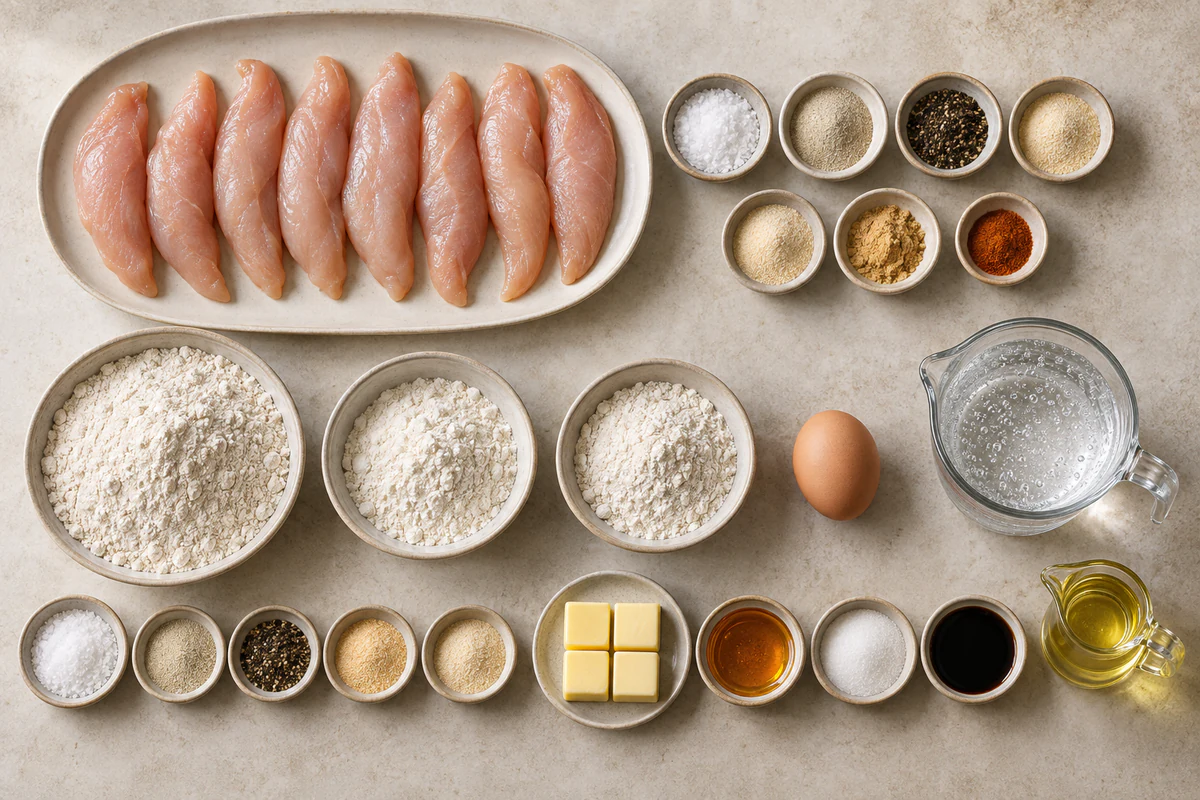
For the Chicken Marinade: 1 pound chicken tenders (about 8-10 pieces); 1 teaspoon kosher salt; ½ teaspoon white pepper; ½ teaspoon black pepper; ½ teaspoon garlic powder; ½ teaspoon onion powder; ½ teaspoon ginger powder; ¼ teaspoon cayenne pepper (adjust to your spice preference).
For the Seasoned Flour: 2 cups all-purpose flour; 1 tablespoon kosher salt; 1 tablespoon white pepper; 1 teaspoon black pepper; 1 teaspoon garlic powder; 1 teaspoon onion powder.
For the Wet Batter: ½ cup all-purpose flour; 1 large egg; 1 cup ice-cold sparkling water (soda water works great).
For the Honey Butter Sauce: 4 tablespoons unsalted butter; 2 tablespoons honey (local if possible for best flavor); 2 tablespoons granulated sugar; 2 tablespoons soy sauce.
Additional Items: 1 cup all-purpose flour (for initial dusting); Neutral oil for frying (vegetable, canola, or peanut oil).
If you enjoy this recipe, you may also like Crock Pot Chicken and Rice Burrito Bowl.
Plan the Work Before Cooking
Measure every ingredient and prepare these tools: Heavy-bottomed pot or Dutch oven for frying; Cooking thermometer (for monitoring oil temperature); Three mixing bowls for dredging stations; Wire rack and baking sheet; Tongs for handling the chicken safely; Small saucepan for the honey butter sauce. Arrange each recipe group in method order. Keep raw chicken or beef and their utensils away from cooked food, and reserve clean serving tools. This setup protects short timing windows and lets you watch browning, bubbling, doneness, or melting instead of searching for an item. Keep the exact source quantities because their ratios determine seasoning, structure, and yield.
For storage details after serving, the USDA leftovers and food safety guidance.
How to Make Honey Butter Fried Chicken
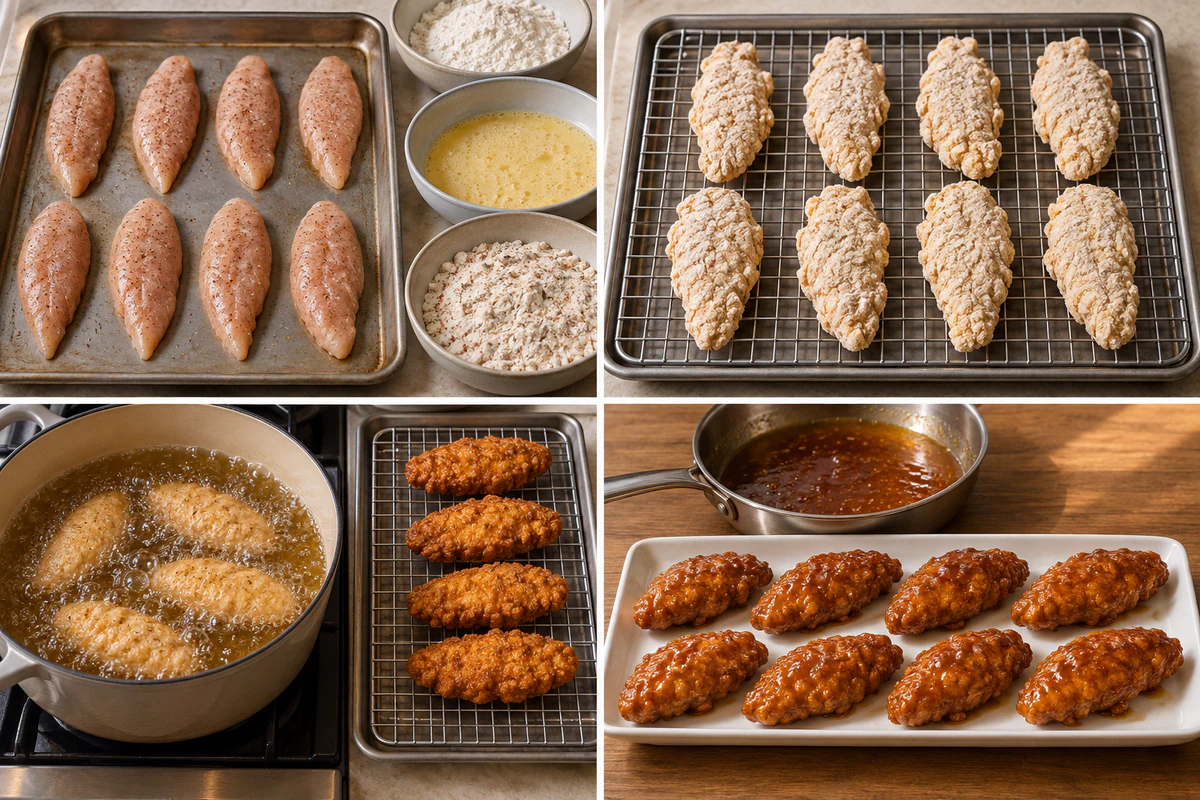
- Season the chicken: In a medium bowl, toss the chicken tenders with kosher salt, white pepper, black pepper, garlic powder, onion powder, ginger powder, and cayenne pepper. Mix thoroughly with your hands to ensure each tender is well coated. Let them marinate for at least 30 minutes in the refrigerator, or up to overnight for maximum flavor.
- Prepare the dredging stations: Set up your dredging stations in a row: First, a bowl with 1 cup of plain all-purpose flour. Second, make your wet batter by whisking together ½ cup flour, the egg, and ice-cold sparkling water until smooth. Third, in a large bowl, combine the 2 cups of flour with kosher salt, white pepper, black pepper, garlic powder, and onion powder for your seasoned flour mixture.
- Create texture in the seasoned flour: Add 1 tablespoon of the sparkling water to your seasoned flour mixture. Use your fingers to rub the water into the flour, creating small clumps. These little clumps will stick to the chicken and create extra crispy, craggy bits when fried – the secret to incredible fried chicken texture!
- Coat the chicken: Take a chicken tender and first dust it in the plain flour, shaking off any excess. Next, dip it into the wet batter, making sure it's fully coated, and allow any excess batter to drip off. Finally, place it in the seasoned flour and press firmly, really packing on the flour mixture until completely coated. Set aside on a tray and repeat with all tenders.
- Rest before frying: Let the coated chicken tenders rest on the tray for about 10 minutes while you heat your oil. This resting period helps the coating adhere better to the chicken during frying.
- First fry: Fill a heavy-bottomed pot or Dutch oven with about 2 inches of neutral oil and heat to 350°F (use a thermometer for accuracy). Working in small batches to avoid overcrowding, gently lower 3-4 tenders into the hot oil. Fry for 4-5 minutes until lightly golden, turning occasionally. Remove and place on a wire rack set over a baking sheet.
- Second fry for extra crispiness: Once all tenders have had their first fry, bring the oil back to 350°F. Re-fry each tender for an additional 1-2 minutes until they reach a deeper golden color and become extra crispy. Transfer back to the wire rack and immediately sprinkle with a little salt while hot.
- Make the honey butter sauce: In a saucepan over medium heat, melt the butter. Once melted, add the honey, sugar, and soy sauce. Stir continuously until the sugar has completely dissolved and the sauce begins to bubble slightly. Cook for another 1-2 minutes until the sauce thickens enough to coat the back of a spoon.
- Coat the chicken: You can either brush the honey butter sauce over the fried chicken tenders or toss them directly in the sauce. If tossing, do it quickly to maintain as much crispiness as possible. For best results, serve immediately while still warm and ultra-crispy.
If you enjoy this recipe, you may also like Chicken Fried Steak w/ Country Gravy.
Why the Order Matters
The seven-seasoning marinade flavors the chicken before coating. Plain flour creates the first dry grip, cold egg-and-sparkling-water batter adds a light wet layer, and heavily seasoned flour builds the crust. Rubbing one tablespoon sparkling water into that last flour creates the small clumps responsible for craggy edges. A 10-minute rest helps the coating adhere. The first fry cooks and lightly colors the tenders, while the short second fry deepens crispness after the oil returns to 350°F. Applying the sauce quickly at the end balances coverage against the steam that can soften fried coating.
Critical Visual and Timing Cues
Marinate the eight to ten tenders at least 30 minutes. Keep the three stations in exact order: one cup plain flour; batter of one-half cup flour, one large egg, and one cup ice-cold sparkling water; then two cups flour with its recorded seasonings. Fry only three or four tenders at a time in about two inches neutral oil at 350°F for four to five minutes. Return the oil to 350°F and fry each tender again for one to two minutes. Melt four tablespoons butter with two tablespoons each honey, sugar, and soy sauce until the glaze coats a spoon.
Serving and Storage
Brush the glaze over the fried tenders or toss them very quickly, then serve immediately while warm and crisp. A light salt sprinkle belongs on the chicken after the second fry and before glazing as recorded. Use a thermometer, a heavy pot with ample headroom, and tongs around the hot oil; allow discarded oil to cool safely. Refrigerate leftovers promptly. Reheat them in an oven or air fryer until hot, then add any reserved glaze afterward if available. The recipe contains gluten, egg, dairy, and soy, so verify every flour, butter, and soy-sauce label for guests with allergies.
Food Safety and Allergen Note
The recorded allergen information is: Contains gluten (flour); Contains eggs; Contains dairy (butter); Contains soy (soy sauce). Check packaged ingredients when cooking for someone with an allergy because brands and facilities vary. Refrigerate perishables promptly, prevent cross-contamination, and use every explicit internal-temperature or doneness test in the source method. These precautions support the recipe without changing its quantities, temperatures, timing, or sequence.

Conclusion
Honey Butter Fried Chicken makes 3 servings in 80 minutes of recorded preparation and cooking, plus any separately stated marinating or resting time. Follow the exact ingredient list and ordered method for the intended texture and doneness.
Frequently Asked Questions
- → How many servings does Honey Butter Fried Chicken make?
It serves 3 and makes 3 servings.
- → How long does Honey Butter Fried Chicken take?
The recipe records 60 minutes of preparation, 20 minutes of cooking, and 80 minutes total, plus any separately stated marinating or resting time.
- → What equipment should be ready?
Prepare Heavy-bottomed pot or Dutch oven for frying; Cooking thermometer (for monitoring oil temperature); Three mixing bowls for dredging stations; Wire rack and baking sheet; Tongs for handling the chicken safely; Small saucepan for the honey butter sauce before starting.
- → Can I change the recorded method?
For the verified result, keep the listed quantities, temperatures, timing, and ordered instructions exactly as written. Use only optional variations explicitly recorded in the recipe tips.