


One-pot chicken and rice cooks crisp-skinned chicken thighs over tomato, paprika, and garlic-scented rice in an oven-safe skillet. Green olives and peas go in after baking, while lemon and parsley brighten the finished rice. The result is a full dinner with one cooking vessel and clearly layered flavors.
Two details protect the texture: thoroughly dry the chicken before searing, and keep the skillet covered while the rice bakes. Dry skin browns instead of steaming, and trapped moisture gives every grain enough liquid to become tender.
Ingredients for One-Pot Chicken and Rice
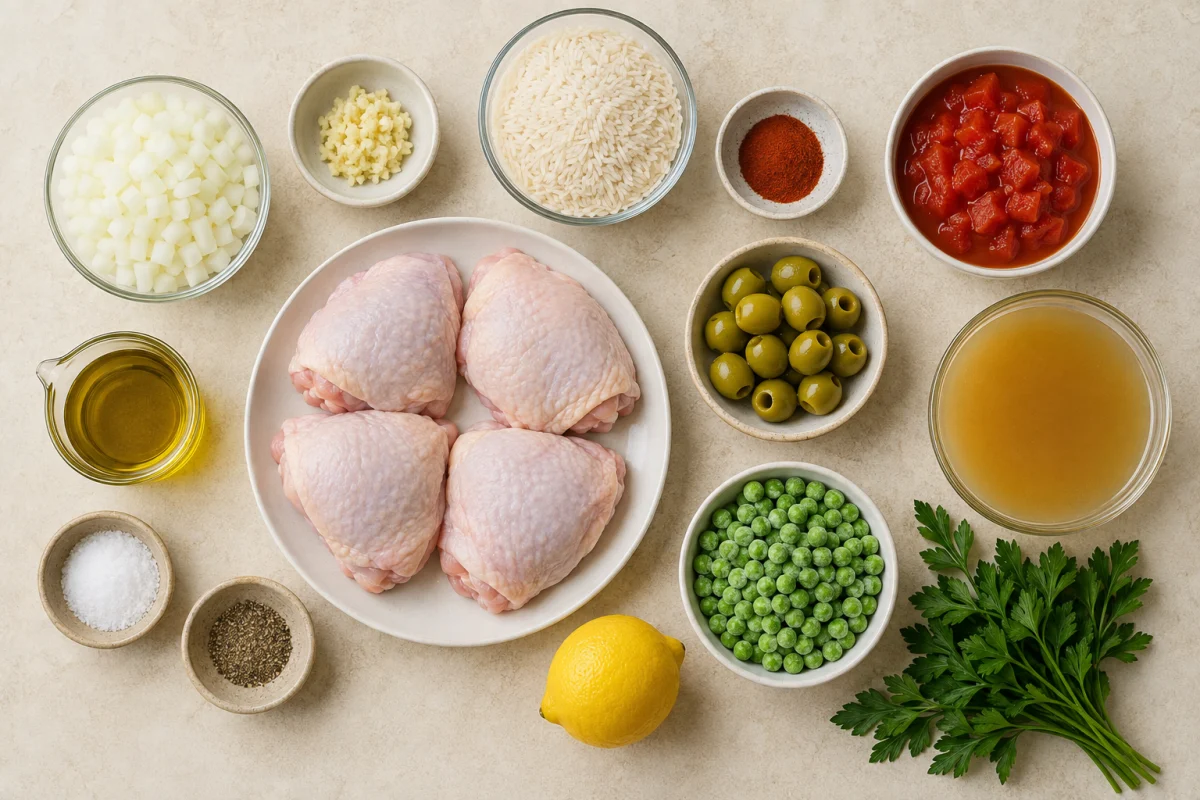
For the chicken, use four bone-in chicken thighs, 2 tablespoons olive oil, salt, and black pepper. The rice base needs one chopped yellow onion, three minced garlic cloves, 1 cup long-grain white rice, 1 teaspoon smoked paprika, one 14.5-ounce can diced tomatoes, and 1 1/2 cups chicken stock.
Finish with 1 cup pitted Castelvetrano olives, 1 cup thawed frozen peas, the juice of one lemon, and 2 tablespoons minced fresh parsley. Bone-in, skin-on thighs suit the 40-minute bake better than lean boneless breasts.
If you enjoy this recipe, you may also like Slow Cooker Pot Roast with Goat Cheese Mashed Potatoes.
How to Make One-Pot Chicken and Rice
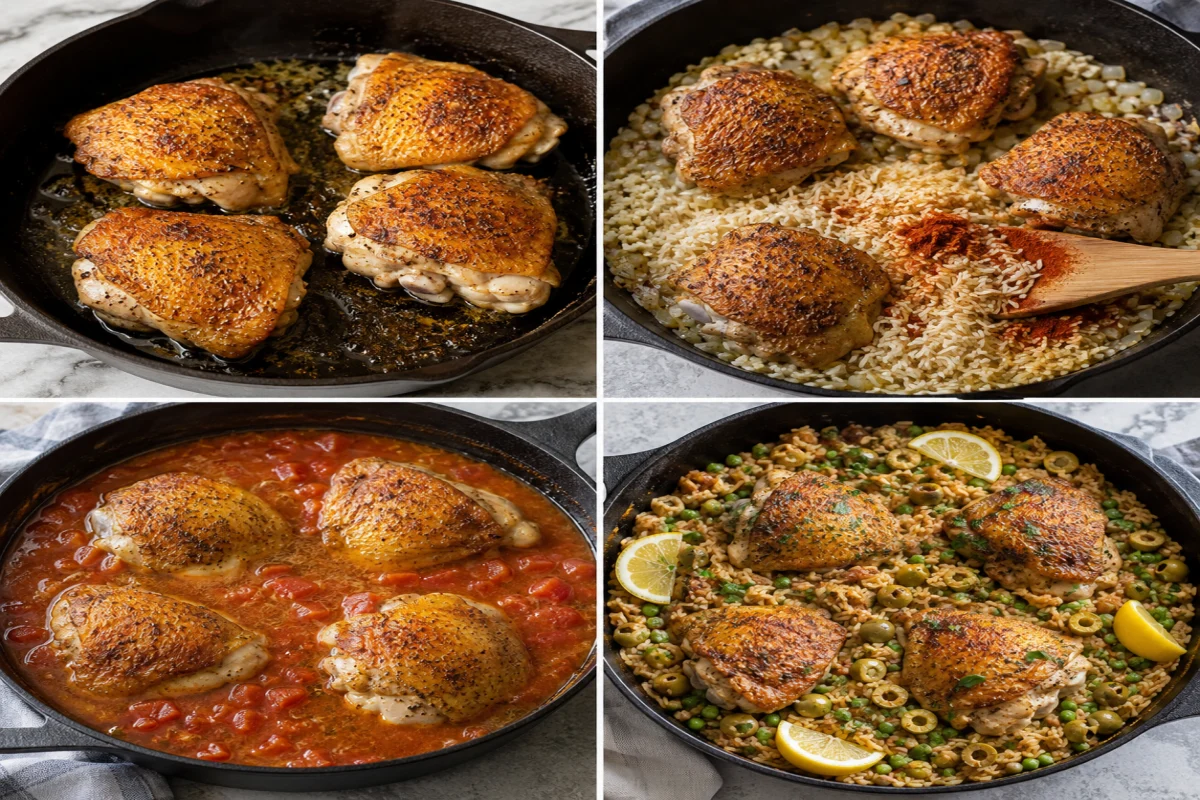
- Preheat. Heat the oven to 350°F and position a rack near the center.
- Dry and season. Pat the chicken thighs completely dry, then season both sides with salt and pepper.
- Sear. Heat the olive oil in a large oven-safe skillet over medium-high. Place the thighs skin-side down and cook undisturbed for five to eight minutes, until deep golden. Turn them.
- Add aromatics. Scatter onion and garlic around the chicken and cook for another five minutes.
- Build the rice base. Stir in long-grain rice, smoked paprika, diced tomatoes with their juice, and chicken stock, distributing the rice evenly around the thighs.
- Cover and bake. Seal with a lid or foil and bake for 40 minutes.
- Finish. Stir olives and thawed peas into the rice and warm over low heat for three to five minutes. Remove the chicken, then add lemon juice and parsley to the rice before serving.
For storage details after serving, the USDA leftovers and food safety guidance.
Choose Bone-In Chicken Thighs
Bone-in thighs stay juicy during the time required for the rice to absorb stock. Their rendered fat also seasons the grains. Skin-on pieces provide a crisp surface and a rich base for sautéing the onion.
Select thighs of similar size so they finish together. If they vary greatly, check the smallest early. Chicken should reach at least 165°F in the thickest part without the thermometer touching bone.
If you enjoy this recipe, you may also like Crock Pot Chicken Parmesan Soup.
Dry the Skin Before Searing
Moisture on chicken turns to steam when it meets the pan. Blot the skin and underside thoroughly with paper towel, then season just before cooking. Preheat the skillet and oil so the meat sizzles immediately.
Set the thighs skin-side down and resist moving them. Properly browned skin releases more easily from the pan. If a piece sticks firmly, give it another minute rather than tearing the surface with tongs.
Soften Onion and Garlic in the Pan
After turning the chicken, add the chopped onion around the pieces where it can contact the rendered fat. Stir the onion and garlic without scraping the browned skin. Five minutes begins softening the aromatics before the liquid enters.
Keep garlic moving so it does not burn against the hot metal. If the pan looks extremely dark or dry, reduce the heat. Golden browned bits add depth, but black garlic would make the rice bitter.
Coat the Long-Grain Rice
Stir the dry rice through the onion and oil before adding the full liquid. Coating the grains distributes the smoked paprika and gives the finished rice a more separate texture. Make sure no large mound remains under one piece of chicken.
Use long-grain white rice for the stated stock amount and cooking time. Brown rice requires more liquid and a longer bake; quick-cooking rice can become soft before the chicken is ready.
Add Tomatoes and Stock
Pour in the diced tomatoes with their juices and 1 1/2 cups chicken stock. Stir around the thighs until the rice forms an even layer. Keep the chicken skin above the liquid as much as possible so it retains its browned surface.
Bring the liquid close to a simmer on the stove if the skillet has cooled significantly. A hot start helps the covered oven stage remain predictable and reduces the chance of firm rice in the center.
Cover Tightly for the Oven
A lid traps steam, which cooks the upper layer of rice as the lower layer absorbs stock. If using foil, crimp it firmly around the rim and avoid gaps near the handle. Do not open the skillet repeatedly during the 40-minute bake.
At the end, the rice should be tender and most liquid absorbed. If grains remain firm, add 1/4 cup hot stock, reseal the pan, and cook several minutes longer before adding olives and peas.
Add Olives and Peas at the End
Castelvetrano olives are mild, buttery, and less sharp than many dark olives. Stir them into the rice after baking so their flavor stays distinct. Thawed peas also need only a few minutes over low heat to warm through.
Adding peas earlier makes them dull and soft. Fold both ingredients carefully around the chicken, or move the thighs temporarily to a plate. Return them to the skillet for presentation if desired.

Finish With Lemon and Parsley
Remove the chicken before stirring lemon juice and parsley through the rice. This prevents the crisp skin from being splashed and lets the seasonings distribute evenly. Add part of the lemon first, taste, and continue until the rice feels bright rather than sour.
Serve each thigh beside or over a generous spoonful of rice. A simple green salad is enough on the side because the skillet already contains protein, starch, peas, tomatoes, and olives.
Storage and Reheating
Cool leftovers promptly and refrigerate in sealed containers for up to three days. Store chicken above the rice or separately so the skin does not sit in moisture. Rice should not remain at room temperature for extended periods.
Reheat covered with a tablespoon of stock or water until steaming hot. An oven or air fryer can restore some crispness to the chicken skin; warm the rice separately to avoid drying the meat.
Conclusion
Dry and sear four bone-in chicken thighs skin-side down, soften onion and garlic in the same oven-safe skillet, then add long-grain rice, paprika, tomatoes, and stock. Cover tightly and bake for 40 minutes before folding in olives, peas, lemon, and parsley.
Frequently Asked Questions
- → Can I use boneless chicken breasts?
They are not ideal for this timing because they can dry out before the rice finishes. Bone-in thighs remain juicier during the covered bake.
- → Why is my rice still firm?
The lid may not have sealed tightly or the skillet may have needed more liquid. Add 1/4 cup hot stock, cover, and cook several minutes longer.
- → Can I use a different green olive?
Yes. Choose a mild pitted green olive and taste for salt before adding more seasoning to the rice.
- → How long do chicken and rice leftovers keep?
Refrigerate promptly and use within three days. Reheat until both chicken and rice are steaming hot.