
 Pin it
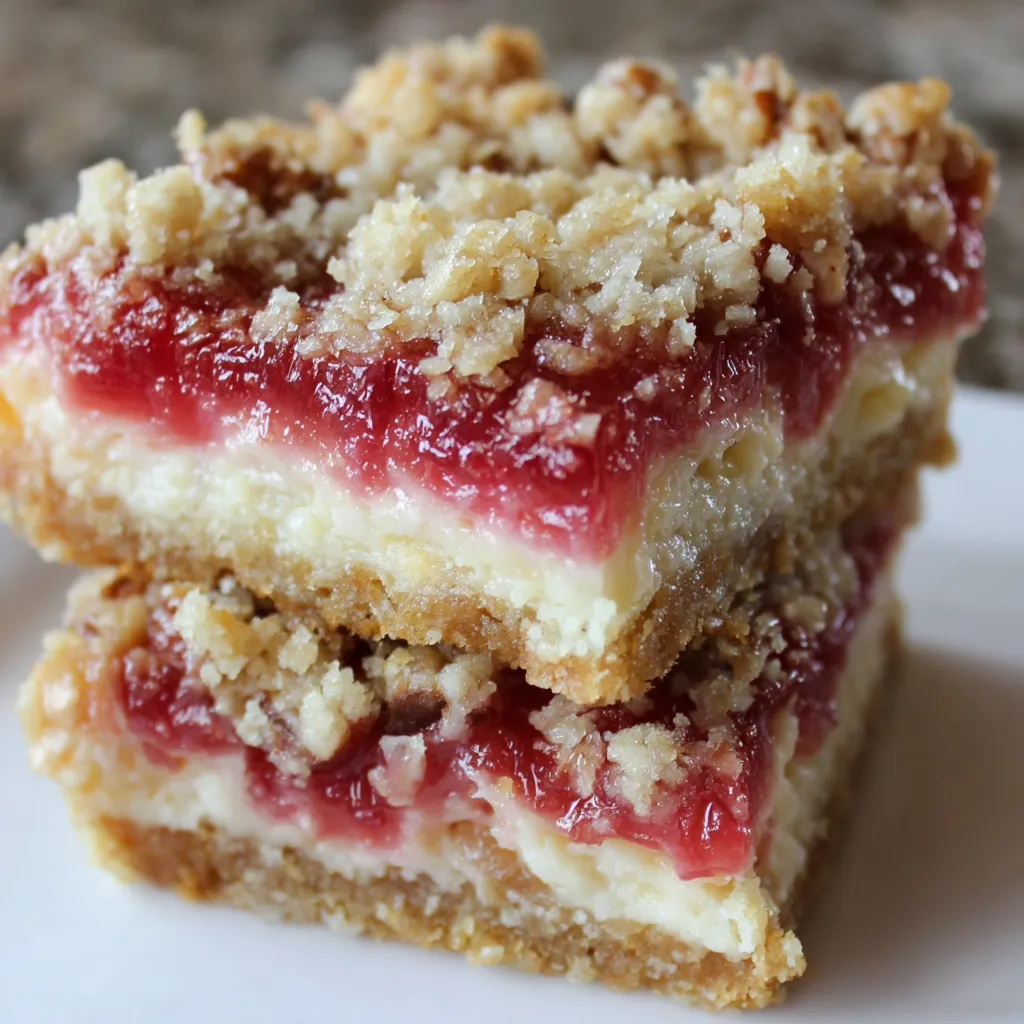
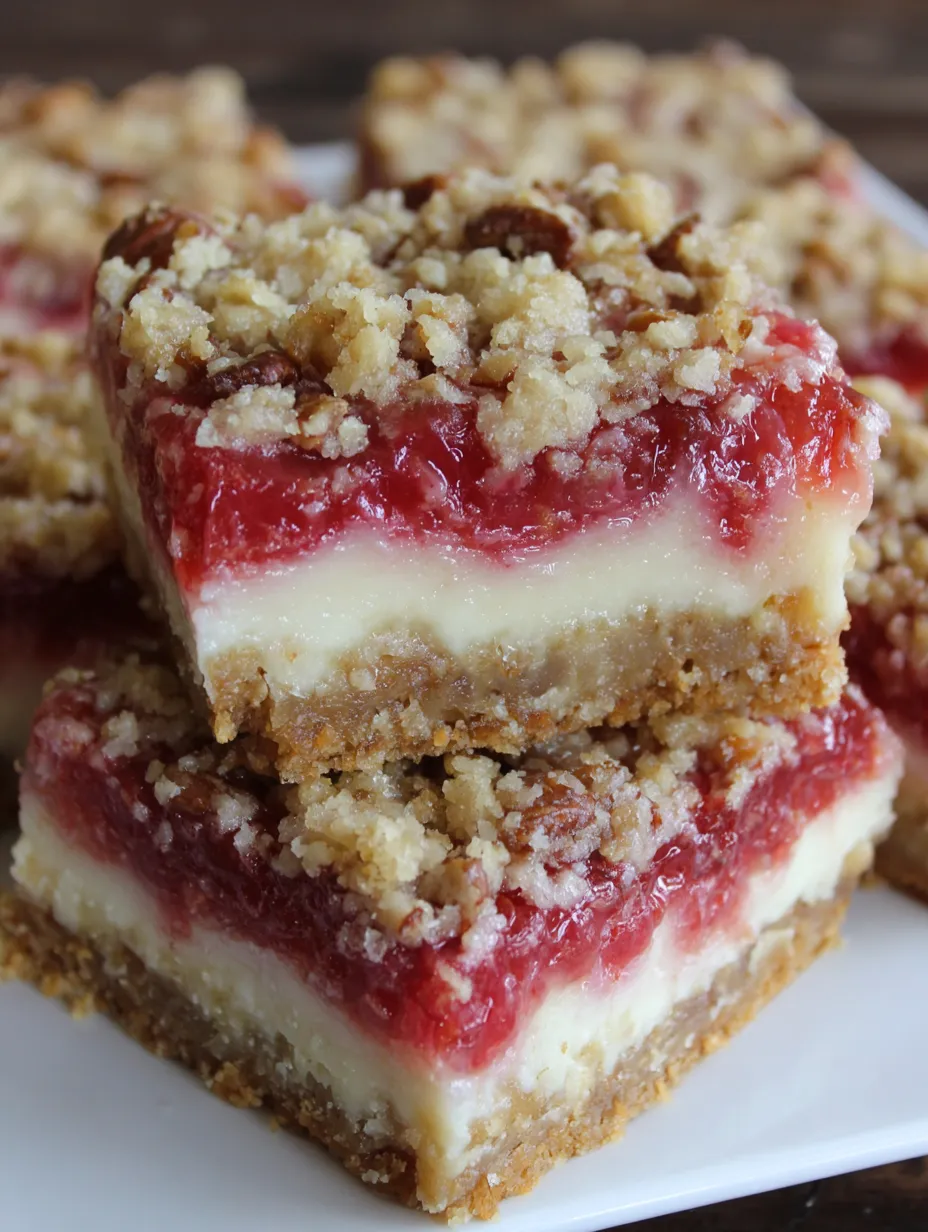
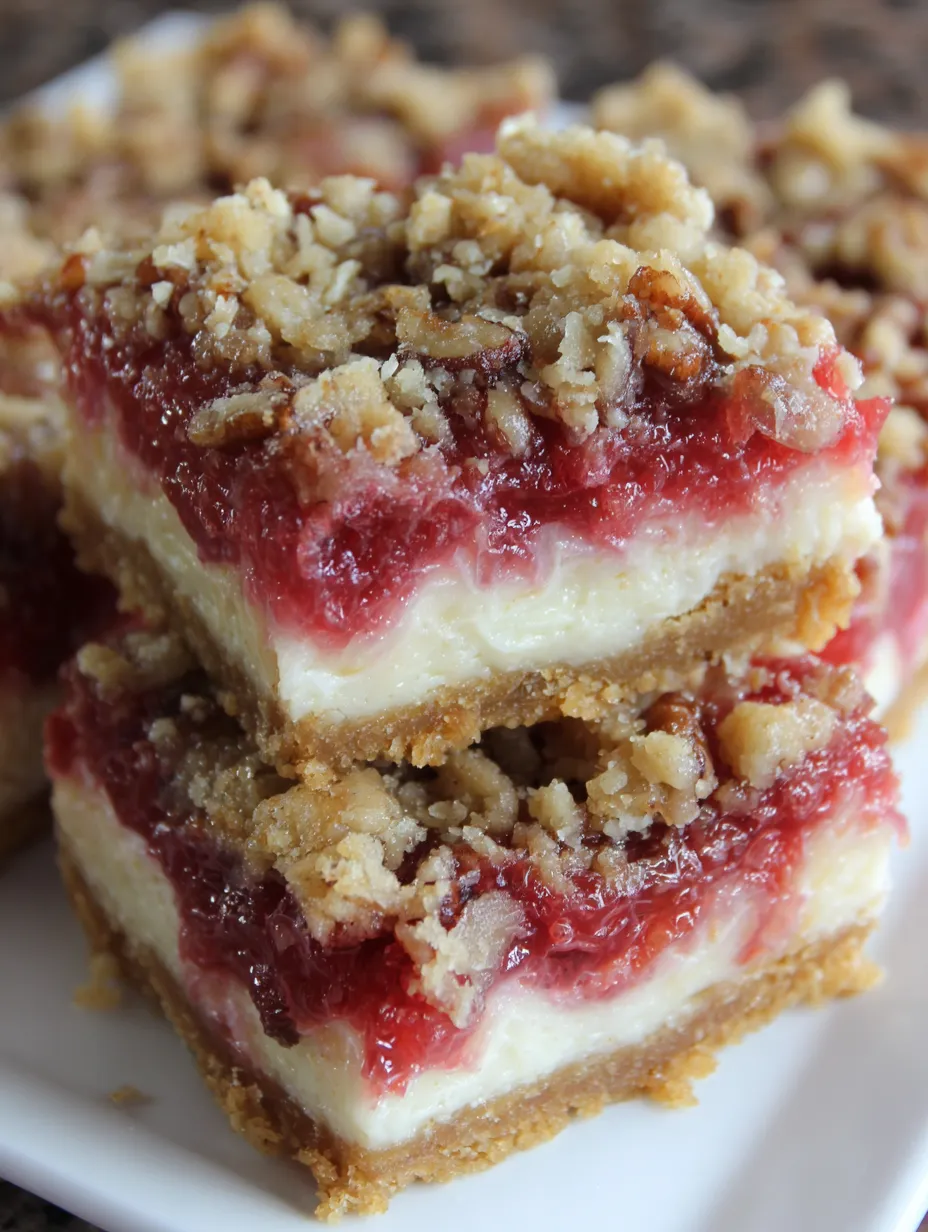
These rhubarb cheesecake bars solve my biggest summer baking dilemma every single year when my backyard rhubarb plant produces more stalks than I know what to do with. I created this recipe after years of making plain rhubarb crisp and wanting something more exciting that would really showcase that gorgeous pink rhubarb color while adding creamy richness to balance the tartness. The combination of buttery oat crumble on top and bottom, silky cream cheese layer, and that vibrant sweet-tart rhubarb filling creates these stunning layered bars that look bakery-professional but come together with simple ingredients you probably already have. Every time I bring these to a gathering, people who claim they don't like rhubarb end up going back for seconds because the cheesecake layer mellows that intense tartness into something magical.
My neighbor Susan grows rhubarb along her back fence and brings me armfuls of it every June because her family won't eat it. The first time I made these bars and brought some over to thank her, she called me that same evening asking for the recipe because her husband ate three pieces and declared them the best rhubarb dessert he'd ever tasted. Now she specifically grows extra rhubarb just so I'll make these bars, and I've become the unofficial neighborhood rhubarb baker. Her grandson told his mom he wants these instead of birthday cake next year, which I think is the ultimate compliment!
What You're Working With
- Old-fashioned rolled oats: These create that hearty, rustic texture in both the crust and crumble topping that makes these bars feel substantial rather than delicate. Quick oats won't work here because they're too finely cut and will turn mushy instead of maintaining that pleasant chewy texture. The oats also add a wholesome, slightly nutty flavor that complements the buttery brown sugar beautifully.
- Brown sugar: Provides deep caramel notes with its molasses content that white sugar simply can't replicate. The moisture in brown sugar also helps create that perfect crumbly texture in the crust and topping. Light or dark brown sugar both work, though dark will give you slightly more intense molasses flavor.
- Chopped pecans: Add buttery richness and sophisticated crunch to the crumble layers. Pecans are naturally sweet and pair beautifully with rhubarb's tartness. You can substitute walnuts if that's what you have, though pecans have a milder, more buttery flavor that I prefer in this particular recipe.
- Cream cheese: Your foundation for that rich, tangy cheesecake layer that provides creamy contrast to the crunchy crust and jammy fruit. It must be fully softened to room temperature or you'll end up with lumps that no amount of beating will smooth out. I leave mine on the counter for at least two hours before starting.
- Fresh rhubarb: The star ingredient that brings that distinctive sweet-tart flavor and gorgeous pink color. Look for firm stalks that are mostly red or pink because they'll give you the prettiest filling. Trim off any leaves because they're toxic, and use only the stalks. If your rhubarb is very green, the filling will be less vibrant but will taste just as delicious.
- Cornstarch: Thickens the rhubarb filling into that perfect jammy consistency that spreads smoothly and holds its shape when you cut the bars. Without cornstarch, the rhubarb would be too watery and would make the crust soggy. This small amount creates the ideal texture that's thick enough to stay put but not gluey.
- Vanilla extract: Enhances all the other flavors and adds warmth to the cream cheese layer. Pure vanilla extract makes a noticeable difference in the final flavor compared to imitation, though either will work if that's what you have available.
- Melted butter: Binds the crust and crumble mixture together while adding rich flavor throughout. The butter needs to be fully melted but not hot, or it will start cooking the other ingredients when you mix them together. I melt mine and let it cool for about five minutes before using.
 Pin it
Building Perfect Layers
- Preparing your foundation:
- Turn your oven to 350 degrees and let it preheat completely while you prepare your pan. Take out a 9x13 inch baking pan and spray it thoroughly with nonstick cooking spray, making sure to get into all the corners and edges where bars tend to stick. Set this prepared pan aside on your counter where you can easily reach it. Gather all your ingredients and measuring cups because this recipe moves quickly once you start assembling, and you want everything ready to go.
- Creating the crumble:
- Measure your flour and dump it into a large mixing bowl. Add the old-fashioned rolled oats, brown sugar, and chopped pecans right on top. Pour the melted butter over everything in a steady stream. Use a fork to mix everything together, working the butter through all the dry ingredients until the mixture resembles coarse, damp sand with some larger clumps forming. You want it to look crumbly but hold together when you squeeze a handful. Continue mixing until you don't see any dry flour pockets remaining and the mixture is evenly moistened throughout. Scoop out exactly one and a half cups of this mixture and put it in a separate small bowl, setting it aside on your counter for the topping later. This reserved portion is crucial, so measure it carefully rather than just eyeballing it.
- Forming the base:
- Take the remaining crumble mixture still in your large bowl and dump it into your prepared 9x13 pan. Use your hands or the bottom of a measuring cup to press the mixture evenly across the entire bottom of the pan, working it into all the corners and edges. Press firmly enough that it compacts into a solid layer that won't fall apart, but don't pack it so hard that it becomes dense and hard. The layer should be uniform thickness across the entire pan with no thin spots or gaps. Slide the pan into your preheated oven and bake for exactly ten minutes until the crust just starts to set and turn slightly golden around the edges. Remove it from the oven and set it on a cooling rack, letting it cool for about five minutes while you prepare the cheesecake layer. Don't skip this partial baking because it prevents the bottom crust from getting soggy when you add the wet layers on top.
- Making the cheesecake:
- Place your softened cream cheese in a medium mixing bowl and beat it with an electric mixer on medium speed for about a minute until it becomes smooth and fluffy with no lumps remaining. Add the sugar and continue beating for another minute until the mixture is light and creamy. Crack the egg into the bowl and add the vanilla extract, then beat everything together just until the egg completely incorporates into the cream cheese mixture and you have a smooth, pale yellow batter. Don't overbeat once you add the egg because too much air will cause cracks later. Scrape down the sides of the bowl with a rubber spatula to make sure everything is evenly mixed.
- Spreading the cheesecake:
- Pour the cream cheese mixture over your slightly cooled crust, using a rubber spatula or offset spatula to spread it evenly across the entire surface. Work carefully to create an even layer that reaches all the way to the edges and corners of the pan. The layer should be smooth and uniform without any bare spots where the crust shows through. Take your time with this step because an even cheesecake layer ensures your bars will have that beautiful layered appearance when you cut them. Set this aside while you cook the rhubarb filling.
- Cooking the rhubarb:
- Wash your rhubarb stalks thoroughly under cold running water and pat them dry with a towel. Use a sharp knife to trim off any leafy ends and the very bottom of each stalk, then cut the rhubarb into half-inch pieces, working your way down each stalk until you have about three cups of chopped rhubarb. Place the chopped rhubarb in a medium saucepan and add the sugar, cornstarch, and water. Set the pan over medium heat and stir everything together constantly as it heats up. The mixture will look strange and chalky at first from the cornstarch, but keep stirring. After about five minutes, the rhubarb will start releasing its juices and the mixture will become more liquid. Continue cooking and stirring frequently for eight to ten minutes total until the rhubarb breaks down into a thick, jammy sauce that coats the back of your spoon. The color will intensify to this beautiful ruby red as it cooks. If your mixture looks too thick to spread smoothly, add hot water one tablespoon at a time, stirring after each addition, until you reach a thick but spreadable consistency similar to jam. Remove the pan from the heat and let the rhubarb filling cool for about ten minutes, stirring occasionally to release steam and speed up the cooling process.
- Assembling the layers:
- Once your rhubarb filling has cooled enough that it's no longer steaming hot, carefully spoon it over the cream cheese layer in your pan. Use the back of your spoon or a spatula to spread it gently and evenly across the entire surface, being careful not to disturb or mix the cream cheese layer underneath. Work slowly and gently because the rhubarb is still quite warm and can make the cream cheese layer soft if you're too aggressive. Spread the rhubarb all the way to the edges of the pan, creating a smooth, even layer. Take your reserved crumble topping from earlier and sprinkle it evenly over the rhubarb layer, distributing it across the entire surface and creating a nice thick coating that will bake into that gorgeous golden-brown crumble topping. Return the pan to your 350-degree oven and bake for thirty to thirty-five minutes until the crumble topping turns deep golden brown and you can see the edges of the cheesecake layer just starting to puff slightly. The bars will still seem a bit soft in the center when you take them out, but they'll firm up as they cool. Let the pan cool completely on a wire rack at room temperature for at least an hour, then cover it tightly with plastic wrap or aluminum foil and refrigerate for at least four hours or overnight until the cheesecake layer is completely firm and set.
Essential Information
- The bars must chill: The bars must chill thoroughly in the refrigerator for at least four hours before cutting, or the layers will be too soft and won't slice cleanly
- Use a sharp knife: Use a sharp knife dipped in hot water and wiped clean between each cut for the cleanest, most professional-looking slices
- Rhubarb options: Fresh rhubarb works best, but you can use frozen rhubarb if you thaw it completely and drain off excess liquid before cooking
- Watch the topping: The crumble topping should be golden brown but not burnt, so watch it carefully during the last ten minutes of baking
I've learned so many tricks with this recipe over the years of making it dozens of times. My first attempt was a disaster because I didn't let the bars chill long enough before cutting them, and they completely fell apart into this messy pile instead of nice neat squares. Now I always make them the day before I need them so they have plenty of time to set up properly in the refrigerator overnight. I also discovered that pressing the bottom crust really firmly makes a huge difference in preventing sogginess. Another game-changer was learning to cool the rhubarb filling before spreading it, which prevents it from melting the cream cheese layer and creating this weird mixed-up mess.
How to Serve Them
Serve these rhubarb cheesecake bars cold straight from the refrigerator for the best texture and flavor experience. The cold temperature keeps the cheesecake layer firm and sliceable while making the contrast between creamy filling and crunchy topping even more pronounced. Cut them into small squares because they're quite rich, and a little goes a long way. A dollop of freshly whipped cream on top adds extra indulgence and provides a neutral creamy element that lets the rhubarb flavor shine even more. For fancy presentations, dust each bar lightly with powdered sugar right before serving or add a fresh mint leaf as garnish. These pair beautifully with hot coffee or tea for an afternoon treat. At summer gatherings, I arrange them on a white platter where their gorgeous pink rhubarb layer really pops visually and catches everyone's attention.
Making Them Different
Transform these bars by switching up the fruit filling based on what's in season or available in your area. Strawberries mixed with the rhubarb create that classic strawberry-rhubarb combination that tastes like summertime itself. Use about two cups rhubarb and one cup sliced strawberries for the perfect balance. Fresh or frozen blueberries make an incredible variation during late summer when blueberry season overlaps with late rhubarb. Tart cherries work beautifully if you have access to them fresh or frozen. During fall, substitute diced apples for the rhubarb and add cinnamon to the fruit filling for an apple cheesecake bar that's equally delicious. Add lemon zest to the cream cheese layer for extra brightness that complements the tart fruit. Replace pecans with sliced almonds in the crumble for a different nutty flavor, or use a combination of both. For a gluten-free version, swap the flour with your favorite gluten-free flour blend.
Keeping Them Fresh
Store these bars covered tightly in the refrigerator for up to five days, though they rarely last that long because everyone keeps sneaking pieces. The bars actually taste better on day two and three after all the flavors have had time to meld together and develop. Keep them covered to prevent the crumble topping from absorbing refrigerator odors and to keep the cream cheese layer from drying out. You can freeze individual bars wrapped in plastic wrap and placed in a freezer bag for up to three months. Thaw frozen bars overnight in the refrigerator rather than at room temperature, which keeps them from getting soggy. Don't leave these bars at room temperature for more than an hour because the cream cheese layer can soften too much and become unstable. For transporting to potlucks, keep them in a cooler with ice packs until you're ready to serve them.
Understanding Each Component
These bars work so beautifully because each layer serves a specific purpose in creating the overall experience. The bottom crust provides sturdy structure that prevents sogginess while adding buttery, nutty flavor and crunchy texture. The cream cheese layer brings rich, tangy creaminess that mellows the intense tartness of the rhubarb and creates visual contrast with its pale color. The rhubarb filling contributes that distinctive sweet-tart flavor and gorgeous color that makes these bars special and different from ordinary dessert bars. The top crumble adds textural interest and creates a finished appearance while protecting the rhubarb layer from drying out during baking. Baking the crust first prevents sogginess by creating a barrier between the wet filling and the bottom layer. Chilling thoroughly allows the cream cheese to set up firm enough for clean slicing.
Solving Problems
When your bars turn out soggy on the bottom, you either didn't prebake the crust long enough or didn't let the bars chill adequately before cutting. Make sure you bake that bottom crust the full ten minutes and refrigerate the finished bars at least four hours. If the cream cheese layer has a grainy texture instead of being smooth, your cream cheese wasn't soft enough when you mixed it. Always let cream cheese sit at room temperature for at least two hours before using. Bars that fall apart when you cut them need more chilling time or you're using a dull knife that drags through the layers instead of cutting cleanly. Rhubarb filling that's too runny means you didn't cook it long enough or didn't use enough cornstarch. The filling should be thick and jammy before you spread it. A pale, undercooked crumble topping indicates your oven temperature is too low or you didn't bake the bars long enough. The topping should be deep golden brown for the best flavor and texture.
 Pin it
These rhubarb cheesecake bars represent everything I love about seasonal baking and using fresh ingredients at their peak. The combination of familiar cream cheese filling with that distinctive rhubarb flavor creates something that feels both comforting and exciting at the same time. I love that these bars look so impressive and complex with their beautiful layers, yet they come together with straightforward techniques that any home baker can master. They've become my signature contribution to every summer potluck and family gathering, and people have started requesting them specifically whenever there's an event. Whether you're a longtime rhubarb lover or someone who's never tried it before, these bars showcase rhubarb in its best possible light with enough sweetness and creaminess to balance that characteristic tartness perfectly!
Frequently Asked Questions
- → Can I use frozen rhubarb for this recipe?
- Yes! Just make sure to thaw it completely and drain off any extra liquid before cooking it. Frozen rhubarb can be a bit wetter than fresh.
- → How do I know when the rhubarb is done cooking?
- The rhubarb should break down and get soft, and the mixture will thicken up. It usually takes about 8 to 10 minutes of stirring over medium heat.
- → Can I make these ahead of time?
- Definitely! These actually taste better after sitting in the fridge overnight. The flavors blend together and they're easier to cut when fully chilled.
- → What can I substitute for pecans?
- Walnuts, almonds, or even leaving out the nuts completely would work. The bars will still be delicious without them if you have nut allergies.
- → Why do my bars fall apart when I cut them?
- They probably need more time in the fridge. Make sure they're completely chilled and firm before cutting. A sharp knife also helps.
- → Can I double this recipe?
- Sure! Just use two 9x13 pans or one large sheet pan. The baking time might be a little longer if using a bigger pan, so keep an eye on it.