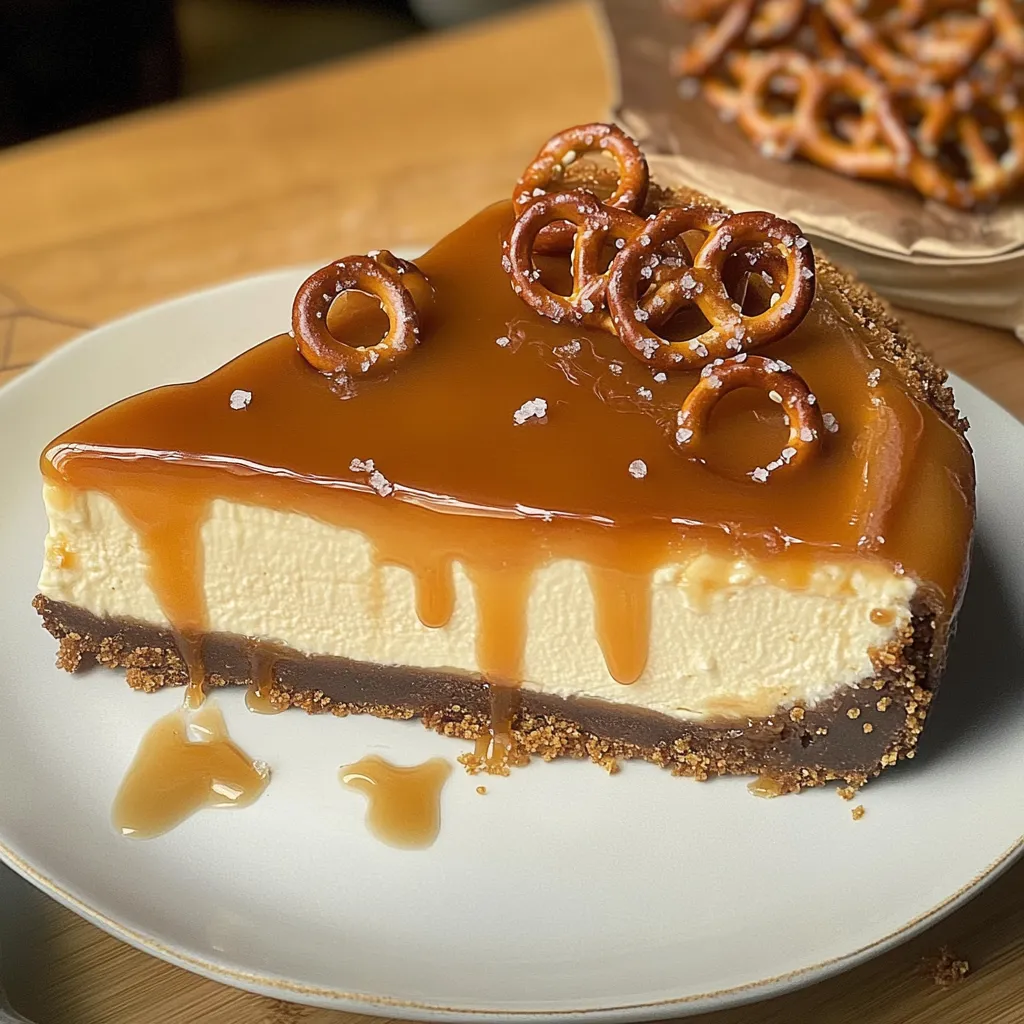
Make homemade salted caramel, create a pretzel-graham cracker crust, mix cream cheese filling with some caramel, bake in a water bath, cool, then top with remaining caramel and pretzels.
These blood orange scones came into my life a few years back during that weird January period when blood oranges suddenly show up in stores and I buy way too many because they're so darn pretty. After making my third batch of curd, I needed something else to do with them and figured – hey, scones! The gorgeous citrus flavor plus that sweet-tart glaze turned out to be absolutely perfect. They've got this amazing bright flavor that cuts through the buttery richness, and that color? Unreal. I make these every winter now when blood oranges appear, and people always think I'm some kind of fancy baker (I'm definitely not).
Why You'll Love This Recipe
They're not overly sweet like some scones can be
The blood orange gives them this gorgeous pink tint naturally
They freeze beautifully for emergency scone cravings
They'll make your kitchen smell incredible while baking
Last winter I brought these to a brunch at my friend Kate's place. Her mother-in-law, who apparently makes "the best scones in Connecticut" according to family lore, asked me for the recipe. Kate texted me later saying this was unprecedented – her MIL had never asked anyone for a recipe before. I'm not saying these scones fixed their relationship, but Kate did mention her next visit went suspiciously well...
Key Ingredients
Blood oranges - Obviously important here! Their flavor is less acidic than regular oranges with these amazing raspberry-like notes. If you can't find them, regular oranges work too, but you'll miss that special flavor and that gorgeous natural pink tint.
Cold butter - When they say cold, they mean COLD. I actually pop mine in the freezer for about 10 minutes before cutting it up. Those little cold butter pockets create the flaky layers when they melt in the oven.
Heavy cream - Don't even think about substituting milk here. The fat content in the cream is crucial for that tender texture. One time I only had half-and-half and the scones were definitely not the same.
Fresh zest - The oils in the zest have so much flavor! I probably use more than the recipe strictly needs, but it makes such a difference. Just be careful not to get the bitter white pith.
Minimal handling - The less you mess with the dough, the better your scones will be. My first attempt, I kept kneading and folding trying to make it "perfect" and ended up with tough little bricks. Now I mix just until it comes together and stop.
Butter technique - I use a pastry cutter to work in the butter, but two knives or even your fingers work fine. You want pieces ranging from pea-sized to lima bean-sized. Don't aim for uniform – the different sized pieces create varied textures.
Cold everything - I chill EVERYTHING – the butter, the cream, even the bowl if I'm being extra. One summer when my kitchen was like 85 degrees, I even put the flour in the freezer for 20 minutes before starting. It honestly makes a difference.
Sticky handling - The dough will be sticky and a bit shaggy, and that's perfect! Resist the urge to add more flour. I just flour my hands and the surface lightly, then gently shape it. If it's not a little sticky, your scones will probably be dry.
Sugar topping - Right before baking, I sometimes sprinkle the tops with a little coarse sugar. It gives them this sweet crunch that's completely addictive and looks pretty too.
You Must Know
Don't overmix or you'll get tough scones instead of tender ones
The dough should look a bit rough and shaggy – that's perfect!
They're best fresh from the oven, but 10 seconds in the microwave revives day-old ones beautifully
The first time I made these, I completely panicked when the dough felt sticky and added way too much extra flour. They came out like little orange-flavored hockey pucks. Now I trust the process and embrace the stickiness. I've also learned that a little extra zest never hurts – I've even been known to zest an extra orange into the dough when no one's looking. Oh, and don't skip the glaze! I tried once thinking they'd be "healthier" without it, but the glaze adds this perfect punch of extra citrus flavor that makes the whole thing pop.
Serving Ideas
These scones are obviously perfect for breakfast or brunch, but honestly, I eat them anytime. They're amazing slightly warm with a smear of salted butter or even a dollop of clotted cream if you're feeling fancy. For afternoon tea, I cut them smaller (making 12 instead of 8) for daintier portions. They pair beautifully with a cup of Earl Grey or a blood orange mimosa if you're doing a special brunch. I've even served them as dessert with a scoop of vanilla ice cream on the side – the contrast of warm scone, cold ice cream, and bright citrus is mind-blowing.
Tasty Twists
Try adding a handful of white chocolate chips to the dough – the sweetness works so well with the citrus. For a little extra something, I sometimes add a teaspoon of vanilla to the dough. If you're feeling adventurous, a pinch of cardamom or a tiny bit of rosemary is amazing with the blood orange. My personal favorite twist is adding a tablespoon of finely chopped candied ginger to the dough, which gives little bursts of heat that complement the citrus perfectly.
Storage Smarts
These scones are definitely best the day they're made, but they'll keep for a couple days in an airtight container. Pro tip though – freeze them! I make a double batch and freeze the extras (before glazing) on a sheet pan, then transfer to a ziplock bag once frozen solid. You can bake them straight from frozen, just add about 3-5 minutes to the baking time. This way, I can have "fresh" scones whenever the mood strikes. The glaze takes seconds to whip up when you're ready to serve them.
Pin itSalted Caramel Pretzel Cheesecake Recipe | recipesbyclare.com
Scone Secrets
For the tallest, fluffiest scones, chill the shaped dough for 15 minutes before baking
Don't twist your cutter if using a round one – it seals the edges and prevents proper rising
Brush the tops with a little cream before baking for a beautiful golden finish
I've made these blood orange scones for countless weekend breakfasts, baby showers, and "just because it's Tuesday" moments. There's something about that bright citrus flavor that makes even the dreariest winter morning feel special. The fact that they're naturally pink-tinged from the blood orange juice makes them look impressive with basically zero effort on my part. And while people always think they're some complicated fancy pastry, the truth is they take about 15 minutes of actual work. Sometimes I don't even tell people how easy they are – it's nice to accept compliments for your "amazing baking skills" even when the recipe's doing all the heavy lifting!
Frequently Asked Questions
→ Can I use store-bought caramel sauce instead of making it from scratch?
Yes, you can substitute about 1 cup of store-bought caramel sauce. Look for high-quality, thick caramel sauce and add extra sea salt to taste for that salted caramel flavor.
→ Why do I need to bake the cheesecake in a water bath?
The water bath provides gentle, even heat and moisture, which prevents cracks, ensures even baking, and gives the cheesecake a silky-smooth texture. Don't skip this step for best results.
→ My caramel sauce crystallized and got grainy. What went wrong?
This usually happens when sugar crystals form during cooking. To prevent this, avoid stirring too vigorously, make sure your pot is very clean, and brush down the sides of the pan with a wet pastry brush if you see sugar crystals forming.
→ Can I make this cheesecake ahead of time?
Absolutely! This cheesecake is perfect for making ahead. The cheesecake can be made 2-3 days in advance and stored in the refrigerator. Add the caramel topping and pretzel garnish just before serving for the best presentation.
→ How do I know when my cheesecake is done baking?
A properly baked cheesecake should still have a slight jiggle in the center (about a 3-inch diameter area) when you gently shake the pan. The edges should be more set than the center. It will continue to set as it cools.
→ Can I freeze this cheesecake?
Yes, you can freeze the baked and cooled cheesecake (without toppings) for up to 2 months. Wrap it tightly in plastic wrap and aluminum foil. Thaw overnight in the refrigerator and add toppings before serving.
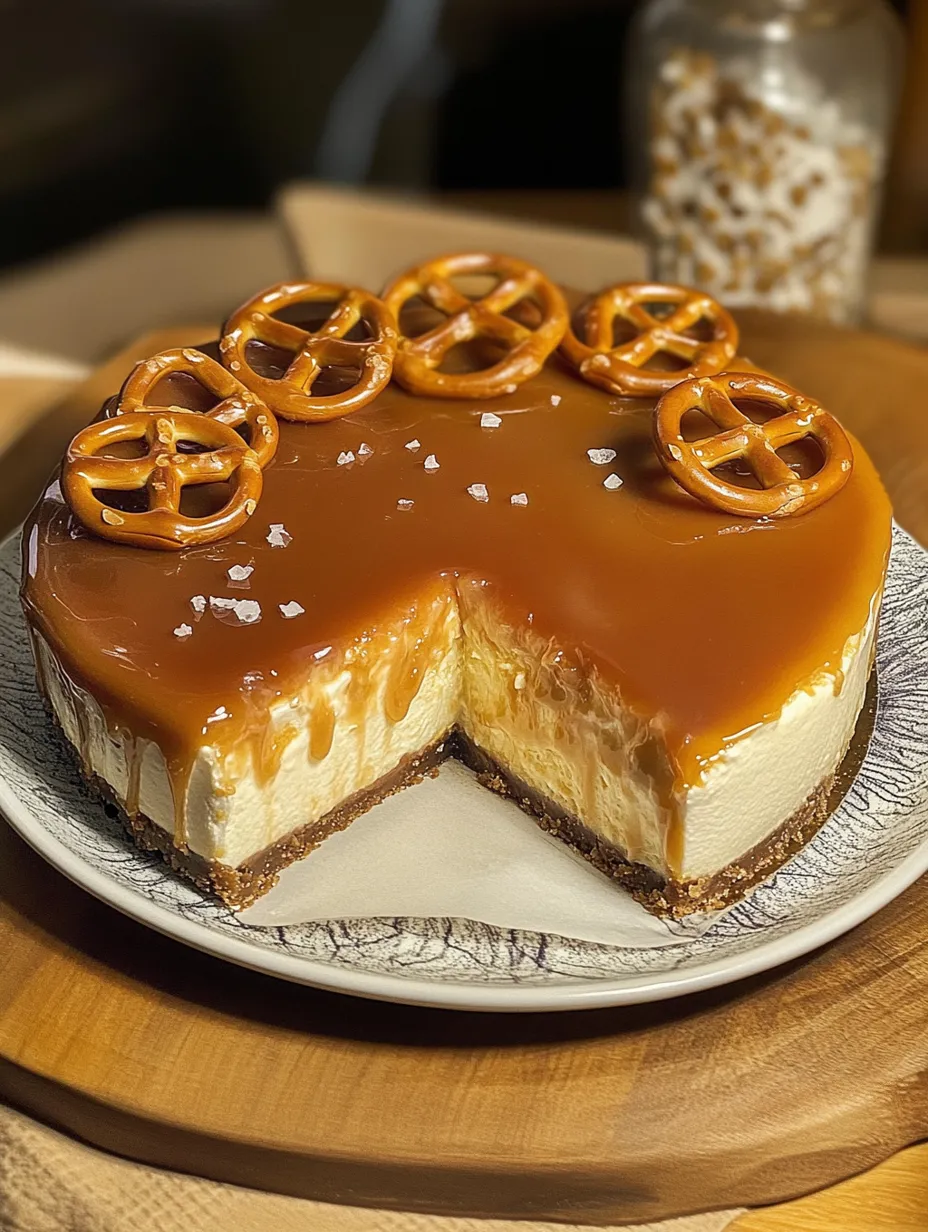
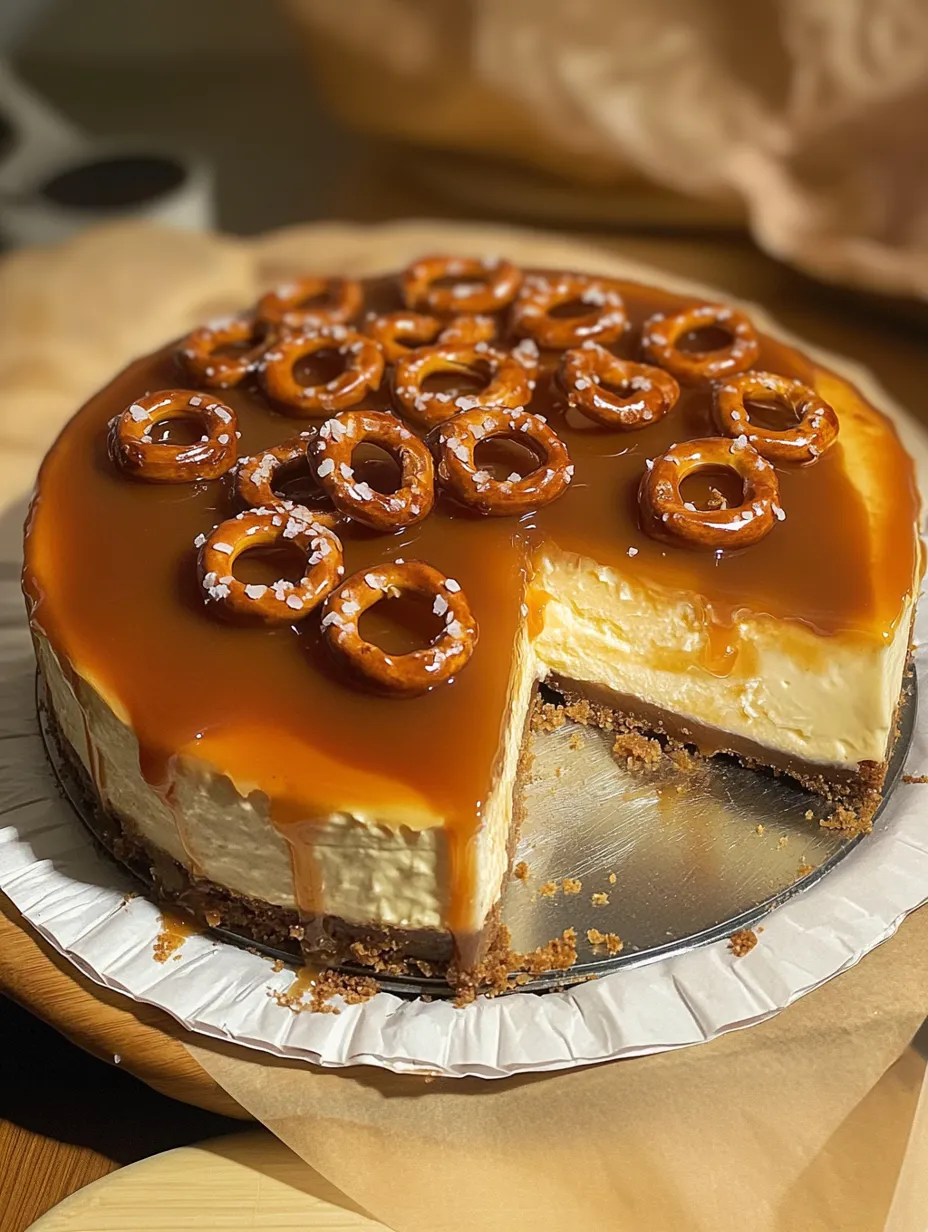
Salted Caramel Pretzel Cheesecake
Creamy cheesecake with homemade salted caramel sauce and a crunchy pretzel crust creates the perfect balance of sweet, salty, smooth and crunchy textures.
In a medium saucepan, add the granulated sugar over medium heat. Stir continuously for 6-10 minutes until the sugar completely melts and turns a rich amber color. Be patient, the sugar will clump at first but keep stirring until it melts into a smooth caramel.
Step 02
Add the cubed room temperature butter and continue stirring. The caramel will bubble up—this is normal! Keep stirring until the butter is fully incorporated.
Step 03
Slowly drizzle in the room-temperature heavy cream while stirring. The mixture will bubble up again. Stir until smooth, then add the fine sea salt and stir to combine. Remove from heat and let cool while you prepare the crust. The sauce will thicken as it cools.
Step 04
Preheat oven to 325°F (165°C). Wrap the outside of a 9-inch springform pan with aluminum foil to prevent water from seeping in during the water bath bake.
Step 05
In a food processor, crush the pretzels into fine crumbs. Add graham cracker crumbs and sugar, and pulse to combine. Add melted butter and process until the mixture resembles wet sand. Press firmly into the bottom and slightly up the sides of the prepared springform pan. Bake for 10 minutes, then cool completely.
Step 06
In a large mixing bowl, beat the cream cheese until smooth and creamy. Add sour cream and sugar, beating until well combined. Add eggs one at a time, mixing well after each addition. Stir in vanilla extract and ¼ cup of the cooled salted caramel sauce.
Step 07
Pour the cheesecake filling over the cooled crust. Place the springform pan in a larger roasting pan and add enough hot water to reach halfway up the sides of the springform pan. Bake for 60-70 minutes until the edges are set but the center still has a slight jiggle.
Step 08
Turn off the oven, crack the door open, and let the cheesecake cool in the oven for 1 hour. Remove from the water bath, run a knife around the edges, and cool completely at room temperature. Refrigerate for at least 6 hours or overnight.
Step 09
Before serving, pour the remaining ¾ cup of salted caramel sauce over the cheesecake. Arrange whole pretzels around the edge for garnish and sprinkle with flaky sea salt to taste. Slice and serve chilled.
Notes
Make sure all refrigerated ingredients are at room temperature before starting for the smoothest cheesecake.
The caramel sauce can be made up to 1 week ahead and stored in the refrigerator. Warm slightly before using as topping.
For clean slices, dip your knife in hot water and wipe dry between each cut.
This cheesecake can be made up to 3 days ahead and stored covered in the refrigerator.
Tools You'll Need
9-inch springform pan
Food processor
Electric mixer
Medium saucepan
Large roasting pan (for water bath)
Aluminum foil
Mixing bowls
Wooden spoon or heat-resistant spatula
Allergy Information
Please check ingredients for potential allergens and consult a health professional if in doubt.
Contains wheat (pretzels, graham crackers)
Contains dairy (butter, cream cheese, sour cream, heavy cream)
Contains eggs
Nutrition Facts (Per Serving)
It is important to consider this information as approximate and not to use it as definitive health advice.

 Pin it
 Pin it
 Pin it