
 Pin it
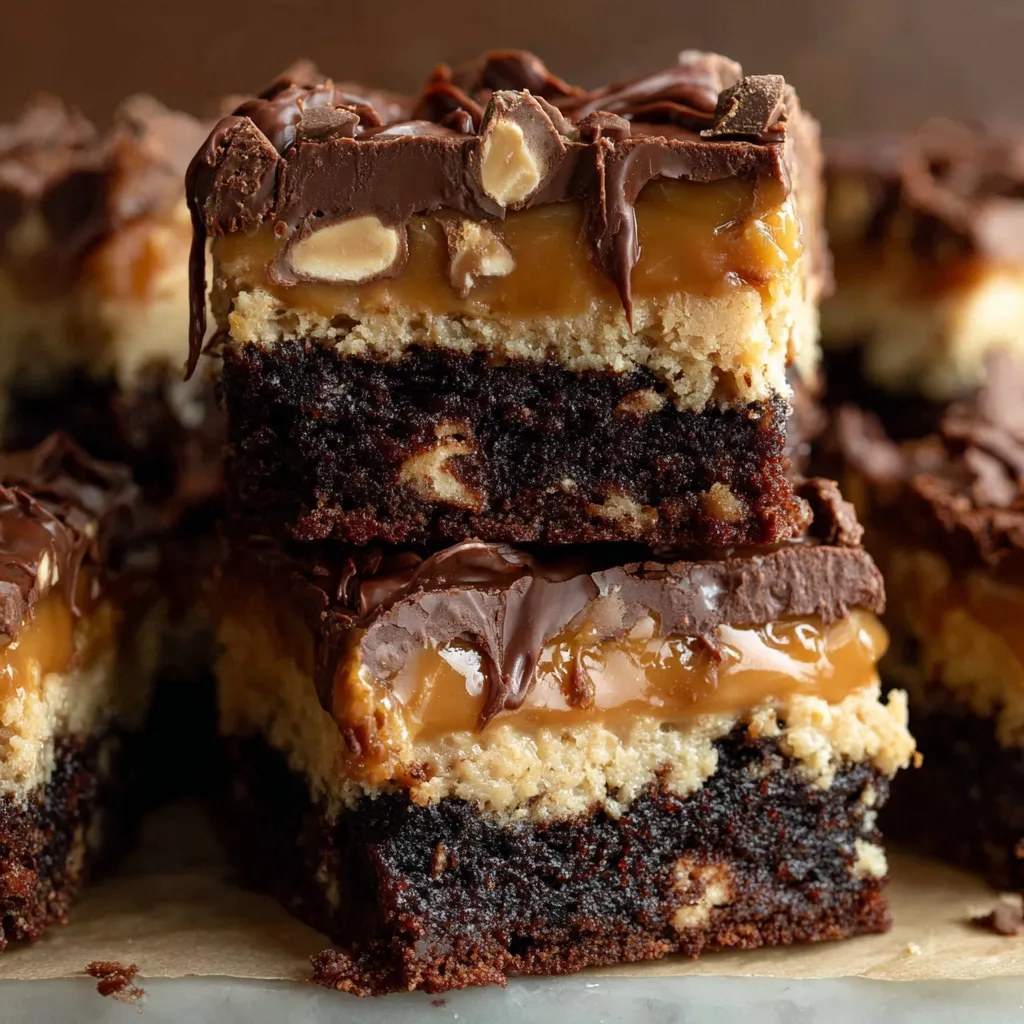
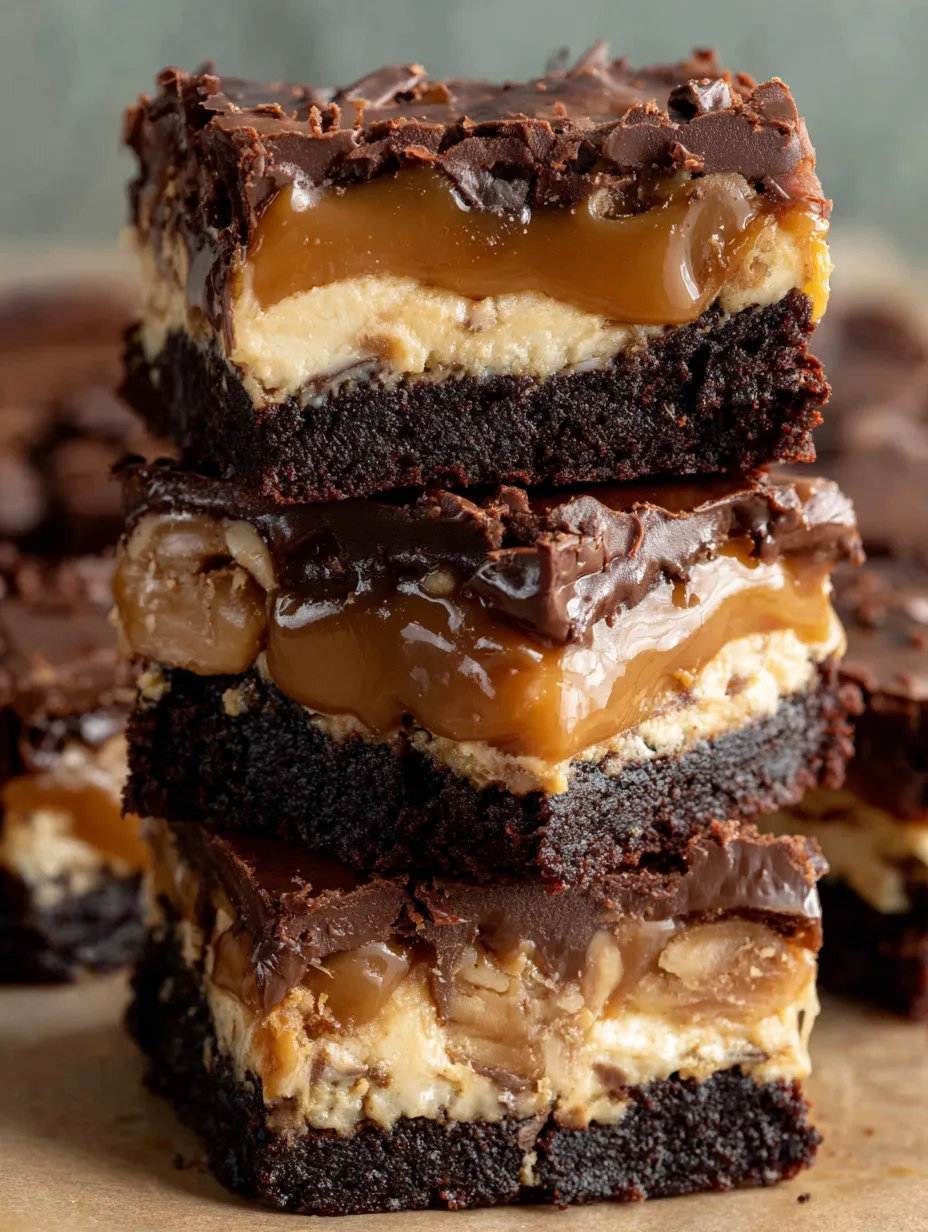
These Snickers brownies transform the beloved candy bar into an over-the-top layered dessert that delivers everything you love about the classic treat in a sliceable, shareable format. Starting with a rich, fudgy brownie base and building up through creamy peanut nougat, crunchy salted peanuts, gooey caramel, and a glossy milk chocolate finish, each layer contributes its own texture and flavor to create something truly extraordinary. What makes these Snickers brownies so irresistible is how they capture the exact experience of biting into a Snickers bar while offering the dense, chocolatey satisfaction that only a homemade brownie can provide. This is the kind of dessert that stops conversations, makes people close their eyes while they chew, and generates immediate requests for the recipe before anyone has even finished their first piece.
I made these Snickers brownies for my nephew's birthday party last year because he declared Snickers his favorite candy and requested a Snickers cake, which seemed impossibly complicated until I discovered this layered brownie approach. The moment I cut into the chilled pan and saw those perfect layers stacked on top of each other, I knew I had created something special. Every kid at the party went completely silent while eating their piece, which any parent knows is the highest compliment children can give to food. My sister-in-law, who runs a small bakery, asked for the recipe and has since added a version to her menu where it became one of her bestselling items within the first month.
Brownie Layer Ingredients
- All-purpose flour: 1 1/2 cups, spooned and leveled for accurate structure.
- Dutch-processed cocoa powder: 1/3 cup to provide a deep, smooth chocolate flavor.
- Eggs: 4 large, room temperature eggs for a dense, fudgy texture.
- Granulated sugar: 2 cups to sweeten and create a crackly top.
- Unsalted butter: 3/4 cup, softened to add richness and moisture.
Nougat Layer Ingredients
- Marshmallow fluff: One 7-ounce jar for a light and chewy texture.
- Creamy peanut butter: 1/4 cup of standard creamy variety.
- Salted peanuts: 2 cups, whole or roughly chopped for crunch and contrast.
Caramel Layer Ingredients
- Caramel bits: One 11-ounce bag for smooth, reliable melting.
- Heavy whipping cream: 1/4 cup to maintain a soft, pourable consistency.
Chocolate Layer Ingredients
- Milk chocolate chips: 2 cups for a classic candy bar finish.
- Vegetable oil: 1 teaspoon to ensure a glossy, easy-to-spread top.
 Pin it
Baking Method Detailed
- Preparing Your Pan
- Preheat your oven to 350 degrees Fahrenheit and position a rack in the center where heat circulates evenly around your baking dish. Line a 9x13-inch baking dish with parchment paper, allowing several inches of overhang on the long sides that will become handles for lifting out the finished brownies. Press the parchment firmly into the corners and smooth it against the sides so your brownie edges bake evenly and release cleanly later. Lightly grease the parchment paper with butter or cooking spray as extra insurance against sticking, though properly lined pans rarely cause issues.
- Mixing Dry Ingredients
- Measure your all-purpose flour, cornstarch, Dutch-processed cocoa powder, baking powder, and kosher salt into a large mixing bowl. Whisk these dry ingredients together thoroughly for at least thirty seconds until everything combines uniformly with no visible pockets of cocoa or flour remaining. The cornstarch helps create that fudgy, dense texture by interfering with gluten development during mixing and baking. Set this bowl aside within reach of your stand mixer since you'll add it to the wet ingredients shortly.
- Creaming Wet Ingredients
- Place your room temperature eggs, granulated sugar, softened butter, and vanilla extract in the bowl of your stand mixer fitted with the paddle attachment. Beat this mixture on medium speed for about four minutes until it becomes noticeably lighter in color, increased in volume, and fluffy in texture. Scrape down the sides of the bowl at least twice during this process to ensure all ingredients incorporate evenly without butter or egg hiding in the corners. The properly creamed mixture should look pale yellow and hold soft peaks when you lift the paddle.
- Combining The Batter
- Stop your mixer and add the whisked dry ingredients all at once to the creamed butter mixture in the bowl. Turn the mixer to low speed and mix just until the flour disappears into the batter and no dry streaks remain visible anywhere. Scrape the bottom of the bowl with a spatula to check for unmixed flour that often hides beneath the wet ingredients. The finished batter will look thick, glossy, and deeply chocolate colored, with a consistency similar to thick cake batter that moves slowly when you tilt the bowl.
- Baking The Base
- Pour your brownie batter into the prepared baking dish and use an offset spatula or the back of a spoon to spread it evenly into all four corners. Smooth the top as level as possible since an uneven brownie base will make all subsequent layers uneven as well. Bake for 30 to 35 minutes, watching for the edges to appear set and slightly pulled away from the pan while the center still looks shiny and slightly underdone. Remove from the oven and let the brownies cool completely at room temperature, then refrigerate for a full two hours until they're cold and firm throughout.
- Creating The Nougat
- Combine the butter, sugar, and heavy cream in a medium saucepan and place over medium heat, stirring occasionally until the butter melts and everything combines. Continue cooking, stirring frequently to prevent scorching on the bottom, until the mixture comes to a rolling boil with bubbles covering the entire surface. Stop stirring and let the mixture boil undisturbed while you monitor the temperature with a candy thermometer, waiting until it reaches exactly 246 degrees Fahrenheit, which takes approximately six minutes. Remove from heat immediately and stir in the peanut butter, marshmallow fluff, and vanilla extract, mixing vigorously until everything combines into a smooth, creamy nougat.
- Layering The Nougat
- Pour the hot nougat mixture evenly over your chilled brownie base, working quickly since it will begin setting as it cools against the cold brownies. Use a spatula or the back of a spoon to spread the nougat into an even layer that reaches all edges of the pan. Pour the salted peanuts over the nougat in an even distribution, then gently press them into the surface so they embed partially and won't roll around when you add the next layer. Return the pan to the refrigerator or freezer while you prepare the caramel layer, which allows the nougat to firm up enough to support what comes next.
- Melting The Caramel
- Place your caramel bits and heavy cream in a medium microwave-safe bowl and heat in thirty-second intervals, stirring thoroughly between each heating session. Continue this process for about one to two minutes total until the caramel melts completely and combines with the cream into a smooth, pourable consistency. The mixture should flow easily when you lift your spoon but still have enough body to coat the peanuts rather than running off immediately. Let the caramel cool for about one minute before pouring so it doesn't melt the nougat layer beneath.
- Adding Caramel Layer
- Pour the melted caramel mixture slowly over the peanut-studded nougat, starting in the center and working outward to cover the entire surface evenly. Use an offset spatula or the back of a spoon to gently spread the caramel into any uncovered corners, being careful not to disturb the peanuts from their positions. The caramel should create a smooth, even layer that fills in around the peanuts and creates a level surface for the final chocolate layer. Return the pan to the refrigerator or freezer for about five minutes until the caramel sets enough to support the chocolate without mixing together.
- Preparing Chocolate Topping
- Combine your milk chocolate chips and vegetable oil in a small microwave-safe bowl and heat in thirty-second intervals, stirring completely between each session. Continue this process for about one to two minutes total until the chocolate melts fully and the oil incorporates into a smooth, glossy mixture. The finished chocolate should flow easily from your spoon in a ribbon that holds its shape briefly before sinking back into the bowl. Let the chocolate cool for about two minutes before pouring so it doesn't melt through the caramel layer beneath.
- Finishing The Bars
- Pour the melted chocolate evenly over the set caramel layer, starting in the center and tilting the pan gently to encourage the chocolate to flow toward the edges. Use an offset spatula to spread the chocolate into a smooth, even layer that completely covers the caramel with no gaps or thin spots visible. Work quickly but carefully since the chocolate begins setting as it contacts the cold layers beneath, and once it starts firming, spreading becomes difficult without creating streaks. Return the finished pan to the refrigerator and chill for 15 to 20 minutes until the chocolate sets completely with a shiny, professional appearance.
- Cutting And Serving
- Use the parchment paper overhang to lift the entire block of Snickers brownies out of the baking pan and onto a cutting board. Let the brownies sit at room temperature for about five minutes before cutting, which allows the chocolate to soften just enough to slice cleanly without cracking. Use a large, sharp knife dipped in hot water and wiped dry between cuts to create twelve generous bars with clean edges that showcase all the beautiful layers. Serve slightly cool rather than ice cold for the best texture and flavor in every layer.
Working with candy thermometers intimidated me for years until I finally invested in a good digital one and realized how much easier it makes recipes like this Snickers brownies nougat layer. The difference between properly tempered nougat and undercooked or overcooked versions is dramatic, so this is one step where precision truly matters. My first attempt at these brownies failed spectacularly because I rushed the chilling times and ended up with layers that bled into each other rather than staying distinct. Learning patience with layer desserts changed my baking completely, and now I schedule the chilling time into my day so I'm never tempted to skip ahead before each layer has properly set.
Candy Thermometer Importance
The nougat layer requires cooking to a precise temperature, making a candy thermometer essential rather than optional for this recipe. At 246 degrees Fahrenheit, the sugar syrup reaches what confectioners call the firm-ball stage, which creates nougat that's soft and chewy rather than runny or rock hard. Digital probe thermometers respond faster and read more accurately than traditional glass thermometers, making them worth the small investment if you plan to make candy-style desserts regularly. Clip your thermometer to the side of your pan before the mixture starts boiling so you can monitor the temperature rise without scrambling to attach it mid-process.
Layer Chilling Strategy
Each chilling period in this Snickers brownies recipe serves a specific purpose that affects your final results significantly. The two-hour brownie chill creates a firm, cold base that prevents the hot nougat from melting into the chocolate layer and muddying the boundary between them. The brief chill after the nougat sets that layer enough to hold embedded peanuts in place when you pour the liquid caramel over them. The final chocolate chill sets the topping into a shiny, snappable layer that slices cleanly rather than smearing under your knife.
Peanut Pressing Technique
How you arrange and press the peanuts into the nougat layer affects both the appearance and eating experience of your finished Snickers brownies. Distribute the peanuts evenly across the entire surface before pressing any of them, which ensures consistent peanut distribution in every slice. Press gently but firmly enough that each peanut embeds about halfway into the soft nougat without pushing all the way through to the brownie. Peanuts that sit completely on top will roll around when you add caramel, while peanuts pushed too deep won't provide the textural crunch you want in each bite.
Chocolate Spreading Tips
Achieving a smooth, professional-looking chocolate top layer requires working quickly and confidently once you pour the melted chocolate. The chocolate begins setting immediately when it contacts the cold caramel beneath, so you have only about thirty seconds to spread before it becomes difficult to manipulate. An offset spatula works better than a regular spatula because the angled blade lets you smooth the surface without your hand dragging through the chocolate. If your chocolate sets before you finish spreading, briefly apply gentle heat with a kitchen torch or hold the pan over warm steam to soften the surface just enough to smooth.
Serving Temperature Perfect
The temperature at which you serve these Snickers brownies significantly affects the eating experience and how the layers interact in your mouth. Straight from the refrigerator, the caramel and nougat feel quite firm and the chocolate might crack when bitten rather than yielding smoothly. Letting the bars sit at room temperature for five to ten minutes softens the caramel to that ideal gooey consistency and relaxes the nougat into chewy rather than stiff texture. Don't let them warm too long though, or the layers will soften too much and the beautiful structure will slump when you try to pick up a slice.
Creative Twists Explored
Swapping the milk chocolate topping for dark chocolate creates a more sophisticated version with deeper, more intense chocolate flavor that appeals to adults who find Snickers too sweet. Adding a sprinkle of flaky sea salt over the chocolate before it sets enhances all the flavors and creates a trendy salted caramel effect that makes these bars even more addictive. Using crunchy peanut butter instead of creamy in the nougat layer introduces extra texture that some peanut lovers prefer. For a completely different candy bar experience, substitute the peanuts with almonds and use almond butter in the nougat to create Almond Joy-inspired brownies.
Storing These Treats
Your finished Snickers brownies must be stored in the refrigerator where they keep beautifully for up to one week in an airtight container or wrapped tightly with plastic wrap. The cold temperature maintains the proper texture of all four layers and prevents the caramel from becoming too soft and gooey. Stack layers of brownies with parchment paper between them to prevent the chocolate tops from sticking together or getting damaged. Bring individual portions to room temperature for about ten minutes before eating to achieve that perfect balance of textures.
Freezing For Later
These Snickers brownies freeze exceptionally well for up to three months, making them perfect for preparing ahead for special occasions or keeping on hand for unexpected guests. Wrap individual bars in plastic wrap and then place them in a freezer-safe container or bag with as much air removed as possible. Thaw frozen brownies overnight in the refrigerator rather than at room temperature, which prevents condensation from forming on the chocolate surface and making it look dull. The layers maintain their distinct textures beautifully through freezing and thawing when properly wrapped and stored.
 Pin it
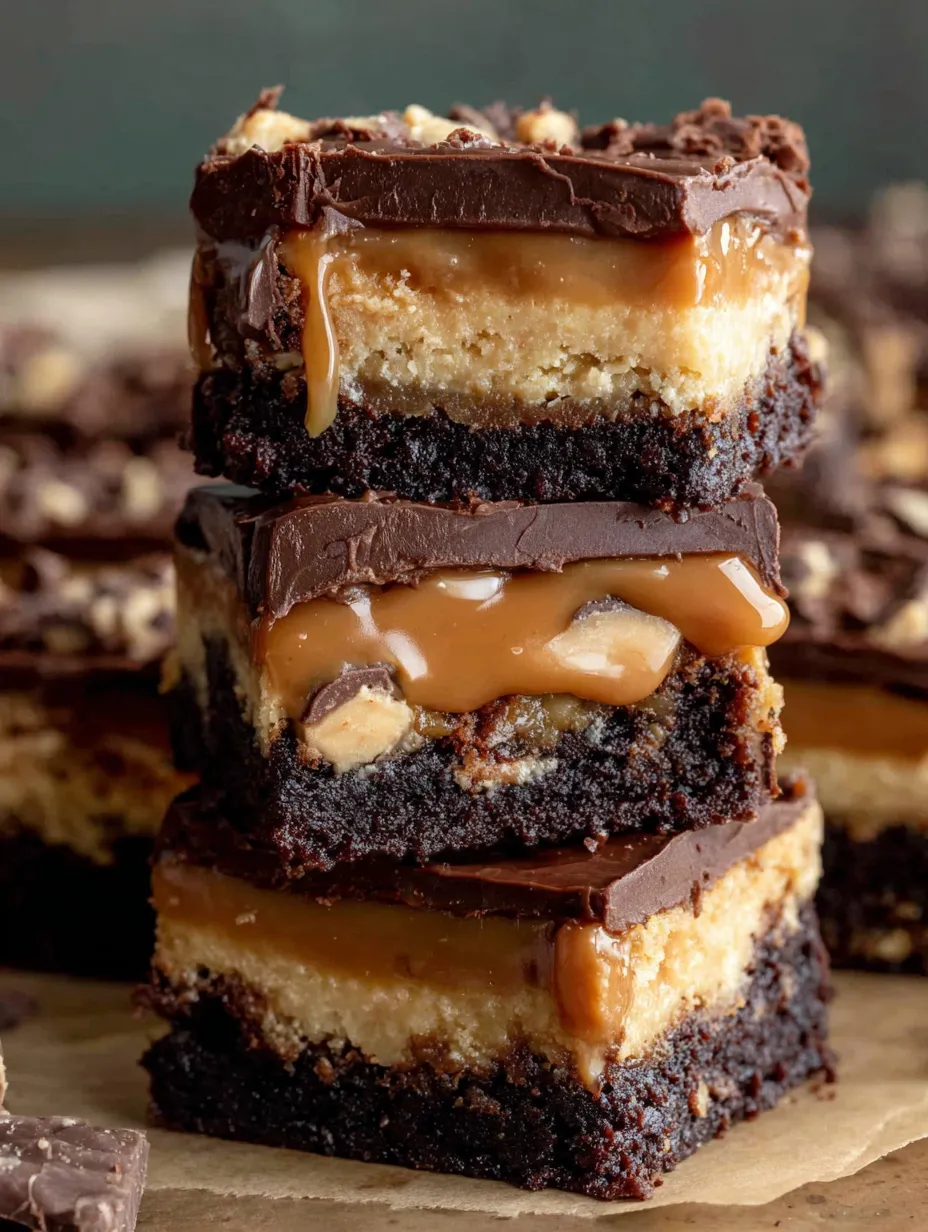
These Snickers brownies represent everything I love about ambitious baking projects that reward patience and attention with results far beyond what simple recipes can achieve. The process takes time with all the chilling stages and careful layer building, but every step serves a purpose and contributes to the final spectacular result. When I slice into a batch and see those four distinct layers stacked perfectly on top of each other, I feel the same satisfaction I imagine artists feel when they step back from a finished painting. The reactions from people who taste these brownies for the first time never get old, from the widening eyes at the first bite to the inevitable question about when I'm making them again, and those moments make all the careful work completely worthwhile.
Frequently Asked Questions
- → Do I really need a candy thermometer?
- Yes! The nougat layer needs to reach exactly 246 degrees to set properly. Without a candy thermometer, it's really hard to get the right consistency.
- → Can I use regular cocoa powder instead of Dutch-processed?
- You can, but Dutch-processed cocoa gives a richer, darker chocolate flavor and color. Regular cocoa will work in a pinch though.
- → Why do the brownies need to chill for 2 hours?
- The brownies need to be completely cold before you add the warm nougat layer, or the heat will make them too soft and the layers will mix together.
- → Can I use a different kind of nut?
- Peanuts are traditional for Snickers flavor, but you could try almonds or cashews if you prefer. Just keep the peanut butter in the nougat for that classic taste.
- → How do I cut these cleanly?
- Use a sharp knife and wipe it clean between each cut. Let the brownies sit at room temperature for a few minutes before cutting - they'll slice better when not super cold.
- → Can I make these ahead of time?
- Yes! These actually need to be made ahead since they require so much chilling time. Make them a day or two before you need them and keep them covered in the fridge.