
 Pin it
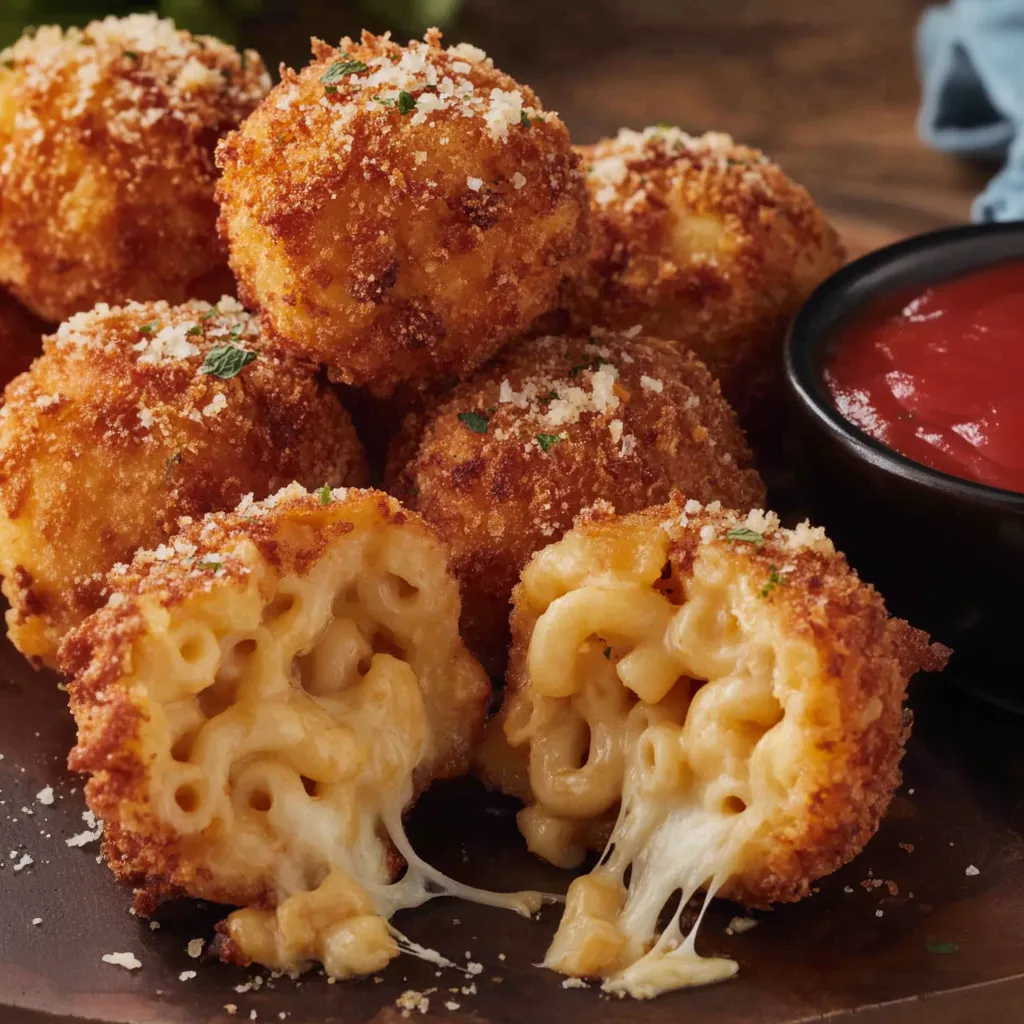
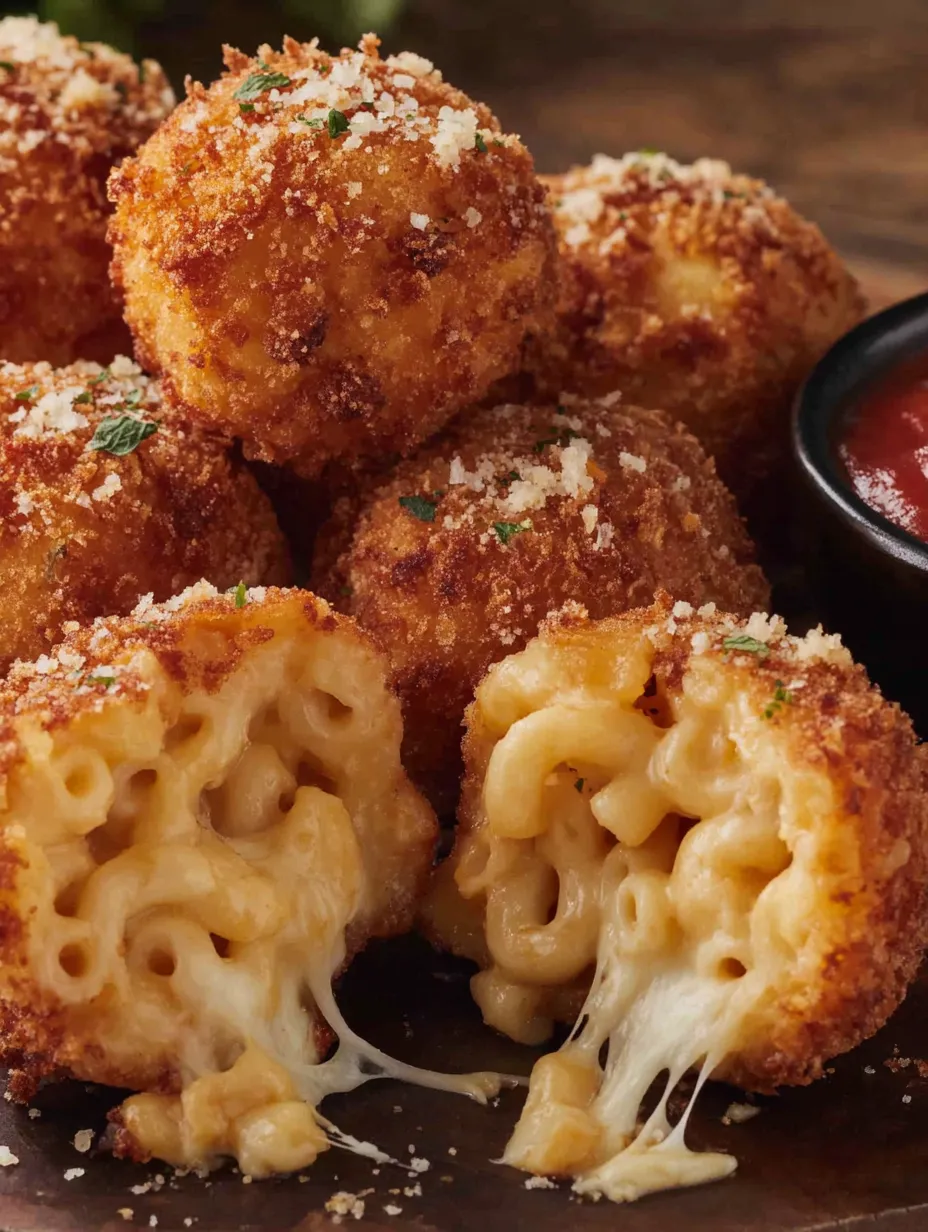
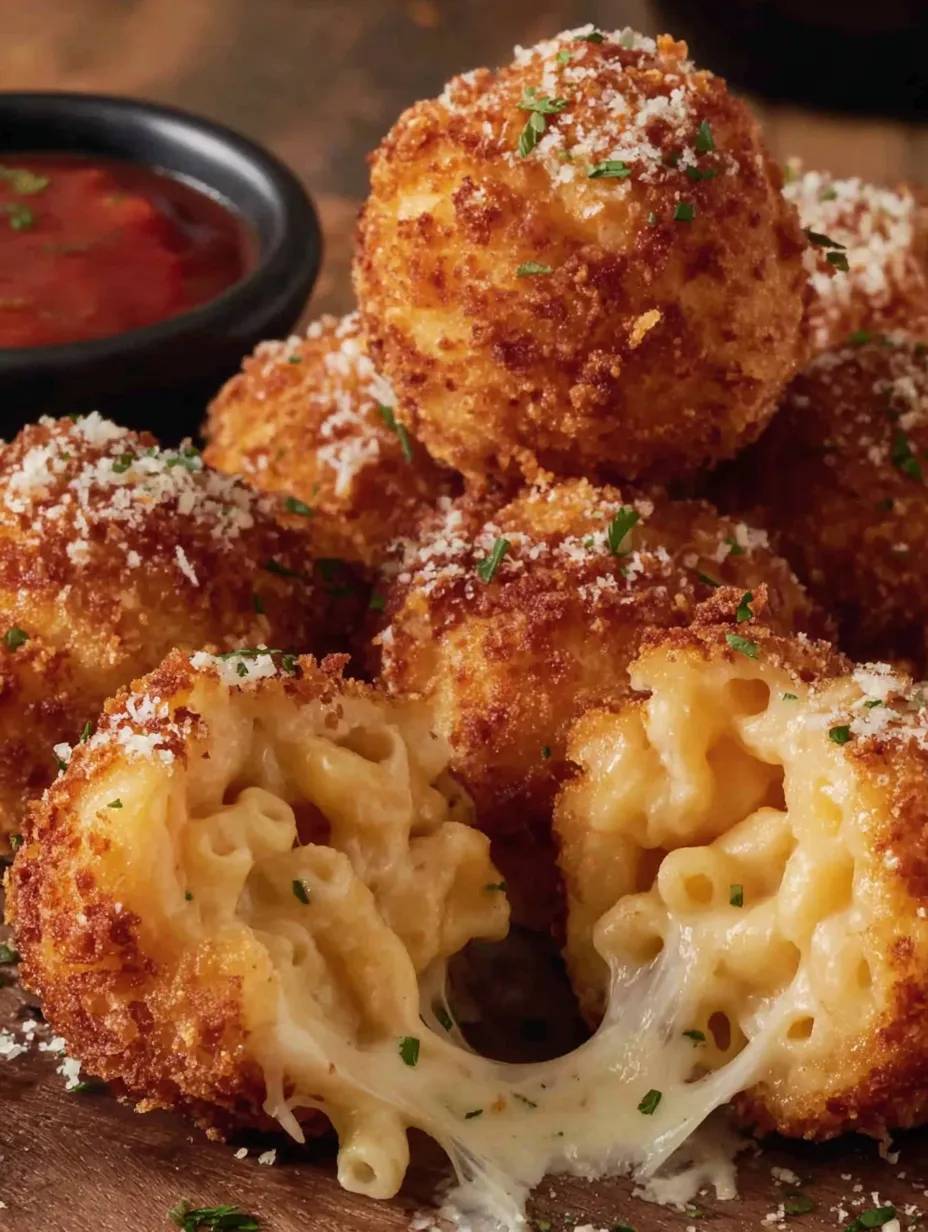
These crispy fried mac and cheese balls started when I had a huge container of leftover mac and cheese from Sunday dinner and couldn't bear the thought of reheating it again. My youngest son suggested turning it into "cheese balls like those fancy restaurants make," which seemed like a crazy idea until I tried it. The combination of creamy, cheesy interior surrounded by golden, crunchy panko coating creates these incredible bite-sized treats that disappear faster than I can make them. Every time I bring these to parties, people literally gather around the platter and devour them while asking for the recipe.
My sister made these for her husband's work holiday party last year and said they caused such a sensation that three different coworkers asked her to cater their upcoming events. She laughed and told them she's not a caterer, just someone with a good recipe and leftover mac and cheese. Now whenever there's an office potluck, people specifically ask if she's bringing "those amazing cheese ball things" because apparently nothing else they've tried comes close.
Smart Ingredient Choices
- Firm mac and cheese works best: Day-old mac and cheese that's been refrigerated holds together much better than fresh, hot pasta
- Extra cheddar enhancement: Adding more shredded cheese to already cheesy mac creates even more intense flavor and helps binding
- Panko breadcrumb superiority: These Japanese breadcrumbs create much crispier coating than regular breadcrumbs and stay crunchy longer
- Parmesan coating boost: Grated Parmesan in the breading adds nutty flavor and helps achieve that gorgeous golden color
- Proper frying oil choice: Canola or peanut oil maintains high heat without imparting flavors, creating cleaner-tasting results
- Fresh spice additions: Garlic powder, onion powder, and smoked paprika elevate the flavor beyond basic mac and cheese
 Pin it
Complete Preparation Process
- Preparing the base mixture
- Start with mac and cheese that's been chilled for at least two hours until it's firm enough to handle easily. If you're using freshly made mac and cheese, patience here is crucial for success. Stir in the extra shredded cheddar, garlic powder, onion powder, smoked paprika, salt, and black pepper, mixing everything thoroughly so the seasonings distribute evenly throughout.
- Shaping into perfect spheres
- Using clean hands or a small cookie scoop, roll the seasoned mac and cheese into one-inch balls, working quickly before the mixture warms up too much from your hands. Place each ball on a parchment-lined baking sheet as you work. Don't worry if they're not perfectly round - rustic shapes actually look more appealing and homemade.
- Essential freezing step
- Transfer the baking sheet to the freezer for thirty minutes to firm up the balls completely. This step is absolutely critical for preventing them from falling apart during the breading and frying process. Set a timer because you don't want them frozen solid, just firm enough to handle without breaking.
- Setting up breading station
- While the balls chill, set up your three-bowl breading station. Place flour in the first shallow bowl, whisk eggs with milk in the second bowl until smooth, and combine panko breadcrumbs with Parmesan cheese, salt, and pepper in the third bowl. Having everything ready makes the coating process much faster and less messy.
- Perfect coating technique
- Working with a few balls at a time, roll each one first in flour, shaking off excess. Dip into the egg mixture, making sure the entire surface gets coated. Finally, roll in the seasoned panko mixture, pressing gently so the breadcrumbs adhere well. Place the coated balls back on the baking sheet and return to the freezer for another fifteen minutes.
- Achieving golden perfection
- Heat two to three inches of oil in a heavy-bottomed pot or deep skillet to exactly 350 degrees Fahrenheit. Use a candy thermometer for accuracy since temperature control is crucial. Fry the balls in small batches to avoid overcrowding, which drops the oil temperature and creates greasy results. Cook for two to three minutes per side until golden brown and crispy all over.
- Proper draining technique
- Remove the fried balls with a slotted spoon and immediately place them on paper towel-lined plates to drain excess oil. The paper towels absorb the oil while keeping the coating crispy. Serve immediately while they're still hot and the cheese inside is perfectly molten.
My first attempts at these taught me several important lessons through trial and error. I initially tried to rush the process and skip the freezing steps, which resulted in balls that fell apart completely in the oil, creating this terrible mess. I also learned that oil temperature really matters - my early batches were either greasy from too-cool oil or burnt from oil that was too hot. Using a thermometer transformed my success rate completely.
Creative Serving Ideas
Serve these immediately while the cheese is still molten, arranged on a platter with small bowls of different dipping sauces. Ranch dressing, honey mustard, and sriracha mayo all work beautifully. For fancier presentations, try garlic aioli or chipotle sauce. During football season, I arrange them alongside other finger foods like wings and sliders for the ultimate game day spread that keeps everyone satisfied.
Delicious Recipe Variations
Transform the basic recipe by adding bacon bits to the mac and cheese mixture before rolling for smoky, savory notes. Jalapeño mac and cheese creates amazing spicy versions that heat lovers adore. For breakfast parties, use mac and cheese made with breakfast sausage and serve with maple syrup for dipping. Kids love versions made with different colored mac and cheese or mixed with their favorite cheese varieties.
Storage and Reheating
These taste absolutely best when served immediately after frying, but leftovers can be stored in the refrigerator for two days. Reheat them in a 400-degree oven for about eight minutes to restore crispiness - avoid the microwave which makes them soggy. For make-ahead convenience, you can bread them completely and freeze for up to one month, then fry directly from frozen, adding an extra minute to the cooking time.
 Pin it
These crispy fried mac and cheese balls perfectly capture what makes comfort food so appealing while elevating it into something special enough for entertaining. The transformation from humble leftovers into these gorgeous, restaurant-quality appetizers never fails to impress people. While the technique requires some patience with the chilling and breading process, the results are absolutely worth the effort. They've become my signature party contribution because people always remember them fondly and specifically request them for future gatherings.
Frequently Asked Questions
- → Can I use any type of mac and cheese?
- Yes! Homemade, boxed, or leftover mac and cheese all work. Just make sure it's thick and well-chilled so the balls hold together.
- → Why do I need to freeze the balls twice?
- Freezing helps them keep their shape during frying. The first freeze sets the balls, the second freeze after breading prevents the coating from falling off.
- → Can I bake these instead of frying?
- You can bake at 425°F for 15-20 minutes, but they won't be as crispy. Spray with cooking oil for better browning.
- → What are the best dipping sauces?
- Ranch, marinara, sriracha mayo, honey mustard, or BBQ sauce all work great. Get creative with your favorites!
- → Can I make these ahead of time?
- You can bread them and freeze for up to a month. Fry directly from frozen, adding 1-2 extra minutes to cooking time.