

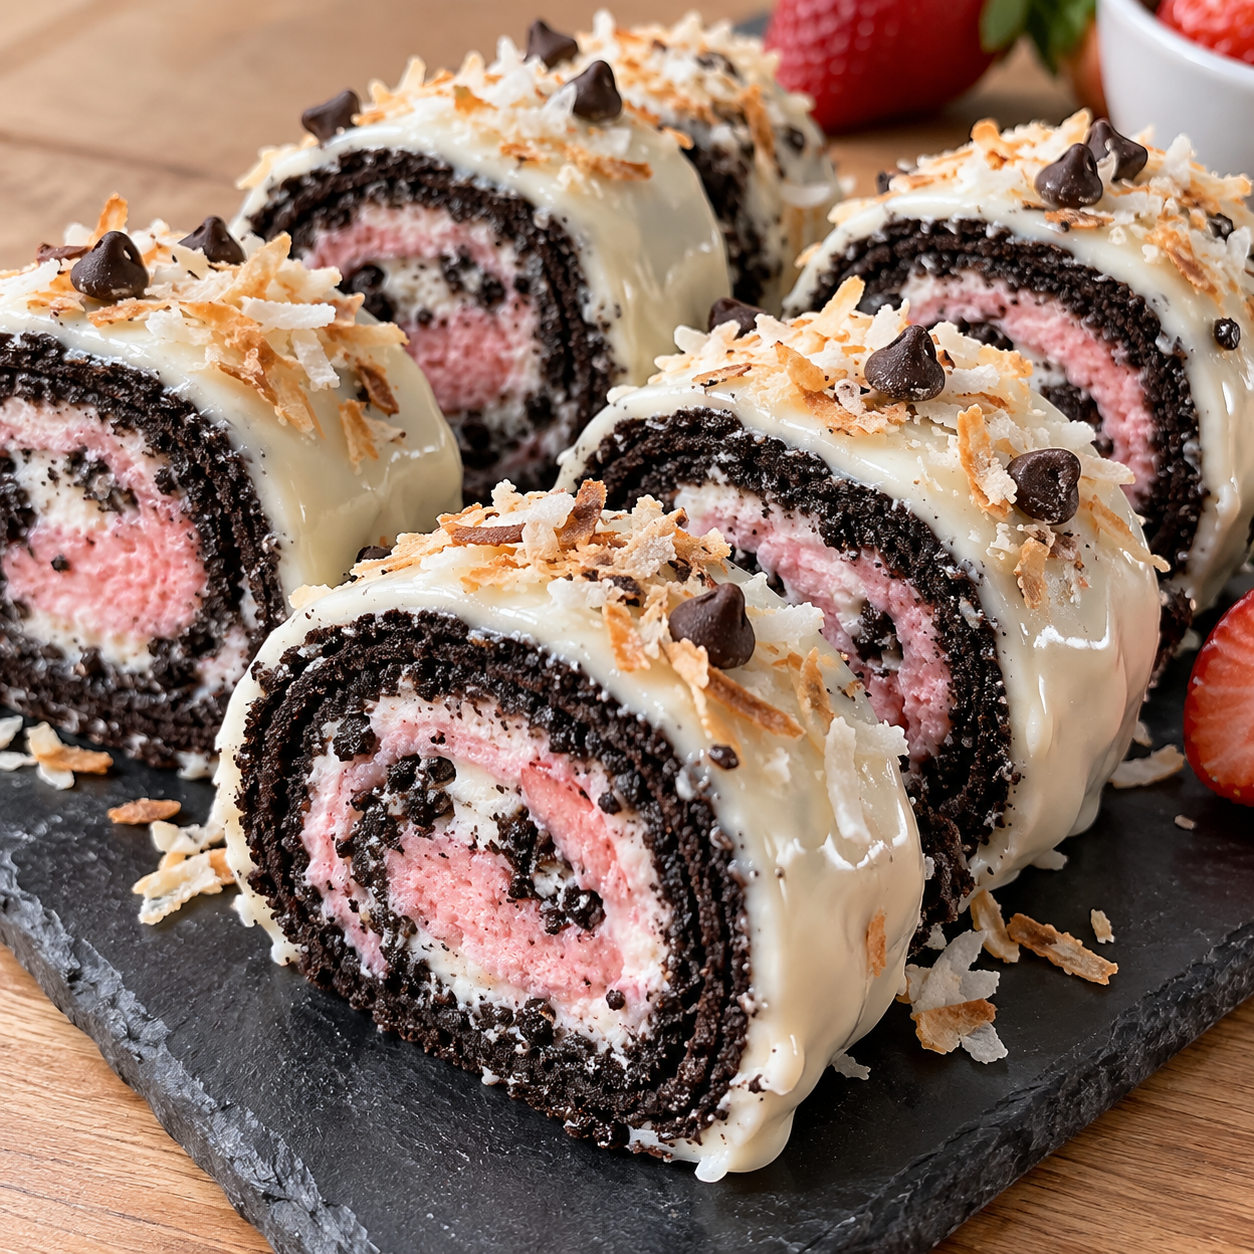
Oreo Sweet Sushi Rolls turn a familiar cookie into a party trick. The dark Oreo dough stands in for a sheet of nori, a whipped cream cheese layer plays the rice, and a thin pink swirl down the center does the job of the filling you would find in a real roll. Slice the log and each round looks like a tiny dessert sushi piece, right down to the toasted coconut standing in for sesame seeds.
This is the treat to make for a themed dinner, a kid's birthday, or anyone who likes a dessert that gets a laugh before the first bite. Nothing here touches the oven. The whole process is crushing, mixing, rolling, and chilling, so the hardest part is getting the roll tight enough that it slices clean.
Work the dough while it is still cool and the slices stay tidy. Let it sit out too long and the log turns soft and hard to cut, which is really the only thing that trips people up.
Pieces That Build the Sushi Look
Every ingredient here pulls double duty, building flavor and the visual trick of a sushi roll. Buy a plain white chocolate bar instead of flavored melting wafers. It sets with a cleaner snap and coats more evenly when you dip the slices.
If you enjoy this recipe, you may also like 4th of July Cake Pops.
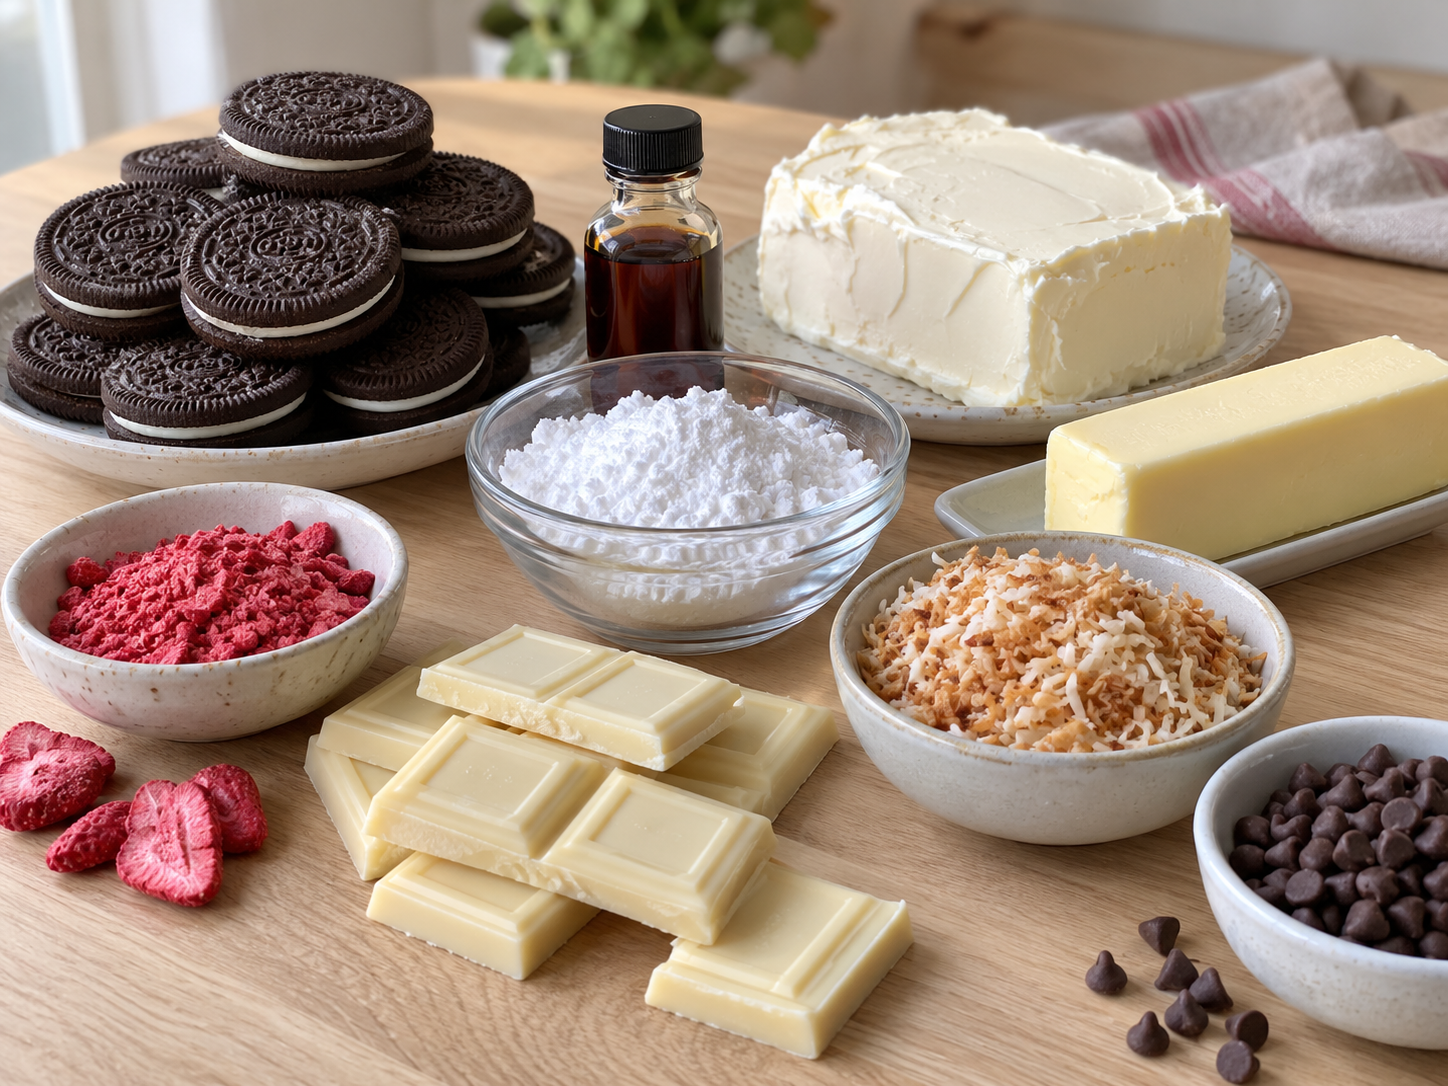
- Oreo cookies. Twisted apart to make the dark dough, with the cream filling saved for the sweet filling layer.
- Unsalted butter, melted. Binds the crushed cookie wafers into a dough you can roll flat like a sheet of nori.
- Cream cheese, softened. Makes up the body of the sweet filling layer, rich and a little tangy against all the sugar.
- Powdered sugar. Sweetens the filling smoothly without any grit.
- Vanilla extract. Rounds out the filling so it tastes like more than plain sugar and cream cheese.
- Salt. A small pinch keeps the filling from tasting flat.
- Freeze-dried strawberries, crushed to powder. Tints part of the filling pink for the colorful swirl down the center.
- White chocolate, melted. Coats the outside of each slice and gives the garnish something to stick to.
- Shredded coconut, toasted. Stands in for sesame seeds pressed onto a finished sushi roll.
- Mini chocolate chips or sprinkles. The last dot of color, like a few grains of roe on top.
For storage details after serving, the USDA leftovers and food safety guidance.
Crushing, Rolling, and Slicing the Log
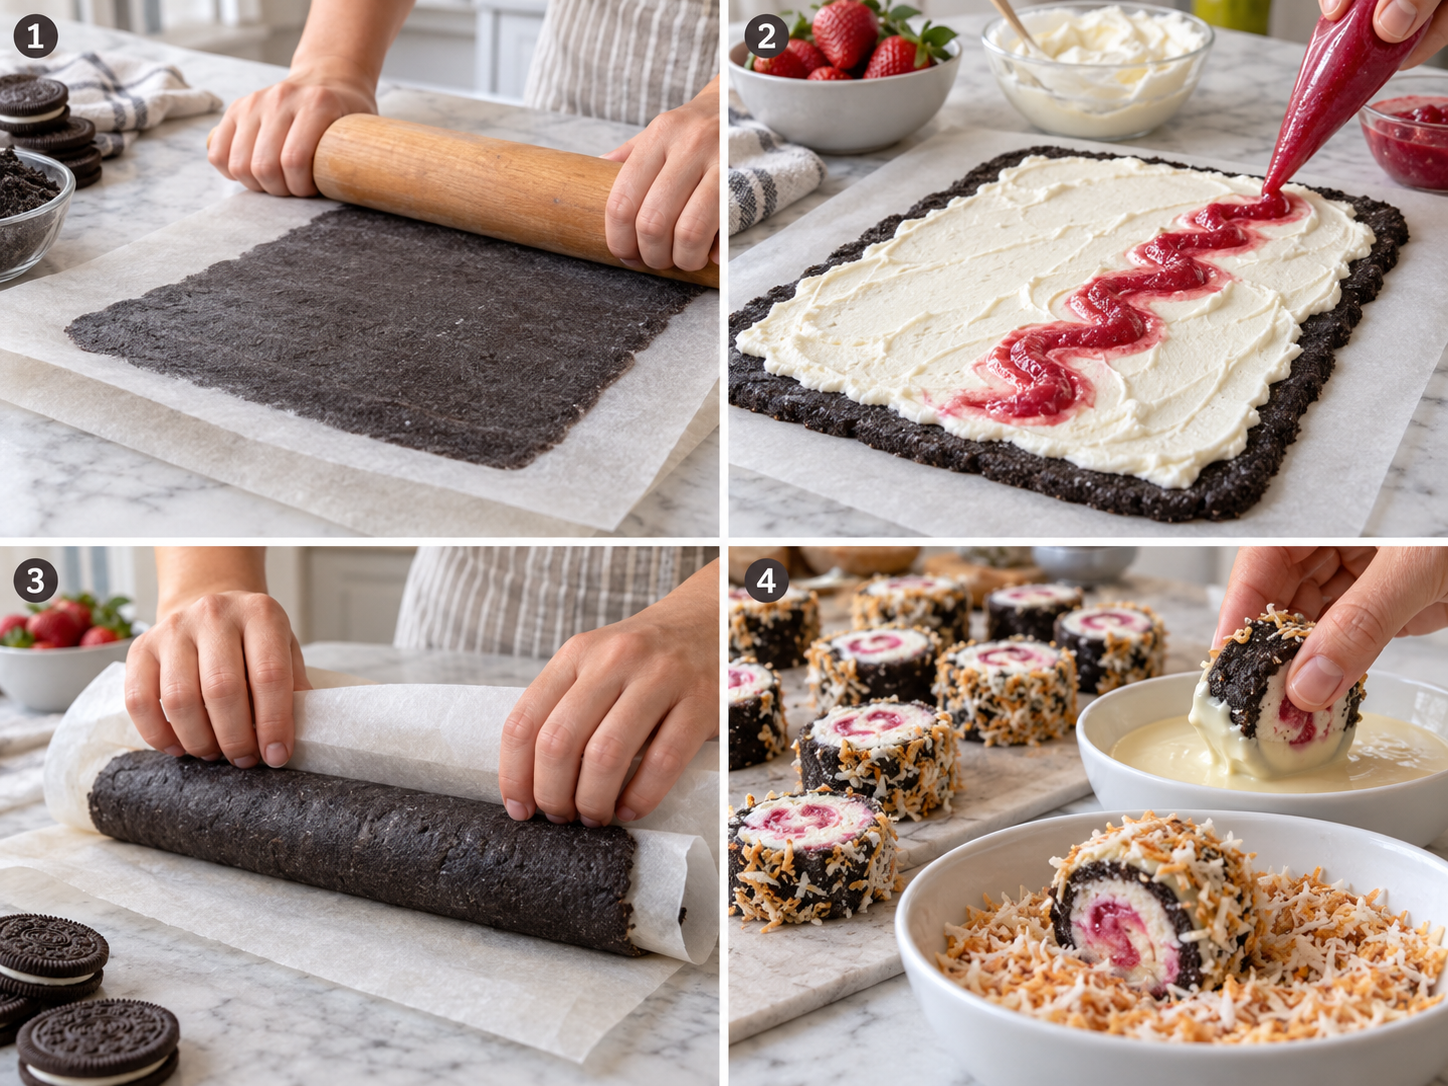
- Make the Oreo dough. Twist apart all the Oreos, scrape the cream filling into a small bowl, and set it aside. Pulse the dark wafers in a food processor until they turn to fine crumbs, then add the melted butter and pulse again until the crumbs clump into a dough that holds together when pressed.
- Roll it into a nori sheet. Set the dough between two sheets of parchment paper and roll it into an even rectangle about 8 by 10 inches, roughly a quarter inch thick. Peel off the top sheet, and chill the dough for 10 minutes if it feels too soft to handle.
- Whip the filling. Beat the cream cheese with the reserved Oreo cream, powdered sugar, vanilla, and salt until smooth and fluffy. Scoop a few tablespoons into a separate bowl and stir in the crushed freeze-dried strawberries until it turns pink.
- Assemble the roll. Spread the plain filling evenly over the dough, leaving a half-inch border along one long edge. Pipe or spoon the pink filling in a straight line down the center, then use the parchment to roll the dough into a tight log, pressing the seam closed as you go.
- Chill until firm. Wrap the log tightly in the parchment and refrigerate for about 40 minutes, until it feels firm enough to slice without squishing.
- Slice into rounds. Trim the ragged ends with a sharp knife, then cut the log into rounds about three-quarters of an inch thick. Wipe the blade clean between cuts for the neatest edges.
- Coat and garnish. Dip the outer edge of each round into the melted white chocolate, then press it into the toasted coconut or sprinkles before the chocolate sets. Chill the finished slices for about 10 minutes to firm up the coating before serving.
If you enjoy this recipe, you may also like Fireworks Sugar Cookie Cake.
Why the Roll Needs to Stay Tight
The difference between a slice that holds its shape and one that falls apart in your hand is how tightly you roll the log in the first place. Use the parchment paper the way you would use a bamboo sushi mat. Lift the edge closest to you and roll forward in one smooth motion, pressing gently as you go instead of yanking the paper tight at the end. Air pockets are the enemy here. If the dough tears while you are rolling, patch it with a scrap pressed into place rather than starting over. The filling underneath will hide the seam anyway. Once the log is rolled, give the seam a firm press with the flat of your hand through the parchment to seal it. Twist the ends like a candy wrapper to hold the shape while it chills. A log that is rolled loosely will slice into rounds with a visible gap between the dough and the filling, which looks messy once it is coated in white chocolate.
The Mistake That Cracks Every Slice
Cracked rounds almost always come down to one thing. The dough got too firm before you tried to cut it. Straight from the freezer or after hours in the fridge, the Oreo layer turns brittle and splits instead of slicing clean. Forty minutes in a regular refrigerator is usually enough, firm but still a little giving when you press it with a finger. If your kitchen runs warm, give it closer to an hour. A warm knife helps too. Run your blade under hot water and wipe it dry before each cut. The heat glides through the dough instead of dragging. Wipe the blade again between slices or the filling will smear across the next cut and blur the swirl in the center.
Easy Swaps for the Filling and Coating
Mascarpone works in place of cream cheese if you want a softer, less tangy filling. Dark or milk chocolate stands in fine for the white chocolate coating, though the pink swirl shows up better against white. Swap the freeze-dried strawberries for matcha powder if you would rather have a green line down the center instead of pink. A few brands now sell gluten-free sandwich cookies that work the same way in the food processor, so the whole dessert can go gluten-free with that one swap. Skip the coconut if you are not a fan and press crushed graham crackers or rainbow sprinkles into the chocolate instead. None of these changes the method, only the color and flavor of the finished slice.
Keeping Slices Safe After They're Made
These slices are a dairy dessert, so they belong in the refrigerator, not on a counter for hours. The UF/IFAS Extension's food safety guidance notes that perishable food left out longer than two hours, or one hour above 90°F, should be discarded rather than risked. The FDA's guidance on holiday desserts lists cream cheese fillings among the creamy desserts that need to stay cold. Store the sliced rolls airtight in the fridge for up to four days. For a party, keep the tray out just long enough for people to grab a piece, then return it to the fridge between rounds. The uncut log freezes well wrapped in parchment and foil for up to a month, and thaws overnight in the fridge before slicing.
Serving Them Like an Actual Sushi Platter
Lean into the bit when you plate these. A dark rectangular plate or a piece of slate makes the white coating and pink swirl pop the way it would on an actual sushi platter. Add a small dish of crushed Oreo crumbs instead of soy sauce and a few whole mint leaves instead of pickled ginger. It sells the joke without any extra work. Chopsticks on the side are optional but they get the biggest laugh at a table. These also travel well to a party if you chill them in a single layer in a shallow container, since stacking squishes the coating before it fully sets.
Frequently Asked Questions
- → Can I use the Oreo cream filling in the dough instead of scraping it out?
Leave it out of the dough. The dough needs to be firm and rollable, and the cream filling makes it too soft and overly sweet. Save the cream for the filling layer instead, where it blends into the cream cheese mixture and nobody notices it is missing from the cookie itself.
- → What can I use instead of freeze-dried strawberries for the pink swirl?
A drop or two of pink or red food coloring works fine if you do not have freeze-dried fruit on hand. Raspberry or strawberry jam also works in a pinch, though a thin layer rather than a thick one keeps the roll from getting slippery when you try to slice it.
- → How long do Oreo sushi rolls keep in the fridge?
Stored airtight in the refrigerator, the sliced rolls hold their texture for about four days. Keep them cold between servings rather than leaving a full tray out at room temperature, since this is a cream cheese dessert and needs the same care as any other dairy-based treat.
- → Do I have to coat the slices in white chocolate?
No. Bare slices still look and taste like dessert sushi, just without the glossy edge. Dust the cut sides with extra Oreo crumbs instead if you want a finished look without melting any chocolate.
- → Why did my log crack when I sliced it?
The dough likely chilled too long or too cold, which makes it brittle instead of firm. Give it closer to 30-40 minutes in a regular refrigerator rather than the freezer, and warm your knife blade under hot water between cuts so it glides through instead of fracturing the dough.
- → Can I make these ahead for a party?
Yes, and they actually slice more cleanly a day ahead. Roll and chill the log up to 24 hours in advance, then slice, coat, and garnish close to serving time so the white chocolate stays glossy instead of dulling in the fridge.